Getting started, Charging and installing the battery pack, Charging the battery pack – Sony CCD-TRV30 User Manual
Page 4: Battery life, Cd-trv30, Ccd-trv40, Use the battery completely before recharging, Removing the battery pack
Attention! The text in this document has been recognized automatically. To view the original document, you can use the "Original mode".
Getting Started
Charging and Installing the Battery Pack
Before using your camcorder, you first need to charge and install the battery pack. To charge the
battery pack, use the supplied AC power adaptor.
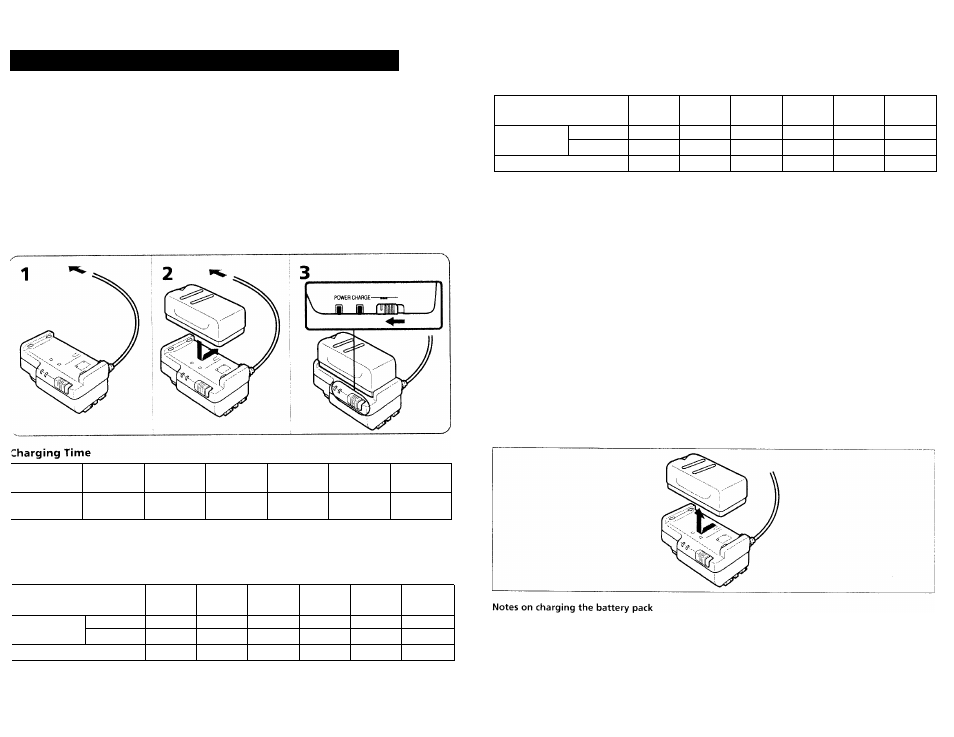
Charging the Battery Pack
Charge the battery pack on a flat place without yibration.
(
1
)
Connect the AC power adaptor to the mains.
(
2
)
Align the right side of the battery pack with the line on the AC power adaptor, then slide the
battery pack in the direction of the arrow.
(3)
Set the selector to CHARGE. The CHARGE lamp (orange) lights up. Charging begins.
When charging is completed, the CHARGE lamp goes out. Set the selector tt^ the center position and
unplug the unit from the mains. Then rcmoye the battery pack and install it on the camcorder.
To stop charging, set the selector to the center position.
Battery pack
NP-66
(supplied)
NP-98/98D
NP-80/80D
NP-68
NP-C65
NP-60D
Charging
time*
95
215
190
125
105
90
Approximate minutes to charge an empty battery pack using the supplied AC power adaptor (Lower
temperatures require a longer charging time.)
Battery Life
:CD-TRV30
Battery pack
NP-66
(supplied)
NP-98/98DNP-80/80D
NP-68
NP-C65
NP-60D
While
LCD open^l
35 (65)
70 (130)
60(115)
40 (80)
30 (60)
25 (50)
recording'!
LCD close
50 (95)
105 (200)
90(170)
65 (120)
50 (95)
45(85)
While playing back on LCD^l
70
140
120
85
65
55
CCD-TRV40
Battery pack
NP-66
(supplied)
NP-98/98DNP-80/80D
NP-68
NP-C65
NP-60D
While
recording'!
LCD open^!
35 (65)
65 (125)
60(110)
40(80)
30 (60)
25 (50)
LCD close
45(90)
95(185)
83 (165)
60(115)
45(90)
40 (80)
While playing back on LCD^>
70
140
120
83
63
3^
A[ipmxiniate minutes when recording while you rcqreat recoicling start/stop, /.ooming and tuniing the
power on/off. The actual battery life may be shorter.
Approximate continuous recording time indoors is indicated in parenthe.ses.
.Approximate minutes when using both the viewfinder and the LCD screen. When using the LCD screen
onl\', the battery life is longer.
.Approximate continuous playback time indoors.
Important!
Use the battery completely before recharging!
Before you recharge the battery, make sure the battery has been used up (discharged) completeK'.
Repeated charging while some capacity remains causes a lowering of battery capacity. I lowex er,
the original battery capacity can be recovered if you use the battery completely and charge it fully
again.
lo use up the battery, remove the cassette and turn the POWER switch to CAMERA w'ith the
battery attached, and leave the camcorder until the Cg indicator and the red lamp flash rapidly in
the view'finder.
Removing the Battery Pack
Slide the battery pack in the direction of fhe arrow.
The POWER lamp wdll remain lit for a while even if the battery pack is removed and the power cord
is unplugged after charging the battery pack. This is normal.
If the POWER lamp does not light, set the selector to the center position and disconnect the power
cord. After about one minute, reconnect the pow'er cord and set the selector to CHARGE again.
You cannot operate the camcorder using the AC power adaptor while charging the battery pack.