Installation and assembly, 30” pedestal fan: pt-30p-ddf-l – ProTemp PT-30P-DDF-A User Manual
Page 17
Installation and Assembly
Tools Needed:
Pliers
Phillips head screwdriver
Flat head screwdriver
10mm / adjustable wrench
Parts Included In Box:
(1) Base
(1) Front Guard
(1) Rear Guard
(1) Motor Assembly
(1) Fan Blade Assembly
(1) Locking Collar
(1) Upper Support Pole
(1) Lower Support Pole
1. Mount the lower support pole to the base
using four (4) 20 mm cap bolts. Secure tightly
with four (4) nuts.
2. Remove the screw at the top of the lower
support pole.
3. Slide upper support pole into lower support
pole.
4. Line up the hole in the locking collar with the
hole in the side of the lower support pole.
Secure locking collar to lower support pole
with screw removed in step 2.
5. Secure and tighten locking collar with
attached knob screw.
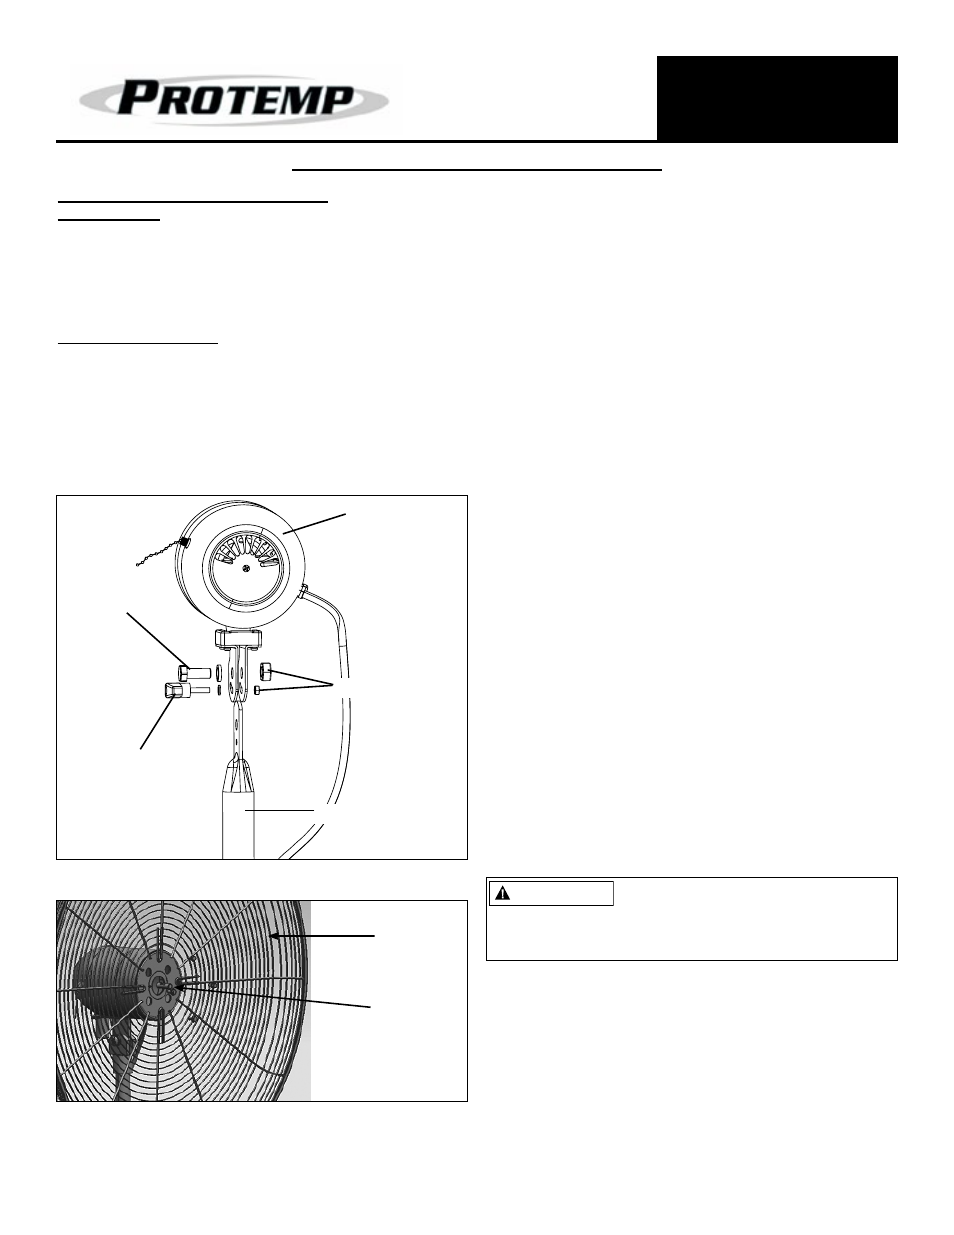
6. Mount motor assembly to upper support pole
using 25 mm pivot bolt and nut.
7. Attach knob screw to motor assembly
through lower hole and curved slot. Adjust
motor assembly angle as desired and tighten
knob screw to secure in place.
8. Slide rear guard onto motor studs and secure
with washers and nuts. Secure and tighten
firmly.
9. Loosen the set screw on the back of the fan
blade assembly and slide onto the motor
shaft.
10. Position set screw over the flat groove on the
motor shaft and tighten set screw. Be sure
the set screw is on the groove and front of
the fan blade assembly is flush with the front
of the shaft before tightening.
11. Attach the front guard using four (4) bolts and
nuts. line up holes on on front and rear guard
and tighten firmly.
NOTE: This model CAN NOT be wall mounted
30” PEDESTAL FAN: PT-30P-DDF-L
NEVER LEAVE A FAN
UNATTENDED WHILE
OPERATING OR WHILE
CONNECTED TO A POWER
SOURCE
© 2014, Pinnacle Products International, Inc.
17
HVF Air Circulator User’s Manual
Figure 19: Attaching Rear Guard to Motor
Rear Guard
Motor
Motor Assembly
Pivot Bolt
Knob
Screw
Nut
Upper Support Pole
Figure 18: Attaching Motor to Motor Support Assembly
Do NOT slide fan blade screw
beyond the groove on the shaft!
This will cause the fan blade to not spin properly
and can cause damage to your fan! Be sure that fan
shaft is flush with front of fan blade assembly.
CAUTION