To display the clock screen, To make one of the clocks the main clock – Casio PV-S460/PV-S660 User Manual
Page 115
113
Chapter 10 Pop Up Tools
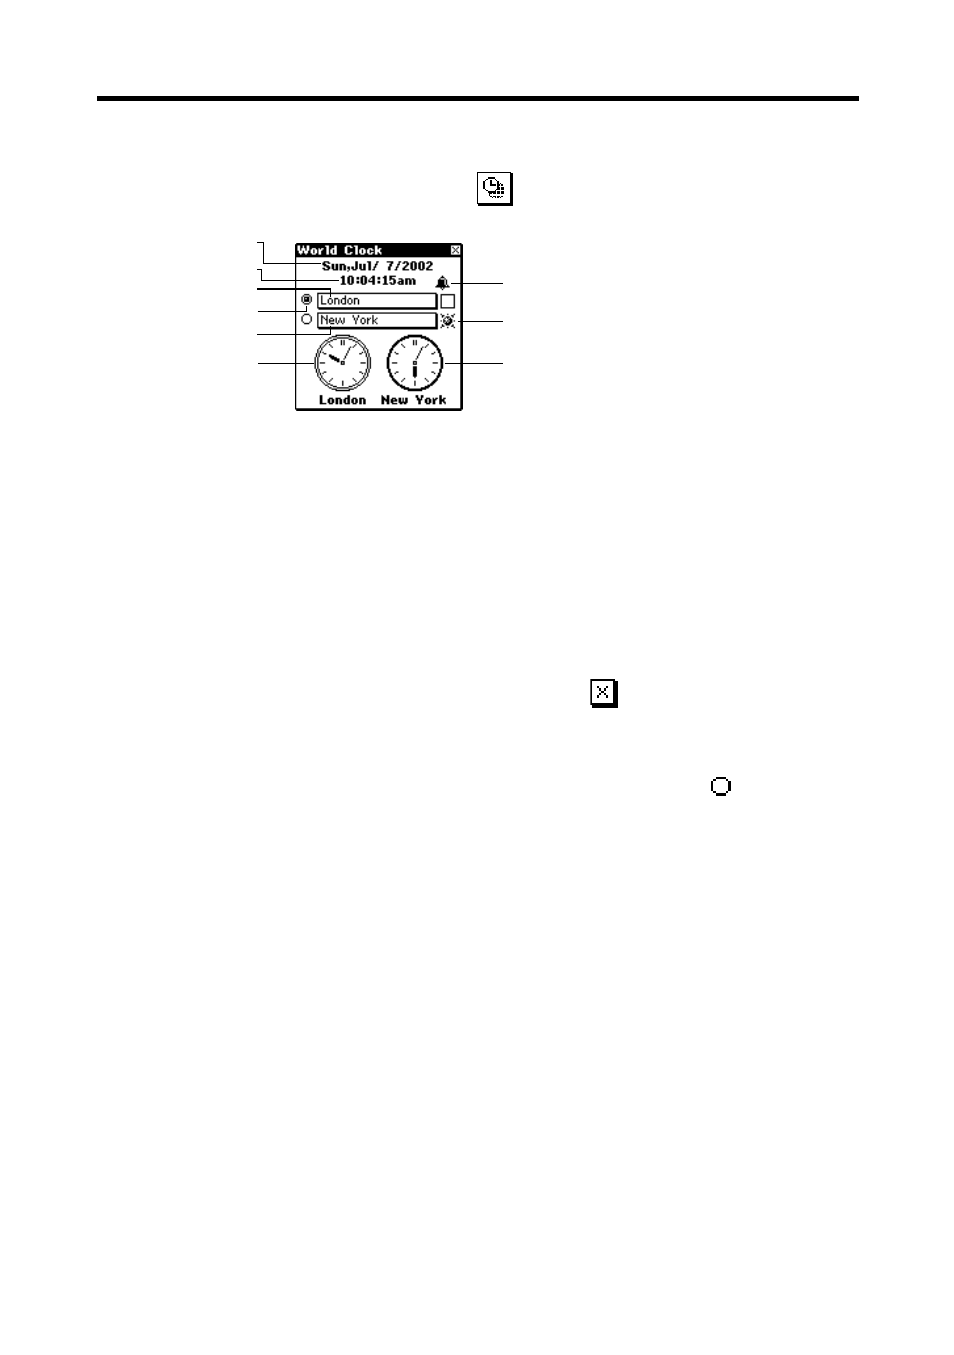
To display the clock screen
On the pop up tool screen, tap the
icon.
1
3
2
4
5
6
7
8
9
•
Holding the stylus on Clock 1 or Clock 2 causes the date and time for
the clock to appear in the first two lines of the clock screen.
•
You can close the clock screen by tapping
.
To make one of the clocks the main clock
1. While the clock screen is on the display, tap the button ( ) to the left of
the city name whose clock you want to make the main clock.
2. In response to the confirmation message that appears, tap Set to change
the main clock or Esc to close the dialog box without doing anything.
Important!
•
The time being kept by the main clock affects all alarms and other date-
sensitive data currently in PV Unit memory. If you set an alarm to sound
at 11:00 a.m. while Tokyo time is being used for the main clock, changing
to New York time, for example, will cause the alarm to sound at 11:00
a.m. New York time.
•
Changing the main clock automatically resets the seconds count of the
clock to 00.
1 Date in city of main clock
2 Time in city of main clock
3 Clock 1 city name
4 Main clock
5 Clock 2 city name
6 Clock 1
7 Alarm indicator
(Tap to display alarm setting
screen on page 158.)
8 Daylight saving time indicator
9 Clock 2
- PV-200 Before using for the first time PV-100 Before using for the first time PV-S450 Before using for the first time PV-S250 Before using for the first time PV-750 Before using for the first time PV-750 Plus Before using for the first time PV-200 Memo PV-100 Memo PV-S450 Memo PV-S250 Memo PV-750 Memo PV-750 Plus Memo PV-200 Contacts PV-100 Contacts PV-S450 Contacts PV-S250 Contacts PV-750 Contacts PV-750 Plus Contacts PV-200 Scheduler PV-100 Scheduler PV-S450 Scheduler PV-S250 Scheduler PV-750 Scheduler PV-750 Plus Scheduler PV-200 Quick-Memo PV-100 Quick-Memo PV-S450 Quick-Memo PV-S250 Quick-Memo PV-750 Quick-Memo PV-750 Plus Quick-Memo PV-S6100 PV-200 Expense Manager PV-100 Expense Manager PV-S450 Expense Manager PV-S250 Expense Manager PV-750 Expense Manager PV-750 Plus Expense Manager PV-200 Game PV-100 Game PV-S450 Game PV-S250 Game PV-750 Game PV-750 Plus Game PV-200 Pop Up Tools PV-100 Pop Up Tools PV-S450 Pop Up Tools PV-S250 Pop Up Tools PV-750 Pop Up Tools PV-750 Plus Pop Up Tools PV-200 Data Communication PV-100 Data Communication PV-S450 Data Communication PV-S250 Data Communication PV-750 Data Communication PV-750 Plus Data Communication PV-200 Configuring the Unit PV-100 Configuring the Unit PV-S450 Configuring the Unit PV-S250 Configuring the Unit PV-750 Configuring the Unit PV-750 Plus Configuring the Unit PV-200 General Operations PV-100 General Operations PV-S450 General Operations PV-S250 General Operations PV-750 General Operations PV-750 Plus General Operations PV-750 Technical Reference 2 PV-200 Technical Reference PV-100 Technical Reference PV-S450 Technical Reference PV-S250 Technical Reference PV-750 Technical Reference 1 PV-750 Technical Reference PV-750 Plus Technical Reference