Marker breakaway protection, Storage – Great Plains PT8030 V1015 Operator Manual User Manual
Page 45
43
Section 5 Maintenance and Lubrication
4/12/05
PT6030 and PT8030 Pull-Type Planter 401-032M-B
Great Plains Mfg., Inc.
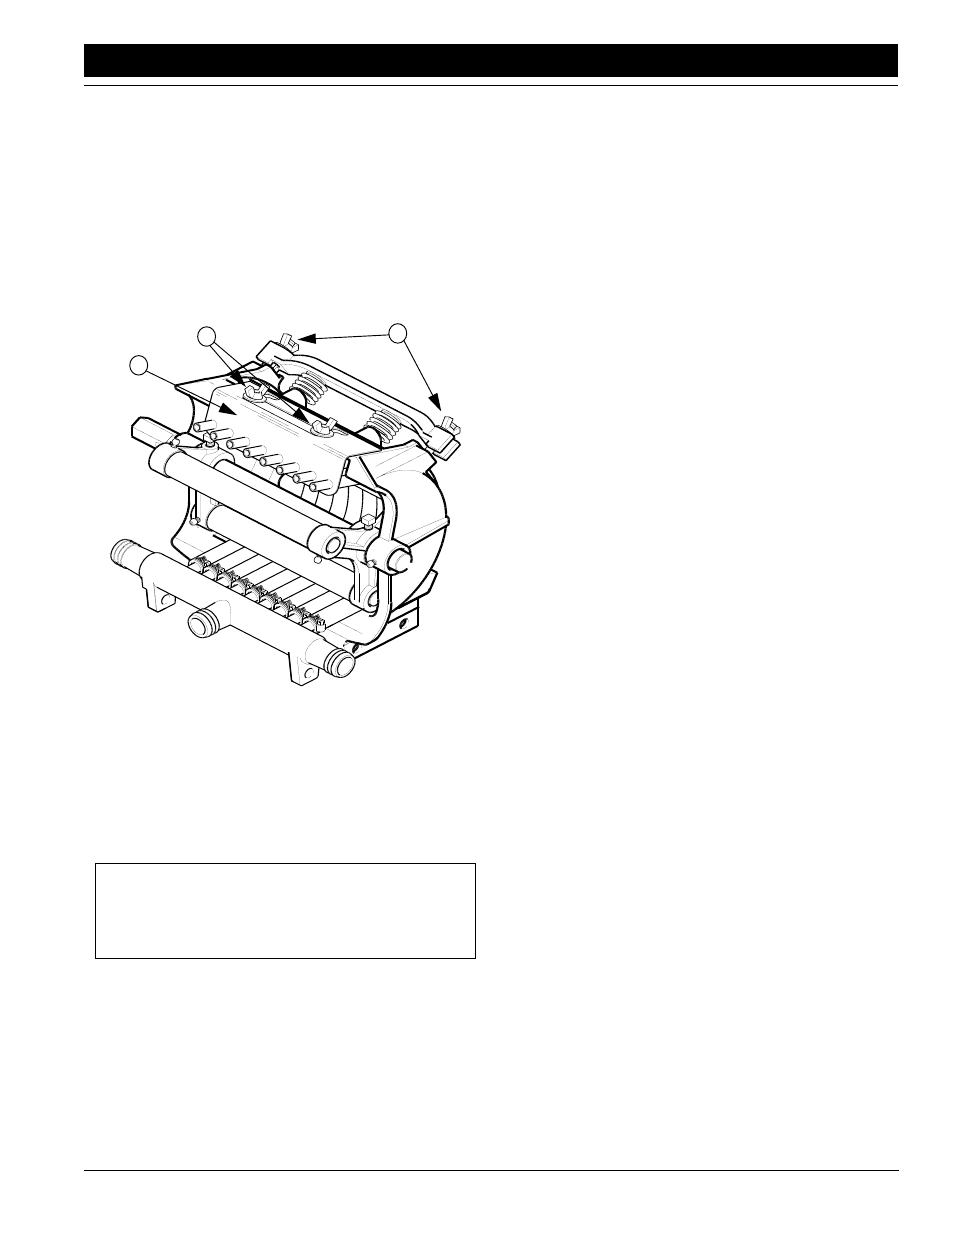
Squeeze Pumps
During periods when the pump is not being used, com-
plete these steps to prevent hose deformation and prolong
hose life.
1.
To release pressure against the hoses, loosen the
wing nuts (1) holding the spring bar to the pump
frame. (There are four nuts total–only two are shown.)
2.
Loosen the wing nuts (2) on the discharge manifold (3)
and shift the manifold rearward.
3.
Store out of sunlight.
12409
1
2
3
Figure 5-10
Relaxing Pressure on Metering Hoses
Marker Breakaway Protection
The marker arm is attached to the marker body with a
5/16-inch breakaway bolt. If excessive force is put on the
marker during operation, the bolt will break, allowing the
marker arm to swing away rather than cause damage to
the marker.
IMPORTANT: The breakaway bolt is a 5/16-by-1 1/2-
inch grade 5 on planter only (GP 802-012C). If it
breaks, it must be replaced by an equivalent grade 5
bolt to prevent marker damage.
Storage
Store planter in a clean, dry place with all tires out of the
sun. Store planter where children do not play. If possible,
store planter inside for longer life.
1.
Thoroughly clean planter, hoppers and meters. Re-
move any dirt and debris that can hold moisture and
cause corrosion.
2.
Remove meters from hoppers. Disassemble meters
and inspect for wear. Refer to Finger Pickup Meter,
page 40, or Brush-Type Meter, page 41. Make any re-
pairs required at this time. Blow excessive debris from
meter. Wash meters with mild soap and water. Dry
meters and spray a light coat of rust inhibitor on
meters. Reassemble and store meters in a dry place.
3.
Thoroughly flush liquid herbicide system with clean
water. Disconnect from tractor and completely drain
all lines and components to prevent damage from
freezing.
4.
Inspect planter for worn or damaged parts. Make re-
pairs and service during the off season.
5.
Use spray paint to cover scratches, chips and worn ar-
eas on the planter to protect the metal.
6.
Adjust all drive chains for proper tension.
7.
Lubricate planter at points listed under Lubrication,
page 44. Be sure to lubricate chains to prevent rust-
ing.
8.
Place 1 X 12 closing-wheel handle in the middle slot to
relieve tension on closing wheels. Move T-handle for
opener springs to the lightest setting.
9.
Cover planter with a tarp if stored outside.