Settings, Step five, Power on – tekmar 650 Snow Melting Control User Manual
Page 3: Viewing, Programming, Initiating operating mode
3 of 4
© 2010 D 650 - 08/10
Step Five
Troubleshooting
First observe the system operating parameters. The source of the problem can often be identified by noting a temperature or time
reading which seems unreasonable. Observing what the control is doing, and understanding the sequence of operation greatly aids
in troubleshooting. If there is a sensor fault, the control displays an error message. Use the error message table provided below to
determine which circuit has the fault and then refer to Step Four for testing of the wiring and sensors.
Settings
Outdoor temperature - the temperature measured by the Outdoor Sensor.
Slab Sensor temperature - the temperature measured by the Slab Sensor. This sensor should be 1” below the slab surface.
Target Slab temperature - the control calculates a “Target Slab” temperature to maintain the slab surface at the “Melting” or “Idling”
setting when the Slab Sensor is placed 1” below the slab surface and halfway between the pipes or electric cables (See Step Three
of this brochure). The “Target Slab” temperature is calculated from the “Melting” or “Idling” setting and the measured “Outdoor”
temperature. As the “Outdoor” temperature drops or the “Melting” or “Idling” setting is raised, the “Target Slab” temperature increases.
On Time - when the control is in melting mode, the On Time display indicates the time left until the control exits melting mode. When
programming, the On Time can be set from 30 minutes to 19 hours 50 minutes or it can be set to “Inf” (Infinite). When the On Time
is set to “Inf”, the control remains in melting mode indefinitely until the “STOP” button is pressed.
Melting temperature - the “Melting” temperature is the desired slab surface temperature when the control is in melting mode and is
also used as the Warm Weather Cut Off temperature. The slab “Melting” temperature is usually set based on the local weather
conditions. In some areas, heavy snowfall can load a slab at temperatures well above freezing; in these areas, the “Melting”
temperature is set higher. In general if the melting system response is sluggish, increasing the “Melting” temperature causes the
system to melt faster. It is important to remember that increasing this setting increases the snow melt system energy consumption.
Idling temperature - the “Idling” temperature is set based on the requirements of the user. To minimize the time required for the slab
to reach “Melting” temperature, “Idling” is set slightly below freezing (<32°F). To prevent black ice or frost formation, “Idling” is set
slightly above freezing (>32°F). It is important to remember that idling increases energy consumption. Idling can also be set to “Off”.
Cold Weather Cut Off (CWCO) - the “CWCO” temperature is the lowest outdoor temperature at which the melt system operates. This
setting is based on the economics of melting in extreme conditions and the melting capabilities of the snow melt system.
On
Time
Outdoor
Slab Sensor
Target Slab
CWCO
Idling
Melting
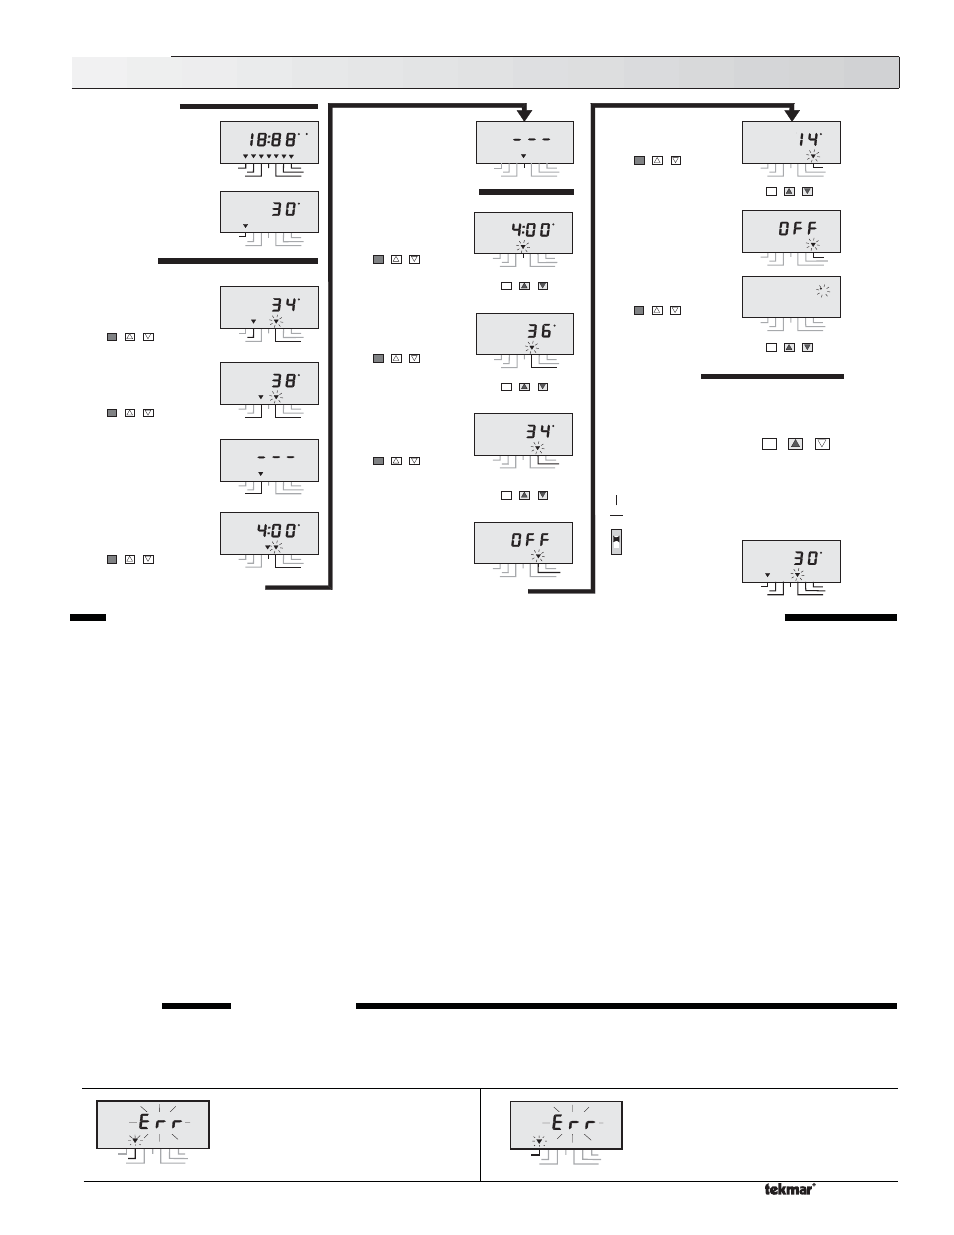
Outdoor Sensor Open/Short Circuit
The display flashes “Err” and the
“Outdoor” pointer. The control con-
tinues operation assuming an out-
door temperature of 20°F (-7°C).
On
Time
Outdoor
Slab Sensor
Target Slab
CWCO
Idling
Melting
Slab Sensor Open/Short Circuit
The display flashes “Err” and the
“Slab Sensor” pointer. The control
shuts down the melting system with
this error.
Press and Release the
“Item” button to change the
display from the “Outdoor”
temperature to the “Slab
Sensor” temperature.
Use the arrow keys to program
the “Melting” temperature.
Note: The control automatically exits out of programming when the buttons are left alone for 20 seconds
Note: The control automatically exits out of programming when the buttons are left alone for 20 seconds
When the control is
powered-up, all display
elements are turned on.
POWER ON
After approximately three
seconds, the “Outdoor”
temperature is displayed.
VIEWING
Press and Release the
"Item" button to change the
display to the "Target Slab"
temperature.
Press and Release the
"Item" button to change the
display to the "On Time"
remaining.
PROGRAMMING
When no Idling function is
desired, set Idling to “OFF”.
Use the arrow keys to program
the “Idling” temperature.
Use the arrow keys to set
the “CWCO” temperature.
When no CWCO is desired,
set CWCO to “OFF”.
Use the arrow keys to switch
between “°F” and “°C”.
Use the arrow keys to program the
“On Time" in hours and minutes.
If the control is not in
melting or idling mode, no
"Target Slab" temperature is
displayed.
If the control is not in
melting mode no “On
Time” is displayed.
Continue to
Press and
Release the “Item” button.
The word “PRGM” is
displayed and the “On
Time” pointer flashes.
On
Time
F
Outdoor
Slab Sensor
Target Slab
CWCO
Idling
Melting
Press and Release the
“Item” button to change the
display to the “Melting”
temperature.
Press and Release the
“Item” button to change
the display to the “Idling”
temperature.
Press and Release the
“Item” button to change the
display to “°F” or “°C”.
On
Time
Outdoor
Slab Sensor
Target Slab
Melting
PRGM
CWCO
Idling
On
Time
F
Outdoor
Slab Sensor
CWCO
Idling
Target Slab
Melting
On
Time
Outdoor
Slab Sensor
CWCO
Idling
Target Slab
Melting
On
Time
PRGM
F
Outdoor
Slab Sensor
Target Slab
CWCO
Idling
Melting
On
Time
F
Outdoor
Target Slab
CWCO
Idling
Slab Sensor
Melting
PRGM
On
Time
F
Outdoor
Target Slab
CWCO
Slab Sensor
Melting
Idling
PRGM
On
Time
F
Outdoor
Target Slab
Idling
Slab Sensor
Melting
PRGM
If the DIP
switch is set to
“Melt at power
up”, the control
switches into
“Melting” mode
when it is
powered up.
If the control is
already powered up
and you are not
programming,
Press and Release
the "Start" button.
When the control is in
melting mode the
melting pointer
flashes.
INITIATING
OPERATING MODE
When the control is not in CWCO or WWCO, the
melt system is turned on as follows:
OR
On
Time
F
Outdoor
Slab Sensor
Target Slab
CWCO
Idling
Melting
On
Time
F
Outdoor
Target Slab
CWCO
Idling
Slab Sensor
Melting
Press and Release the
“Item” button to change the
display to the “CWCO”
temperature.
On
Time
Outdoor
Slab Sensor
Target Slab
Melting
PRGM
CWCO
Idling
On
Time
F
Outdoor
Target Slab
CWCO
Idling
Slab Sensor
Melting
PRGM
CWCO
Melt at power up
On
Off
Item
Start
Stop
On
Time
Outdoor
Slab Sensor
CWCO
Idling
Target Slab
Melting
On
Time
F
Slab Sensor
Target Slab
CWCO
Idling
Melting
Outdoor
On
Time
PRGM
F C
Outdoor
Slab Sensor
Target Slab
CWCO
Idling
Melting
Item
Start
Stop
Item
Start
Stop
Item
Start
Stop
Item
Start
Stop
Item
Start
Stop
Item
Start
Stop
Item
Start
Stop
Item
Start
Stop
Item
Start
Stop
Item
Start
Stop
Item
Start
Stop
Item
Start
Stop
Item
Start
Stop