Transmitter and receiver binding, Installing flight battery, Arming the esc before flight – E-flite UMX Beast BNF User Manual
Page 6: Binding procedure
6
EN
Binding is the process of programming the receiver of the control unit to recognize the GUID (Globally Unique
Identifier) code of a single specific transmitter. You need to ‘bind’ your chosen Spektrum DSM2 technology
equipped aircraft transmitter to the receiver for proper operation.
Note: Any JR
®
or Spektrum DSM2 transmitter can bind to the Spektrum AR6400LBL receiver. Due to the
aerobatic capabillities of the UMX Beast, it is highly recommened that you use a transmitter with adjustable
exponential and dual rates. Please visit www.bindnfly.com for a complete list of compatible transmitters.
Transmitter and Receiver Binding
Note: When using a Futaba transmitter with a Spektrum DSM2 module, reversing the throttle channel is required.
Binding Procedure
1. Refer to your transmitter’s unique instructions for binding to a receiver.
2. Make sure the flight battery is disconnected from the aircraft.
3. Power off your transmitter.
4. Connect the flight battery in the aircraft. The receiver LED will begin to flash rapidly.
(Typically after 5 seconds).
5. Make sure transmitter controls are neutral and throttle and throttle trim are in low position.
6. Put your transmitter into bind mode. Refer to your transmitter’s manual for binding button or switch instructions.
7. After 5 to 10 seconds, the receiver status LED will become solid, indicating that the receiver is bound to the
transmitter.
Note: If the LED does not go to a solid light, refer to Troubleshooting Guide at back of manual.
Note: If using a different battery than the included 2-Cell 7.4V 120mAh 20C Li-Po, you will need to apply a circle of hook
fastener to the back of the battery, opposite the label.
Note: Always disconnect the Li-Po from the receiver of the aircraft when not flying. Failure to do so will render the battery
unusable.
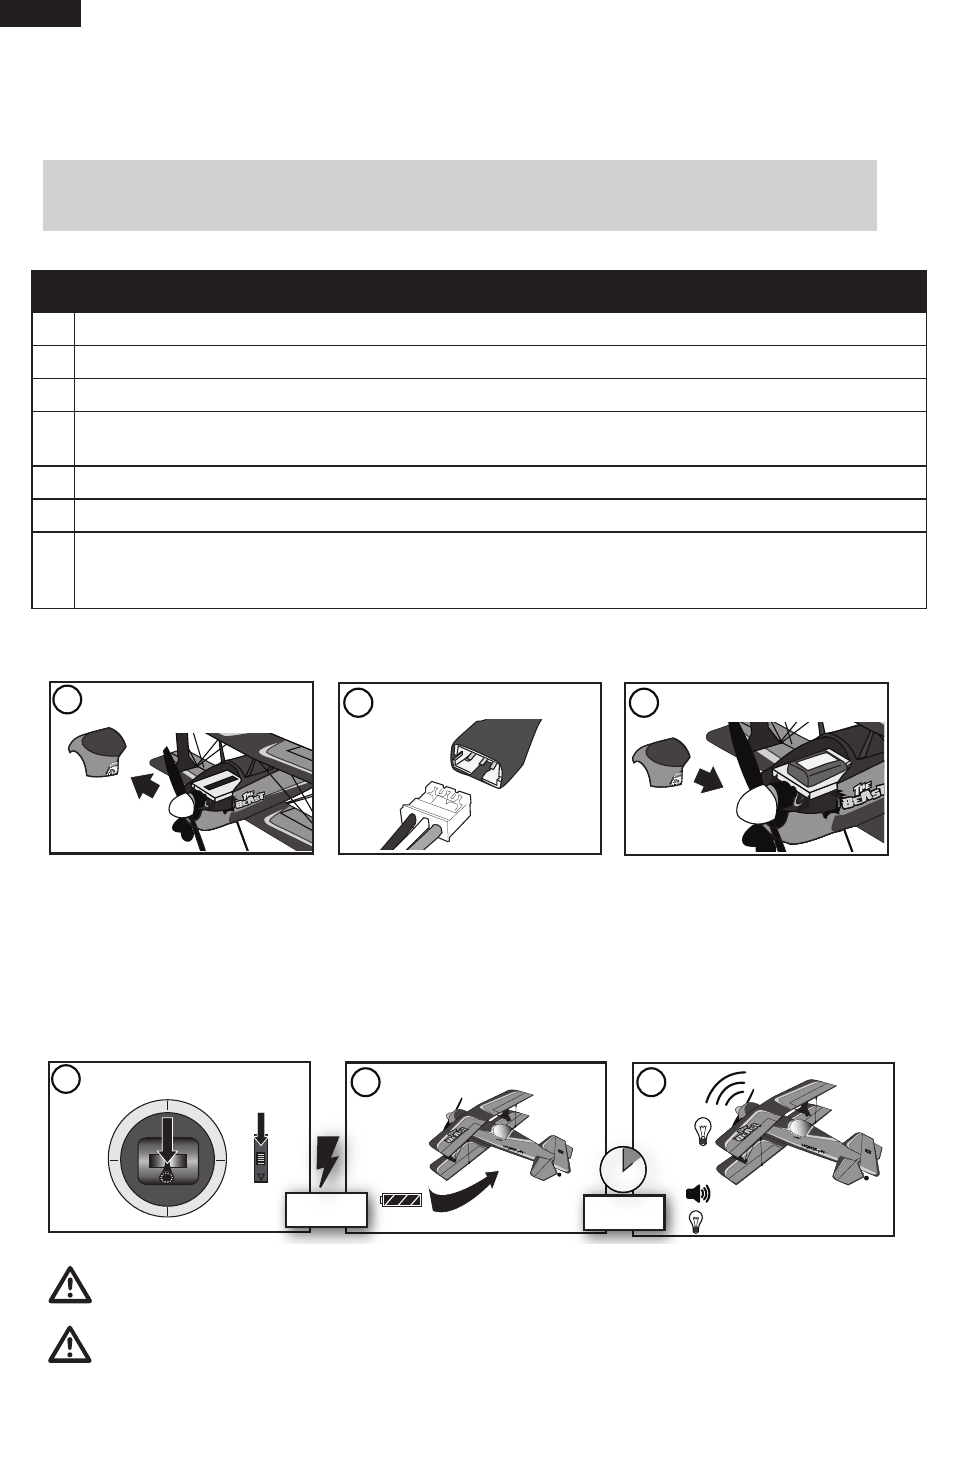
Installing Flight Battery
Connect Flight Battery.
1
Lower throttle and throttle trim
to lowest settings.
2
3
Wait 5
seconds
Continuous LED
Series of tones
Power on
transmitter
1
Remove battery hatch from nose
of aircraft.
Attach battery to battery tray strip
and install battery hatch.
3
Connect Flight Battery to receiver.
2
CAUTION: When armed, the motor will turn the propeller in response to any throttle movement.
When the aircraft does not respond, binding may be required.
Connect Flight Battery.
1
Lower throttle and throttle trim
to lowest settings.
2
3
Wait 5
seconds
Continuous LED
Series of tones
Power on
transmitter
1
Remove battery hatch from nose
of aircraft.
Attach battery to battery tray strip
and install battery hatch.
3
Connect Flight Battery to receiver.
2
Arming the ESC Before Flight
CAUTION: If throttle is fully raised when battery is connected, a musical tone will sound after 5 seconds. Discon-
nect the battery immediately. Fully lower transmitter throttle before connecting the flight battery. Failure to do so
may alter AR6400LBL settings. For more information about the AR6400LBL, visit www.horizonhobby.com.