Hinkley Lighting ATRIUM 3274BZ User Manual
Hinkley, Start here, Commencez ici
start here
commencez ici
empezar aquí
Assembly Instructions
Item No. 3275
Les Instructions D’assemblage
Numéro d’article:3275
Instrucciones De Montaje
Número del artículo: 3275
L I G H T I N G
HINKLEY
english
spanish
french
Drawing 3 - Fixture Mounting
Drawing 2 - Strap Detail
Drawing 1 - Stem Installation
J
B
G
D
C
E
A
B
C
A
C
sc
supply
wire
1 . Busque un lugar claro en el que se puede trabajar .
2 . Desembale fixture y el vidrio de la caja.
3 . Revise cuidadosamente las instrucciones antes del montaje .
*** La construcción de este dispositivo se llevará a cabo
determinando primero la longitud del tallo es necesario, el
montaje de la correa de la fijación de la caja de conexiones, por
lo que todas las conexiones eléctricas necesarias , colgando
el aparato del techo,
1 . Determine la longitud total tendrá el accesorio montado ser.
2 . Determinar qué tallos serán necesarios para lograr la longitud
total que usted requiere. (Tallos adicional están disponibles y se
pueden pedir . Pregunte a su representante local de Hinkley
Lighting o visite www.hinkleylighting.com para obtener
información. )
3 . Instale primer vástago (B ) por el deslizamiento de ellos en el
cable de alimentación de la luminaria , extremo roscado hacia
abajo, y enhebrar el primer vástago (B ) en el acoplamiento ( A)
en la parte superior del cuerpo de la luminaria ( 1 )
- ver Drawing 1.
4 . Instale restante tallos (C ) , repitiendo este proceso hasta que
se cumpla la longitud deseada. Entonces deslizarse cable de
suministro a través del centro de la de la pieza giratoria que está
unida a la cubierta ( SC ) y giro de rosca en el vástago de la parte
superior . Fixture está listo para la instalación.
1 . Instale los tornillos ( A ) en la placa de montaje ( B)
- ver dibujo 2 .
• Asegúrese de que los agujeros en los que se enroscan los
tornillos coinciden con el espaciamiento de los orificios (C )
en el dosel (D) - ver dibujos 2 y 3.
2 . Fije la placa de montaje ( B) a la caja de conexiones ( J) , con
los tornillos (G ), siempre y luego deslizarse cables de
alimentación a través del agujero central grande .
ADVERTENCIA DE SEGURIDAD : LEA INSTRUCCIONES DE
CABLEADO (IS 18 ) , E INSTRUCCIONES ADICIONALES. APAGUE
LA FUENTE DE ALIMENTACIÓN DURANTE LA INSTALACIÓN. SI
NUEVO CABLEADO SE REQUIERE , CONSULTE A UN TÉCNICO
CALIFICADO AUTORIDADES DE ELECTRICISTA O LOCALES PARA
REQUISITOS DEL CÓDIGO .
1 . Cuelgue el aparato por el deslizamiento de los tornillos ( A) a
través del agujero (C ) del dosel (D) - ver
Dibujo 2 and 3 .
2 . Ensartar perillas de bolas (E) en el extremo de los tornillos (A)
y apriete para asegurar fixture hasta el techo.
1. Allez dans un endroit dans lequel vous pouvez travailler .
2 . Déballez luminaire et le verre de carton .
3 . Lire attentivement les instructions avant l'assemblage .
*** La construction de cet accessoire sera accomplie en déterminant
d'abord la longueur de tige nécessaire , le montage de la courroie de
fixation à la boîte de jonction , tous les raccordements électriques
nécessaires , accrocher le projecteur du plafond,
1 . Déterminer la longueur totale , vous devrez l'appareil assemblé
être .
2 . Déterminer ce qui relève sera nécessaire pour atteindre la
longueur totale dont vous avez besoin . ( Tiges supplémentaires sont
disponibles et peuvent être commandés . Demandez à votre
représentant Hinkley Lighting locale ou visitez www.hinkleylighting
.com pour plus d'informations . )
l
fi
e
l
r
u
s
t
n
a
s
s
il
g
s
e
l
n
e
)
B
(
e
g
i
t
e
r
è
i
m
e
r
p
a
l
r
e
ll
a
t
s
n
I
.
3
d'alimentation de l'appareil , l'extrémité filetée vers le bas, et le
filetage de la première tige ( B ) dans le raccord ( A) en haut du corps
de fixation ( 1 ) - voir Drawin.g 1
4 . Installez tiges résiduelles ( C ) en répétant ce processus jusqu'à
ce que la longueur désirée est atteint . Ensuite, faites glisser le fil
d'alimentation à travers le centre de la de la rotule qui est attaché à
la canopée ( SC ) et du fil pivotant dans la tige supérieure . Luminaire
est prêt pour l'installation .
1 . Installez les vis ( A ) dans la plaque de montage ( B )
- voir schéma 2 .
• Assurez-vous que les trous dans lesquels les vis sont vissées
correspondent l'espacement des trous ( C ) dans la canopée ( D )
- voir dessins 2 et 3 .
2 . Fixez la plaque de montage (B ) à la boîte de jonction (J ) , en
utilisant les vis ( G ) fourni, puis glisser fils d'alimentation à travers
le trou de grand centre .
AVERTISSEMENT DE SÉCURITÉ : LIRE RACCORDEMENT ET MISE À LA
TERRE (IS 18) ET TOUTE AUTRE INSTRUCTION . COUPER
L'ALIMENTATION ÉLECTRIQUE PENDANT L'INSTALLATION. SI DE
NOUVELLES CÂBLAGE N'EST NÉCESSAIRE , CONSULTER UN
SPÉCIALISTE QUALIFIÉ AUTORITÉS LOCALES POUR ÉLECTRICIEN OU
EXIGENCES DU CODE.
Une . Accrochez l'appareil en glissant vis (A ) dans le trou ( C ) de la
canopée ( D ) - voir Dessin 2 and 3 .
2 . Enfiler sur les poignées de billes ( E) sur l'extrémité de vis ( A )
et serrer pour sécuriser luminaire au plafond .
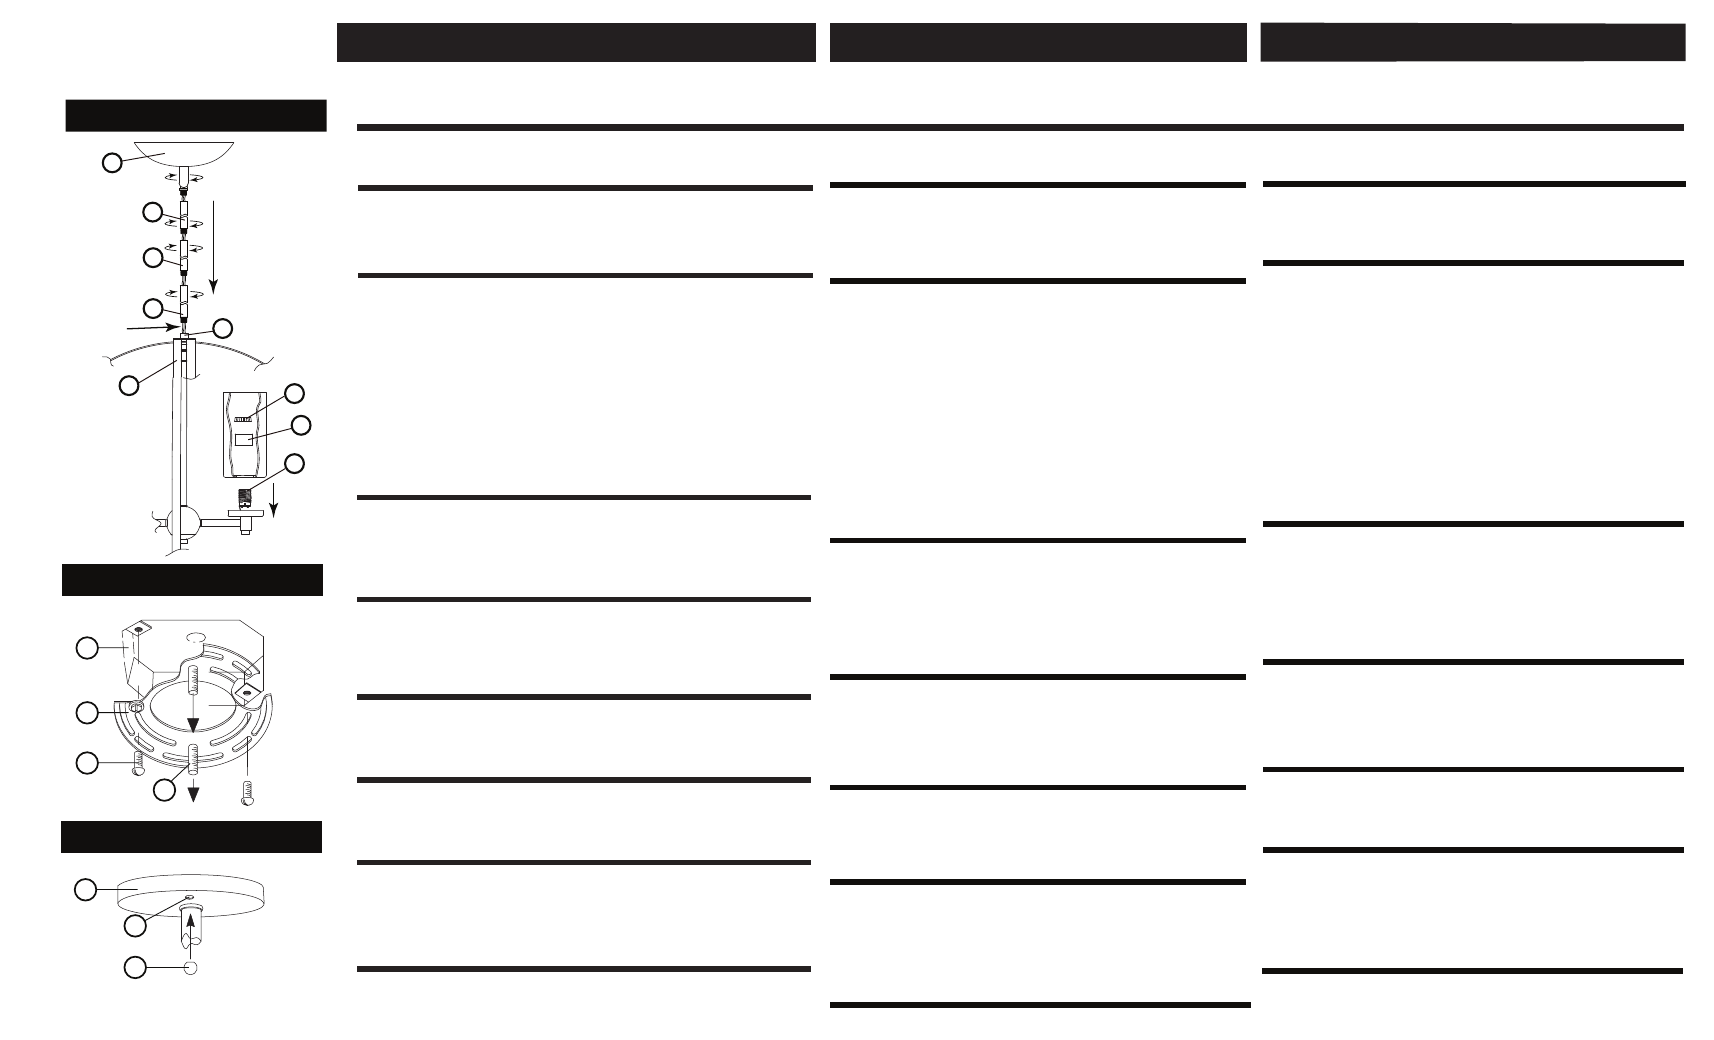
1. Find a clear area in which you can work.
2.
Unpack fixture and glass from carton.
3.
Carefully review instructions prior to assembly.
*** The construction of this fixture will be accomplished by first
determining the length of stem required, mounting the attaching
strap to junction box, making all necessary elctrical connections,
hanging the fixture from the ceiling.
1. Determine the overall length you will need the assembled fixture to
be.
2. Determine what stems will be needed to achieve the overall length
you require. (Additional stems are available and can be ordered.
Ask your local Hinkley Lighting representative or visit
www.hinkleylighting.com for information.)
3. Install first stem (B) by slipping them onto the supply wire of the
fixture, threaded end down, and threading the first stem (B) into
coupling (A) at top of fixture body (4) -see Drawing 1
.
4. Install remaining stems (C) by repeating this process until desired
length is met. Then slip supply wire
of the swivel that is attached to the canopy
through the center of the
(SC) and thread
swivel into the top stem. Fixture is ready for installation.
1. Install screws (A) into mounting plate (B) - see Drawing 2 .
• Be sure the holes into which the screws are threaded match the
spacing of holes (C) in the canopy (D) - see Drawings 2 and 3 .
2. Attach mounting plate (B) to junction box (J), using screws (G)
provided and then slip supply wires through large center hole.
SAFETY WARNING: READ WIRING AND GROUNDING
INSTRUCTIONS (I.S. 18) AND ANY ADDITIONAL DIRECTIONS.
TURN POWER SUPPLY OFF DURING INSTALLATION. IF NEW
WIRING IS REQUIRED, CONSULT A QUALIFIED ELECTRICIAN
OR LOCAL AUTHORITIES FOR CODE REQUIREMENTS.
Make electrical connections from supply wire to fixture lead wires.
refer to instruction sheet (I.S. 18) and follow all instructions to make
all necessary wiring connections. Then refer back to this sheet to
continue installation of this fixture.
1. Hang the fixture by slipping screws (A) through hole (C) of canopy
(D) - see
Drawing 2 and 3.
2. Thread on ball knobs (E) onto the end of screws (A) and tighten to
secure fixture to ceiling.
1. To install glass first remove threaded socket ring (1) and spacer (2)
from socket (3) - see DRAWING 1.
2. Slip small hole in glass over socket, followed by spacer removed
earlier.
3. Thread socket ring back on to socket and hand thighten to
secure glass.
PAGE 1
CONTINUE ASSEMBLY ON PAGE 2 OF INSTRUCTIONS
CONTINUER ENSEMBLE EN PAGE 2 DE MODE
CONTINUAR LA ASAMBLEA EN LA PÁGINA 2 DE INSTRUCCIONES
4
1
2
3
1. Para instalar el vidrio primero quite el anillo casquillo roscado (1)
y la arandela (2) toma la forma (3) - ver dibujo 1.
2. Slip pequeño agujero en el vidrio sobre zócalo, seguido por el
separador (2) que se retiró antes.
3. Usando la herramienta de enchufe previsto, anillo socket hilo de
vuelta (1) en el zócalo y la mano apretar firmemente para asegurar
el vidrio.
1. Pour installer verre retirer première bague de douille filetée (1)
et l'entretoise (2) forme prise (3).
2. Slip petit trou dans le verre au-dessus de la douille, suivie d'une
entretoise (2) enlevés auparavant.
3. En utilisant l'outil de prise prévue, fil prise bague arrière (1) sur
la prise et de la main thighten pour garantir verre.