Hinkley Lighting MARLOWE 3497 User Manual
Hinkley, Start here, Commencez ici
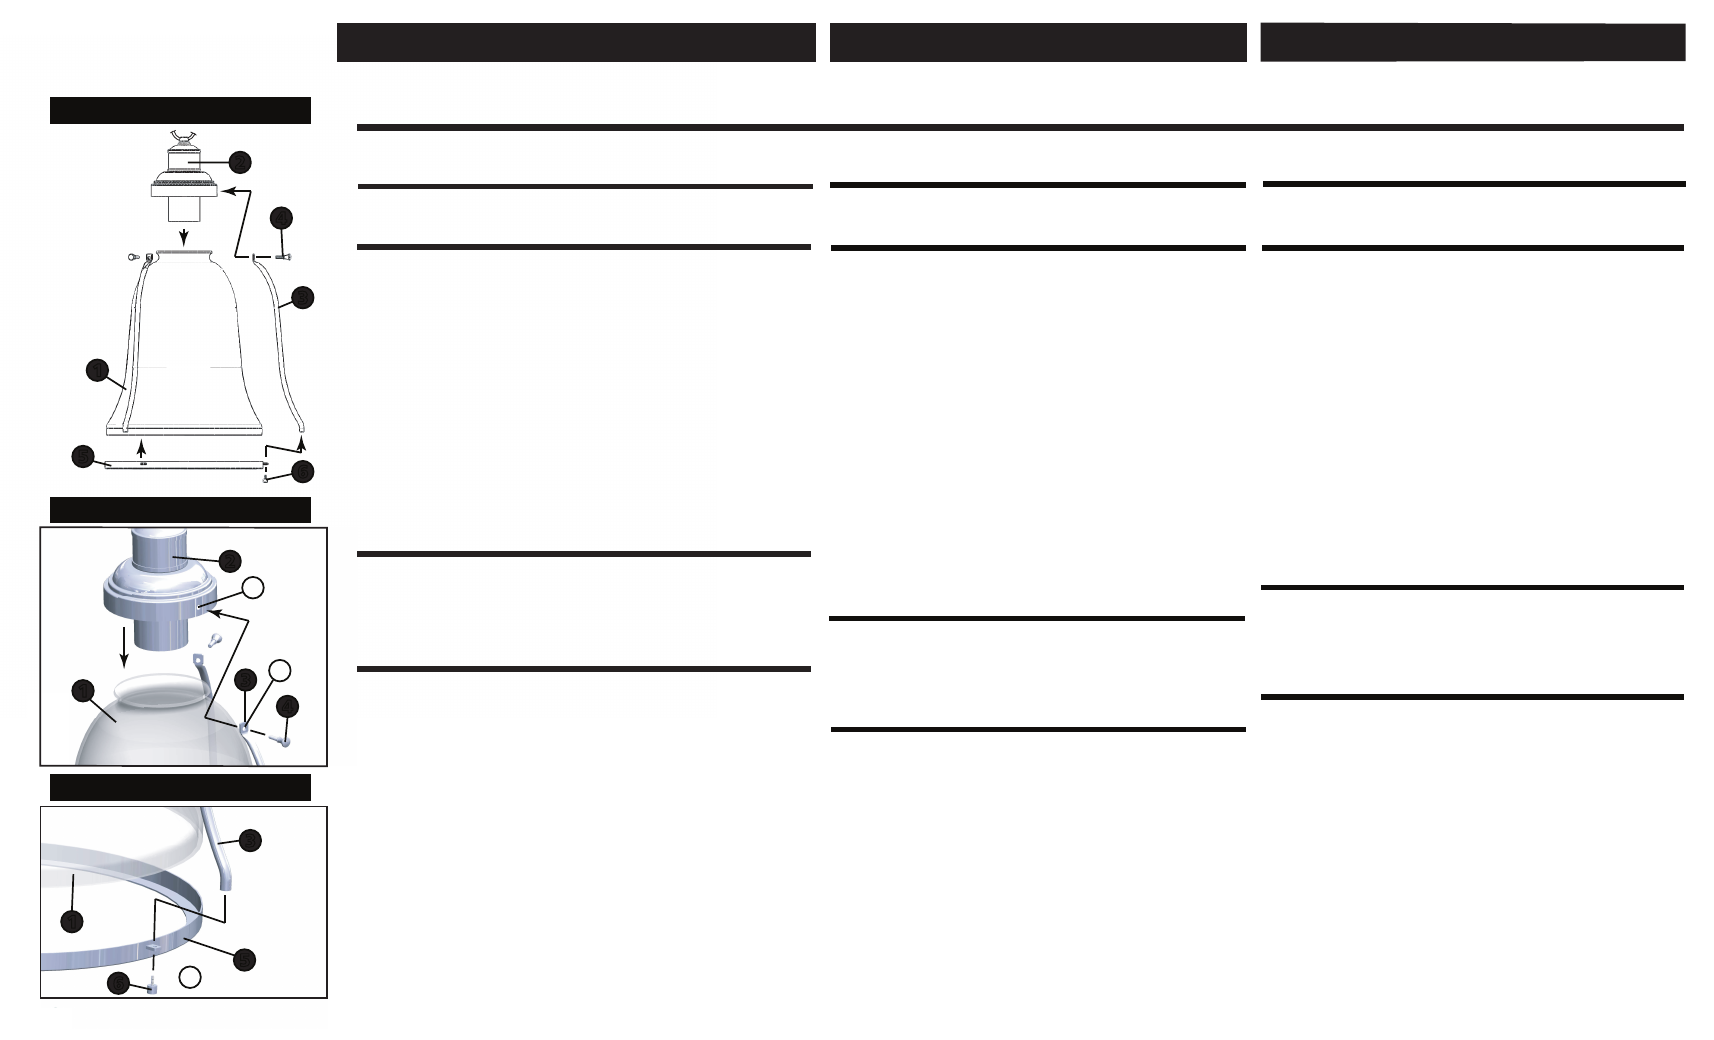
1. To begin assembly, first set glass (1) on a table with small hole in top
upward, now slip the socket fitter assembly (2) into the top of the glass
- see Drawing 1 and Detail 1.
2. Next take one upright (3) and align hole (H1) in flat tab on the top of the
upright, with one of the threaded holes (H2) in the side of the socket fitter
assembly (2). Now slip threaded portion of decorative knob (4) through
hole in flat tab and thread it into hole in side of socket fitter to secure top
of upright.
3. Repeat this process with the two remaining uprights.
4. Now lay the socket fitter assembly (2) and glass (1) with uprights (3) on
its side, and slip ring (5) onto bottom of glass (1) - see Drawing 1 and
Detail 2.
5. Now align the threaded hole in the bottom of upright (3) with hole in tab
(T) on ring (5).
6. Slip threaded portion on barrel knob (6) through hole in tab and thread
into hole on bottom of upright (3).
7. Repeat this process with the two remaining upright.
8. Fixture is ready for installation.
start here
commencez ici
empezar aquí
Assembly Instructions
Item No.
Les Instructions D’assemblage
Numéro d’article:
Instrucciones De Montaje
Número del artículo:
L I G H T I N G
HINKLEY
English
Spanish
French
H I N K L E Y L I G H T I N G 33000 Pin Oak Parkway, Avon Lake, OH 44012 800.446.5539 / 440.653.5500 hinkleylighting.com
1. Find a clear area in which you can work.
2. Unpack fixture and glass from carton.
3. Carefully review instructions prior to assembly.
*** THE CONSTRUCTION OF THIS FIXTURE WILL BE ACCOMPLISHED
BY FIRST ASSEMBLING THE FIXTURE, INSTALLING THE GLASS, AND
THEN HANGING IT FROM THE CEILING.
SAFETY WARNING: READ WIRING AND GROUNDING INSTRUCTIONS
(I.S. 18) AND ANY ADDITIONAL DIRECTIONS. TURN POWER SUPPLY
OFF DURING INSTALLATION. IF NEW WIRING IS REQUIRED,
CONSULT A QUALIFIED ELECTRICIAN OR LOCAL AUTHORITIES
FOR CODE REQUIREMENTS.
To hang fixture from the ceiling follow instruction sheet (IS19-36) provided.
Please read all instruction sheet prior to installing this fixture. Make sure
all power to the fixture is shut off prior to starting installation.
Drawing 1 - General Assembly
Detail - 1
Detail - 2
1
2
3
4
5
6
T
H1
1
2
3
4
H2
3
5
6
1. Busque un lugar claro en el que se puede trabajar.
2. Desempaque la luminaria y el vidrio de la caja.
3. Revise cuidadosamente las instrucciones antes de asamblea.
Une. Allez dans un endroit dans lequel vous pouvez travailler.
2. Déballez luminaire et le verre de boîte.
3. Examinez attentivement les instructions avant le montage.
*** LA CONSTRUCCIÓN DE ESTE ARTEFACTO SE LOGRARÁ
POR PRIMERA MONTAJE DEL ARTEFACTO, INSTALAR EL
VIDRIO, Y LUEGO COLGANDO DEL TECHO.
*** LA CONSTRUCTION DE L 'APPAREIL SERA ACCOMPLIE
EN ASSEMBLANT ABORD LA FIXATION, INSTALLATION DU
VERRE ET ALORS ACCROCHER AU PLAFOND.
1 . Para comenzar el montaje, sistema de cristal de primera (1)
en una mesa con pequeño agujero en la parte superior hacia arriba,
ahora deslizarse el zócalo de montaje ajustador (2) en la parte
superior de la copa - Ver dibujo 1 y del detalle 1.
2 . A continuación, tomar una posición vertical (3) y alinear el
agujero (H1) en la pestaña de plano sobre la parte superior de la
en posición vertical , con uno de los orificios roscados (H2) en el
lado de la toma de ajustadormontaje (2) . Ahora deslizarse porción
roscada del mando decorativa (4) a través agujero en la pestaña
plana y pase la cuerda en el agujero del lado del ajustador de tubo
para fijar la parte superior de posición vertical .
3 . Repita este proceso con los dos montantes restantes.
4 . Ahora coloque el zócalo de montaje ajustador (2) y vidrio (1)
con los montantes (3) en anillo de su lado , y el deslizamiento (5)
en la parte inferior de vidrio (1) - ver dibujo 1 y Detalle 2 .
5 . Ahora alinee el orificio roscado en la parte inferior del montante
(3) con el agujero en la pestaña (T) en el anillo (5) .
6 . Deslice parte roscada del mando de cañón (6) a través del
agujero en la pestaña y el hilo en el orificio en la parte inferior de la
vertical (3 ) .
7 . Repita este proceso con los dos en posición vertical restante.
8 . Aparato está listo para la instalación .
1 . Pour commencer l'assemblage , définissez d'abord le verre (1)
sur une table avec un petit trou dans le haut vers le haut , maintenant
glisser la prise assemblage installateur dans le haut de la vitre (2)
- Voir schéma 1 et de détail 1 .
2 . Prenez ensuite un montant (3) et l'alignement du trou (H1) dans
l'onglet à plat sur le haut de la en position verticale , avec l'un des
trous filetés (H2) dans le côté de la douille d' ajusteur Ensemble (2) .
Maintenant glisser partie filetée du bouton décoratif (4) par trou dans
l'onglet plat et enfiler dans le trou du côté de la prise installateur pour
garantir haut de droite .
3 . Répétez ce processus avec les deux montants restants .
4 . Posez maintenant la prise assemblage installateur (2) et le verre
(1) avec des montants (3) anneau de son côté , et le glissement (5)
sur fond de verre (1) - voir schéma 1 et Détail 2 .
5 . Maintenant aligner le trou fileté dans le fond de montant (3) avec
le trou dans l'onglet (T) sur l'anneau (5) .
6 . Glissez partie filetée sur le bouton de canon (6) dans le trou
dans l'onglet et le fil dans le trou sur le fond du droit (3) .
7 . Répétez ce processus avec les deux debout restant .
8 . Fixture est prêt pour l'installation.
ADVERTENCIA DE SEGURIDAD: INSTRUCCIONES DE CABLEADO
Y CONEXIÓN A TIERRA LEA
(I.S. 18), E INSTRUCCIONES
ADICIONALES. CORTAR EL SUMINISTRO ELÉCTRICO
DURANTE LA INSTALACIÓN. SI NUEVO CABLEADO SE
REQUIERE, CONSULTE CON UN ELECTRICISTA O
AUTORIDADES LOCALES PARA REQUISITOS DEL CÓDIGO.
AVERTISSEMENT DE SÉCURITÉ: LIRE RACCORDEMENT ET MISE
À LA TERRE
(I.S. 18) ET TOUTE AUTRE INSTRUCTION. COUPER
L'ALIMENTATION ÉLECTRIQUE EN COURS D'INSTALLATION. SI
DE NOUVELLES CÂBLAGE N'EST NÉCESSAIRE, CONSULTEZ
UN ÉLECTRICIEN QUALIFIÉ OU LES AUTORITÉS LOCALES
POUR LES EXIGENCES DE CODE.
Para colgar accesorio de la hoja de techo seguimiento de
instrucciones (19-36-IS), siempre. Por favor, lea toda la hoja de
instrucciones antes de instalar este aparato. cerciorarse todo el
poder para el aparato esté apagado antes de iniciar la instalación.
Pour accrocher fixation de la feuille de plafond de suivi de l'instruction
(IS19-36) fourni. S'il vous plaît lire tous feuille d'instructions avant
d'installer ce luminaire. s'assurer tout le pouvoir à l'appareil est éteint
avant de commencer l'installation.
1