Figure 1, Set up instructions, Control adjustments – Rockwell Automation 5100 Background Suppression Control Type 42MBS User Manual
Page 2: Figure 2 typical response curve, Figure 3 typical suppression curve, Figure 4
2
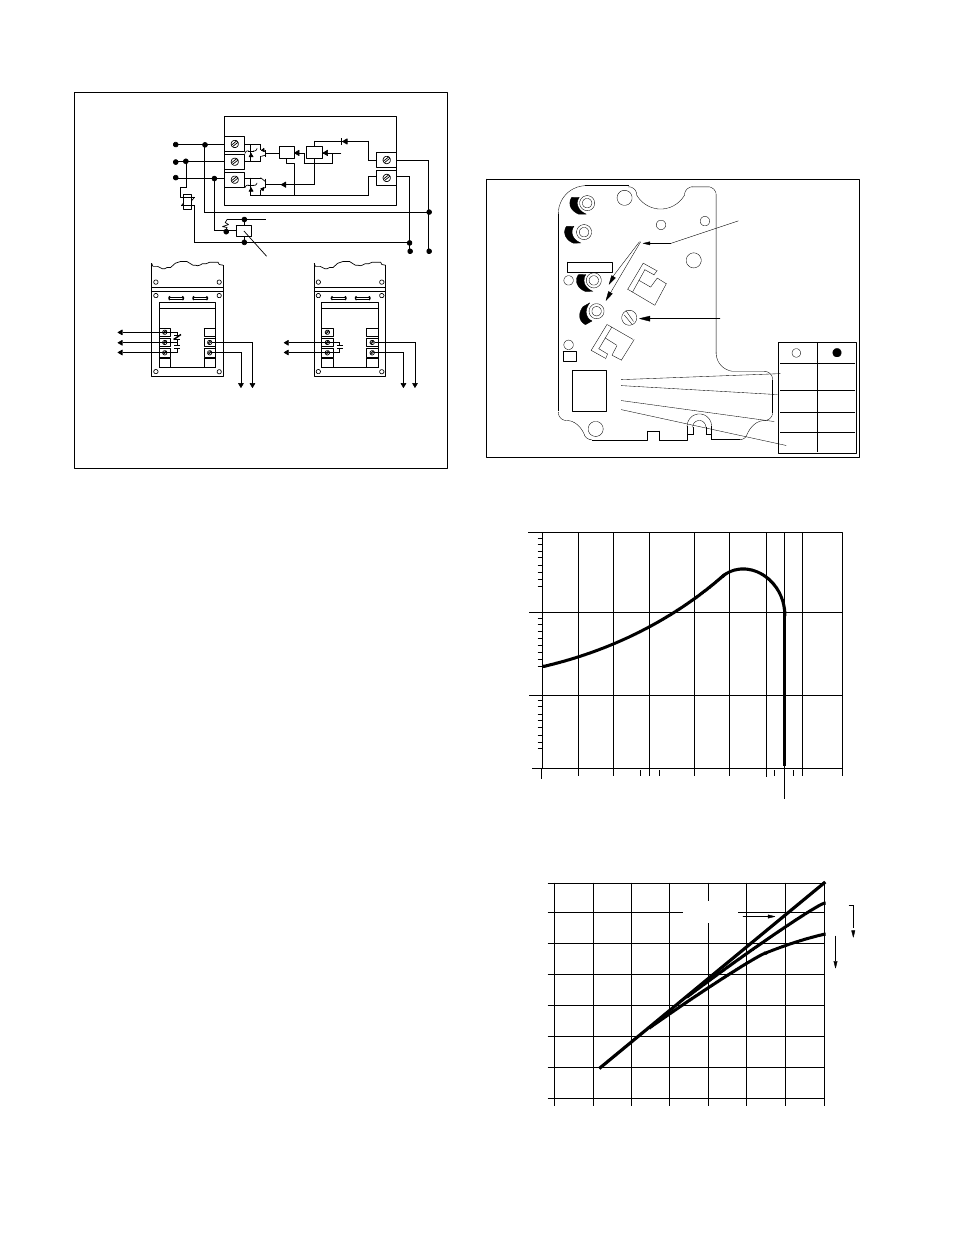
TYPE 42MBS SERIES 5100 CONNECTION DIAGRAMS
L2
SOLID STATE
RELAY
OUTPUT
C
NO
1
2
3
42MTB--5004 WITH #8--593 ONLY and
8 594*
TTL LOGIC
+ 5 VDC
(CURRENT SINK)
(CURRENT
SOURCE)
RELAY LOAD
20--30 VDC
NOTE: MULTIPLE CONTROLS
CAN BE CONNECTED IN “AND”
OR “OR” LOGIC BY USE OF THE
PNP OUTPUT ON TERMINALS #2
AND #3.
L1
L2
L1
EM RELAY
OUTPUT
NC
C
NO
42MTB--5000
42MTB--5001
42MTB--5002
42MTB--5003
120 VAC
240 VAC
48 VAC/DC
24 VAC
42MTB--5000
42MTB--5001
42MTB--5002
42MTB--5003
120 VAC
240 VAC
48 VAC/DC
24 VAC
+
_
_
+
*NOTE: When using
E M relay
#8 594 contact terminals
are:
1 NO 2 C 3 NC
FIGURE 1
SET UP INSTRUCTIONS
1. Loosen lock to make the sensing Range adjustment possible.
2. Adjust “Coarse” sensing range adjustment to the maximum po-
sition. (Full counterclockwise position).
3. Set the Light Energized (LT)/Dark Energized (DK) switch (#4)
to the Light Energized position.
4. With switch #1, select short
(0 1.5 sec.) or long
(0 15 sec.,)
“OFF Delay” (One--shot).
5. With switch #2, select short
(0 1.5 sec) or long
(0 15 sec.)
“ON Delay”
(One shot).
6. With switch #3, select “T
ime Delay” (TD) or
“One shot”
(O.S.) operation.
7. With the
On timing pot. set the
On time to minimum. (Full
counter clockwise).
8. With the
OFF timing pot set the
OFF time to maximum when
in
short OFF mode (Full clockwise) or, when in
long OFF
mode set the OFF time to at least
2 3 seconds.
9. Adjust the “Coarse” sensing range adjustment to the minimum
position. (Full clockwise).
10. Position the control in its application and increase the sensing
range until the control senses the background. The Red LED in-
dicator will turn ON. The Green LED (2X margin indicator)
should turn ON indicating an operating margin of 2X or more ex-
ists.
11. With the Fine sensing range adjustment decrease the sensing
range till the Green LED turns OFF.
12. Place the target to be sensed in front of the control at the expected
sensing distance. The Red and the Green LED should come ON.
Remove the Target.
13. For Time Delay Operation observe the Red LED indicator. If
after the OFF delay has elapsed the Red LED indicator turns
OFF, the control has the correct adjustments and the settings
should be locked with the lock screw. If the Red LED does not
turn OFF, slightly reduce the sensing range with the fine sensing
range adjustment and repeat steps 12 and 13.
14. For
One Shot Operation. Replace the target in front of the
control after the one shot time has elapsed. Observe the Red
LED. If the Red LED comes ON, the settings are correct and can
be locked. If the Red LED does not come on, slightly reduce the
sensing range with the fine sensing range adjustment and repeat
steps 12 and 14.
15. If the dark (DK) operating mode is required, set switch #4 to the
DK position.
16. With the ON and OFF timing pots. adjust for the desired time
delays.
17. Tighten the lockscrew after adjusting the sensing range. A slight
increase in sensing distance may occur. Compensate by readjust-
ing range slightly less then required distance. Example. 5.875
”
(14.9cm) for a 6
” (15.2cm) suppression point. Repeat steps 10,
11 and 12 to verify the range after tightening the lockscrew.
CONTROL ADJUSTMENTS
CAUTION:
MOVE SENSING
RANGE ADJUST
TO ACCESS
FUNCTION
SWITCHES
CAUTION: LOOSEN
LOCK BEFORE
ADJUSTING SENSING
RANGE
COARSE
SENSING
RANGE
ADJUST
FINE
ON
TIMING
OFF
SHORT
OFF
LONG
OFF
SHORT
ON
LONG
ON
O.S.
T.D.
LT.
DK.
1
2
3
4
LT/DK
FIGURE 2
TYPICAL RESPONSE CURVE
SUPPRESSION SET FOR 8” (20.3cm)
OP
ER
AT
IN
G
M
AR
G
IN
OPERATING DISTANCE
100X
10X
.1”
(.25cm)
1000x
1X
.3”
(.76cm)
.5”
(1.27cm)
.8”
(2.03cm)
2”
(5.08cm)
4”
(10.1cm)
6”
(15.2cm)
8”
(20.3cm)
10”
(25.4cm)
12”
(30.5cm)
FIGURE 3
TYPICAL SUPPRESSION CURVE
0
2”
4”
6”
8”
10”
12”
14”
0
2”
4”
6”
8”
10”
12”
14”
(5.08cm) (10.1cm) (15.2cm) (20.3cm) (25.4cm) (30.5cm) (35.5cm)
(30.5cm)
(35.5cm)
(25.4cm)
(20.3cm)
(15.2cm)
(10.1cm)
(5.08cm)
6.1%
2.6%
DISTANCE TO BACKGROUND OBJECT
DI
ST
AN
CE
TO
SE
NS
ED
O
BJ
ECT
(O
PERA
TING
M
ARG
IN
=
16
)
(O
PE
RA
TING
M
ARG
IN
=
38)
WHITE PAPER
FIGURE 4