Table a – n. o. pole conversion kits – Rockwell Automation 500LC Pole Conversion Modification User Manual
Page 2
Installing Pole Conversion Kits 500LC–2PCK, 4PCK, 6PCK, LS3 to Bulletin 500LC Lighting Contactors
2
Publication 500LC–IN004A–EN–P May 2005
F
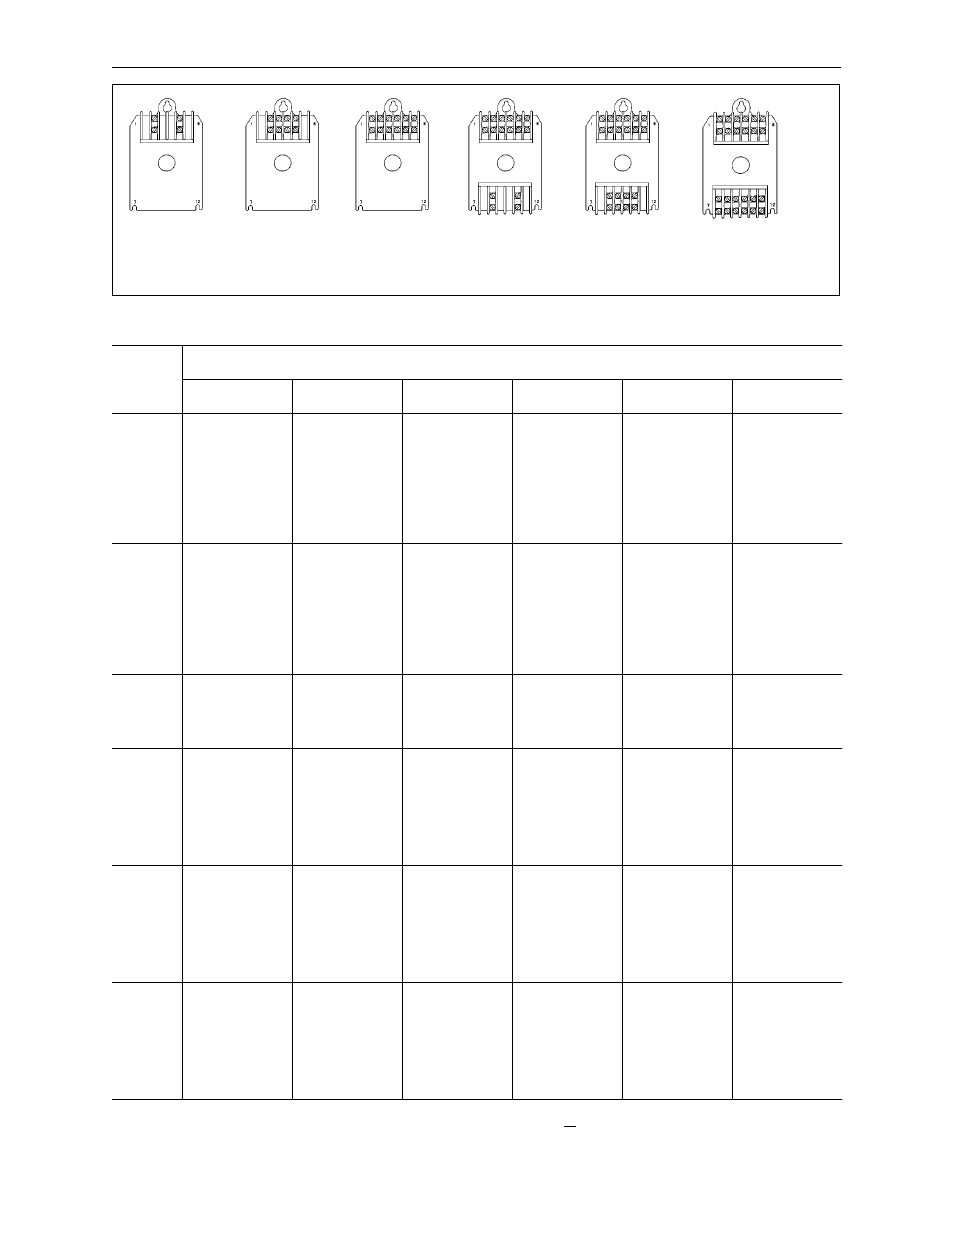
12 Pole
E
10 Pole
D
8 Pole
C
6 Pole
B
4 Pole
A
2 Pole
Figure 2 Location of contact block(s) in relation to number of poles
top
bottom
Table A – N. O. Pole Conversion Kits
Total
Poles
Number of Poles on Existing Bulletin 500LC Lighting Contactor
Poles
Needed 2
4
6
8
10
12
2
see
Fig. 2A
Remove top
block. Install
new block
500LC–2PCK
on top.
Remove top
block. Install
new block
500LC–2PCK
on top.
Remove top block.
Remove bottom
block and
reinstall it on top.
Install a new
leaf spring
500LC–LS3
on bottom.
Remove top block.
Install new block
500LC–2PCK
on top. Remove
bottom block and
install a new
leaf spring
500LC–LS3
on bottom.
Remove top block.
Install new block
500LC–2PCK
on top. Remove
bottom block and
install a new
leaf spring
500LC–LS3
on bottom.
4
see
Fig. 2B
Remove top
block. Install
new block
500LC–4PCK
on top.
Remove top
block. Install
new block
500LC–4PCK
on top.
Remove top block.
Install new block
500LC–4PCK
on top. Remove
bottom block.
Install a new
leaf spring
500LC–LS3
on bottom.
Remove top block.
Remove bottom
block and
reinstall it on top.
Install a new
leaf spring
500LC–LS3
on bottom.
Remove top block.
Install new block
500LC–4PCK
on top. Remove
bottom block and
install a new
leaf spring
500LC–LS3
on bottom.
6
see
Fig. 2C
Remove top
block. Install
new block
500LC–6PCK
on top.
Remove top
block. Install
new block
500LC–6PCK
on top.
Remove bottom
block. install a
new leaf spring
500LC–LS3.
Remove bottom
block. install a
new leaf spring
500LC–LS3.
Remove bottom
block. install a
new leaf spring
500LC–LS3.
8
see
Fig. 2D
Remove leaf
spring. Remove
top block and
reinstall it on
bottom. Install
new block
500LC–6PCK
on top.
Remove top
block. Install
new block
500LC–2PCK
on top.
Remove leaf
spring. Install
new block
500LC–2PCK
on the bottom.
Remove bottom
block. Install
new block
500LC–2PCK
on bottom.
Remove bottom
block. Install
new block
500LC–2PCK
on bottom.
10
see
Fig. 2E
Remove leaf
spring. Remove
top block and
reinstall it on
bottom. Install
new block
500LC–6PCK
on the top.
Remove leaf
spring. Install
new block
500LC–4PCK
on the bottom.
Remove bottom
block. Install
new block
500LC–4PCK
on the bottom.
Remove bottom
block. Install
new block
500LC–4PCK
on the bottom.
12
see
Fig. 2F
Remove top block.
Install new block
500LC–6PCK
on top. Remove
leaf spring. Install
another new block
500LC–6PCK
on the bottom.
Remove top block.
Install new block
500LC–6PCK
on top. Remove
leaf spring. Install
another new block
500LC–6PCK
on the bottom.
Remove the leaf
spring. Install
new block
500LC–6PCK
on the bottom.
Remove bottom
block. Install
new block
500LC–6PCK
on the bottom.
Remove bottom
block. Install
new block
500LC–6PCK
on the bottom.
NOTE: Top and bottom actuators are required for all configurations;
top actuator with a contact block, bottom actuator with a contact block or a leaf spring.