Xxxx30000_designerhood_std_rev06, Sloping hood & angled side panel options, Installation instructions – Salsbury Industries 30000 Series Designer Lockers User Manual
Page 3
SALSBURY INDUSTRIES
1010 East 62
nd
Street, Los Angeles, CA 90001-1598
Phone: 1-800-562-5377 Int’l Phone: 323-846-6700
Fax: 1-800-562-5399 Int’l Fax: 323-846-6800
www.lockers.com engineering
@
lockers.com
Installation instructions are provided as general guidelines. It is advised that a professional installer be consulted. Salsbury Industries assumes no product assembly or installation liability.
Copyright © 2011 Salsbury Industries. All rights reserved. (Rev. 06, 6/21/11)
Sloping Hood & Angled Side Panel Options
For Designer Lockers - 30000 Series
Installation Instructions
Thank you for selecting the 33351 or 33353 sloping hood and/or the 33334 angled side panel for the 30000 Series Designer Lockers. These
instructions are intended to assist you in positioning and fastening the sloping hood and angled side panel to the locker.
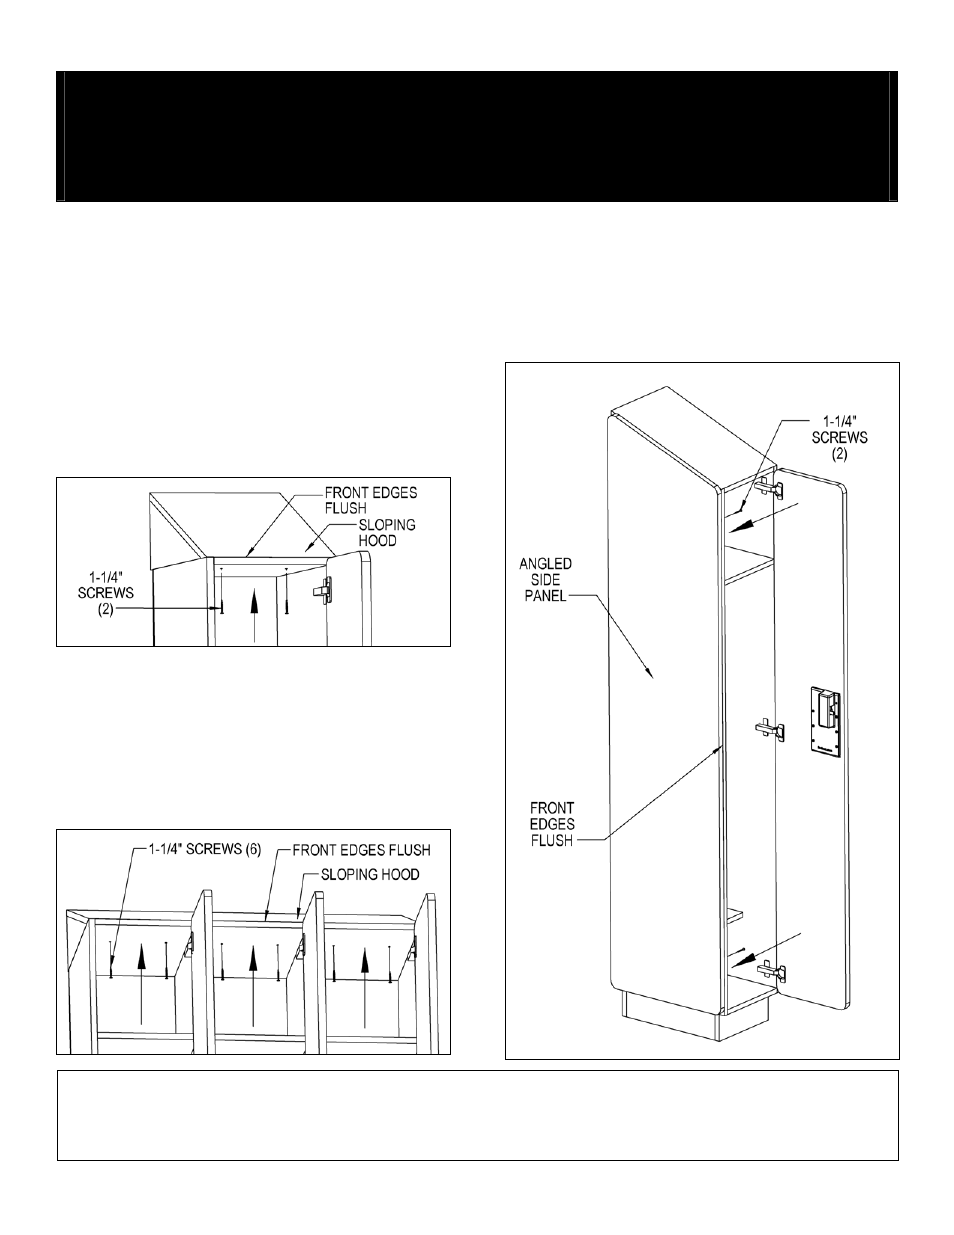
Sloping Hood Installation Instructions
1 - Wide Sloping Hood
Place the sloping hood on top of locker with the front edge flush with
the locker body, not the door, and the sides flush with sides of the
locker. Install two (2) 1-1/4” long self-tapping dry wall screws
(provided) through the ceiling of the locker compartment (from the
inside) into the bottom of the sloping hood. Pre-drill two (2) pilot
holes (6) inches from the front face of the locker with a 1/16” drill bit
as indicated.
3 - Wide Sloping Hood
Place the sloping hood on top of locker with the front edge flush with
the locker body, not the door, and the sides flush with sides of the
locker. Install six (6) 1-1/4” long self-tapping dry wall screws
(provided) through the ceiling of the locker compartment (from the
inside – two (2) per compartment) into the bottom of the sloping
hood. Pre-drill two (2) pilot holes per compartment six (6) inches
from the front face of the locker with a 1/16” drill bit as indicated.
Angled Side Panel Installation Instructions
Attach the side panel flush with the front of the locker body, not the
door. Install two (2) 1-1/4” long self-tapping dry wall screws
(provided) in pre-drilled holes from inside the locker.