Digital controller panel – Multiquip DCA20SPXU2D User Manual
Page 19
DCA20SPXU2D 60 HZ GENERATOR • OPERATION AND PARTS MANUAL — REV. #1 (03/25/11) — PAGE 19
DIGITAL CONTROLLER PANEL
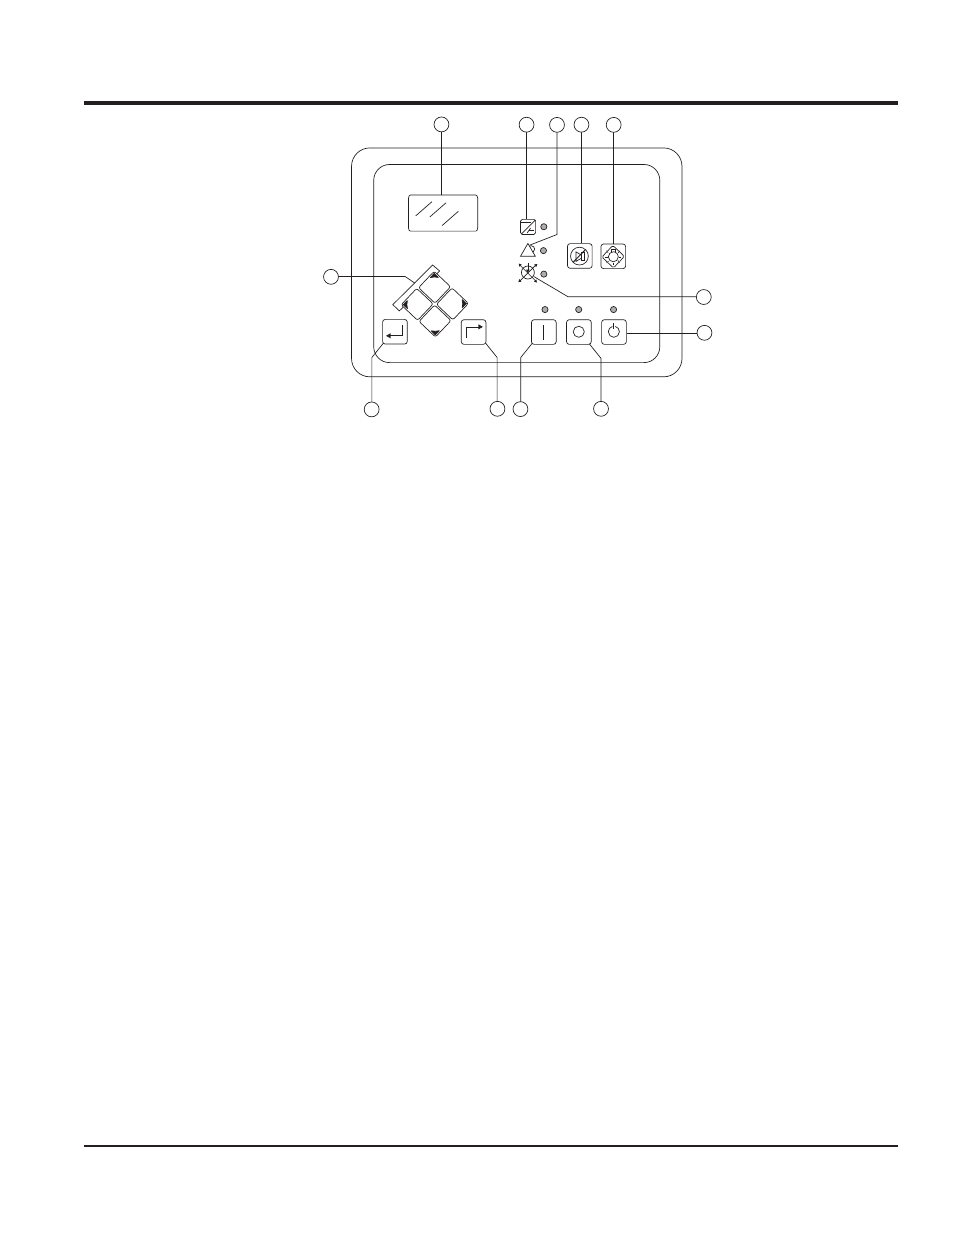
Figure 5. Digital Controller Panel
EDIT
RESET
RUN
OFF
AUTO
ALARM
SILENCE
LAMP
TEST
NOT IN
AUTO
ALARM
SUPPLYING
LOAD
1
2
3
4
5
6
7
8
9
10
11
12
The defi nitions below describe the controls and functions
of the Digital Control Panel (Figure 5).
1. Liquid Crystal Display (LCD) — The LCD serves
as the local information source for metering, alarms,
pre-alarms, and protective functions.
2. Supplying Load Indicator — This green LED lights
when the generator current is greater than the EPS
threshold.
3. Alarm Indicator — This red LED lights continuously
during alarm conditions and fl ashes during pre-alarm
conditions.
4. Alarm Silence — Not used.
5. Lamp Test Pushbutton — Press this pushbutton to
test the illumination of all LCD pixels and LED's on
the Digital Controller.
6. Not in Auto Indicator—This red LED lights when the
Digital Controller is not operating in auto mode.
7. Auto Pushbutton and Mode Indicator — Press
this pushbutton to place the Digital Controller in auto
mode. The green auto LED will light when the auto
mode is active.
8. Off Pushbutton and Mode Indicator — Press this
pushbutton to place the Digital Controller in the off
mode. The red off mode LED will light when the Digital
Controller is in the off mode.
9. Run Pushbutton and Mode Indicator — Press this
pushbutton to place the Digital Controller in the run
mode. The green run mode LED will light when the
Digital Controller is in the run mode.
10. Reset Pushbutton — Press this pushbutton to cancel
a settings editing session and discard any changes
made to the settings.
11. Edit — Press this pushbutton to start an editing
session and enable changes to the Digital Controller
settings. At the conclusion of an editing session, the
edit pushbutton is pressed again to save the setting
changes.
12. Arrow Pushbuttons — These four pushbuttons are
used to navigate through the display menus and modify
settings.
The left and right arrow buttons are used to navigate
through the display menus and modify settings. The
right-arrow button is pressed to move downward
through the menu levels and the left-arrow is pressed
to move upward.
Within a level, the up-arrow and down-arrow buttons
are used to move among items within the menu level.
Pressing the down-arrow button moves to items lower
in the list.
Pressing the up-arrow button moves to items higher in
the list. During a settings editing session, the up and
down arrow buttons are used to raise and lower the
value of the selected setting.