Multiquip LS-50TD User Manual
Page 49
MAYCO LS-40D/LS-40TD/LS-50TD PUMP — OPERATION AND PARTS MANUAL — REV. #11 (09/16/11) — PAGE 49
TIRES/WHEELS/LUG NUTS
Tires and wheels are a very important and critical compo-
nents of the trailer. When specifying or replacing the
trailer wheels it is important the wheels, tires, and axle are
properly matched.
LS-40D/LS-40TD/LS-50TD PUMP — MAINTENANCE (TRAILER)
DO NOT attempt to repair or modify a wheel. DO
NOT install an inter-tube to correct a leak through
the rim. If the rim is cracked, the air pressure in the
inter-tube may cause pieces of the rim to explode
(break-off) with great force and can cause serious
eye or bodily injury.
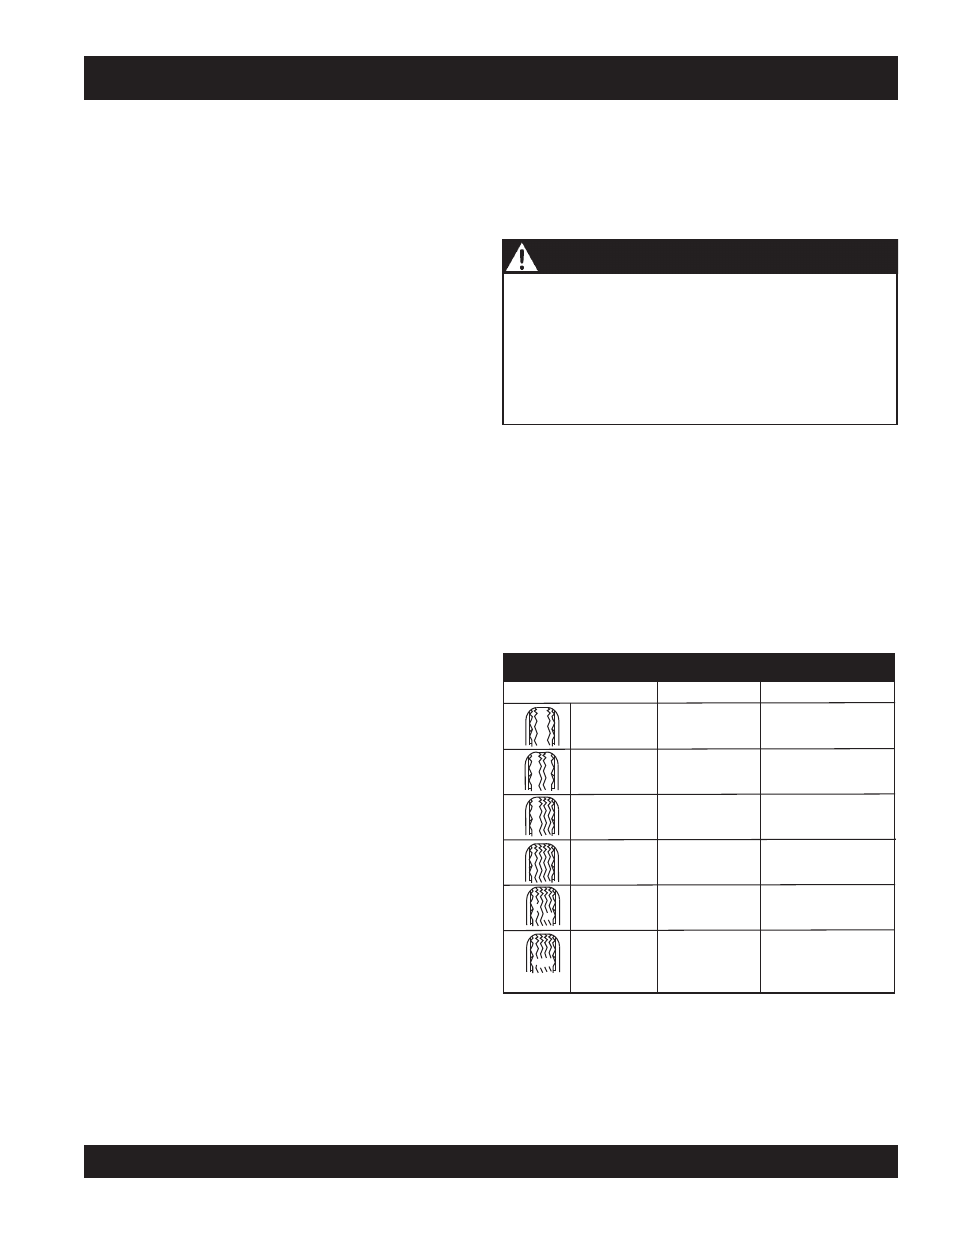
WEAR PATTERN
SOLUTION
CAUSE
Center Wear
Over Inflation
Adjust pressure to
particular load per
tire manufacturer.
Edge Wear
Under Inflation
Make sure load does
not exceed axle rating.
Align wheels.
Side Wear
Adjust pressure to
particular load per
tire manufacturer.
Loss of chamber
or overloading.
Toe Wear
Incorrect toe-in
Align wheels.
Cupping
Out-of balance
Check bearing adjust-
ment and balance tires.
Flat Spots
Wheel lockup &
tire skidding.
Avoid sudden stops
when possible and
adjust brakes.
TABLE 6. TIRE WEAR TROUBLESHOOTING
TIRES WEAR/INFLATION
Tire inflation pressure is the most important factor in tire
life. Pressure should be checked cold before operation. DO
NOT bleed air from tires when they are hot. Check inflation
pressure weekly during use to insure the maximum tire life
and tread wear.
Table 6 (Tire Wear Troubleshooting) will help pinpoint the
causes and solutions of tire wear problems.
CAUTION - TRAILER WHEEL MAINTENANCE
TRAILER ACTUATOR
The following maintenance steps should be performed
before towing the pump:
1. Frequently check actuator brake fluid levels. (Fluids
must be approved, clean, and uncontaminated). Use
DOT 3 or 4 brake fluid.
2. Make sure actuator mounting bolts and coupler bolts
are secure.
3. Periodically check the brake system as descrubed in
the brakes owner’s manual. Consult certified brake
specialists to make necessary adjustments or repairs.
Failure to do so could result in loss of braking capa-
bilities.
Servicing the Actuator Emergency Lever
If the actuator emergency lever is applied, disengage
using a screwdriver to lift upward on the front of the flat
emergency lever spring while pulling the lever forward until
it has been released.
Replace damaged parts as follows:
1. Remove the Master Cylinder and Push Rod Assembly.
Be careful not to get dirt into the master cylinder. A
new Master Cylinder Gasket should be used when re-
installing.
2. Remove the Cable S-hook from the Emergency Lever,
the Emergency Lever Guide, and the Flat Emergency
Lever Spring, then pull the lever out of the actuator
outer case through the cross-slot at the top of the
case.
3. Install a new emergency lever through the cross-slot
in the actuator casing. Attach a new emergency lever
spring and emergency lever guide.
4. Install a new master cylinder gasket to the master
cylinder. Put the push rod assembly and master
cylinder back into the outer case of the actuator.
5. Set the S-hook onto the emergency brake cable and
insert into the emergency lever. Squeeze the s-hook
shut to secure it to the lever.
6. Add adequate brake fluid to the master cylinder and
bleed the brake system.