Labnet Z233M-2 High Capacity MicroCentrifuge User Manual
Page 9
9
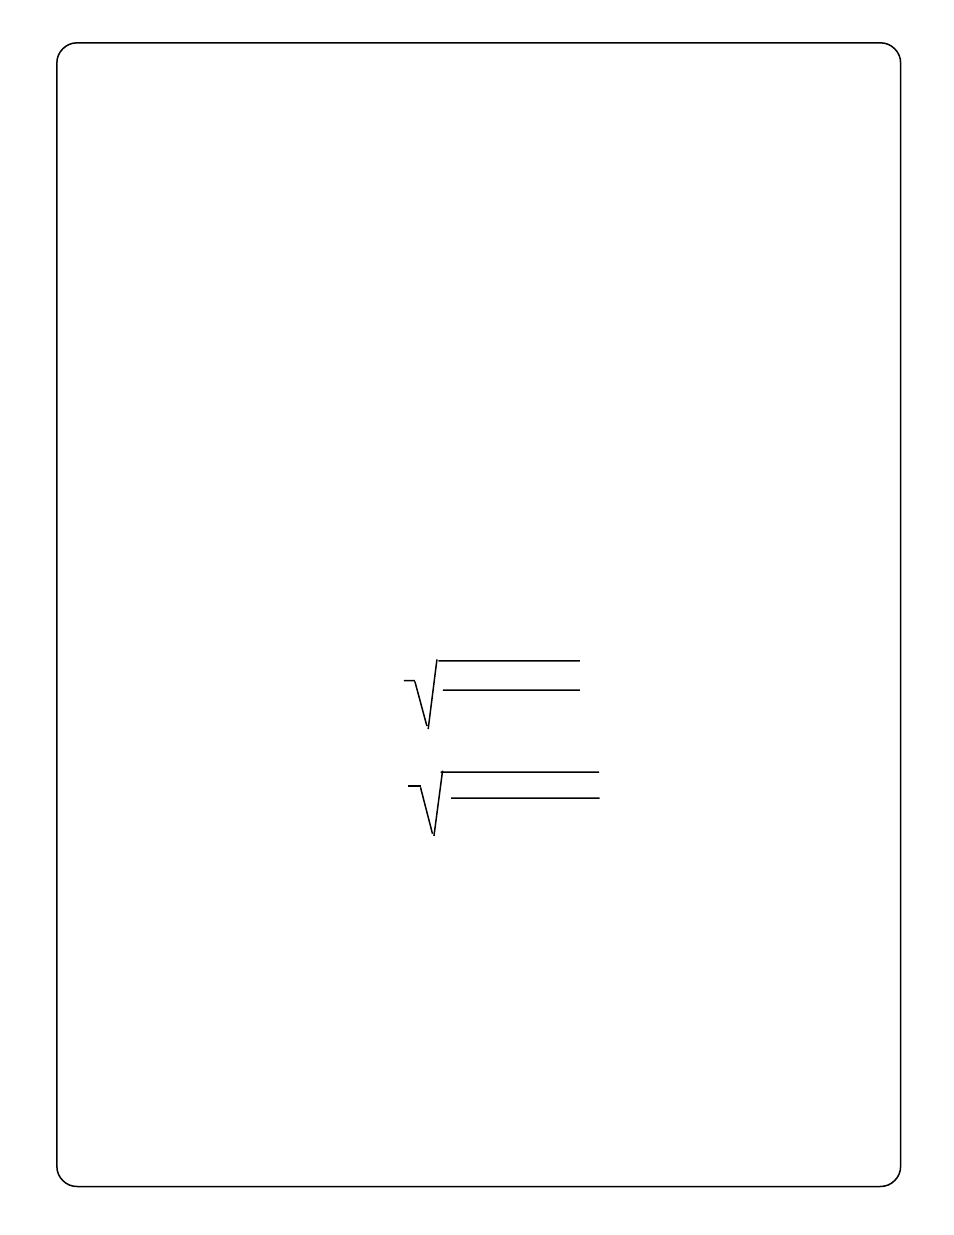
Reduced speed
Reduced speed
Reduced speed
Reduced speed
Reduced speed
n
n
n
n
n
red
red
red
red
red
=
=
=
=
=
x max. speed (n
x max. speed (n
x max. speed (n
x max. speed (n
x max. speed (n
m a x
m a x
m a x
m a x
m a x
)
)
)
)
)
Example:
Example:
Example:
Example:
Example:
n
n
n
n
n
red
red
red
red
red
=
=
=
=
=
x 4000 = 3360 rpm
x 4000 = 3360 rpm
x 4000 = 3360 rpm
x 4000 = 3360 rpm
x 4000 = 3360 rpm
1,2
1,2
1,2
1,2
1,2
1,7
1,7
1,7
1,7
1,7
higher density
higher density
higher density
higher density
higher density
value
value
value
value
value
On the digital display for "speed rpm / rcf g x 10" the number code for the set rotor
type appears. On the digital display "time min-sec" the letters "ro" ( rotor ) appears.
Turn the speed knob (1),
(see figure 4) till the required rotor code appears on the
display.
Rotor
Rotor code
C0230-2A, 24 x 1.5ml
59
C0200-95, 18 x 1.5ml
95
C0230-9A, 44 x 1.5ml
88
C0230-43A, 64 x .05ml
92
C0230-55A, 24 x 1.5, 24 x 0.5ml
88
C0230-TSA Strip tube 4 x 8 - 0.2ml
59
After doing that, disconnect the power supply and put it back and the new rotor
number is stored.
3.3
Overloading rotors
The max. load permitted for a rotor, which is determined by the manufacturer, as
well as the max. speed allowed with the rotor (see indications on the rotor itself)
must not be exceeded. The liquids with which the rotors are loaded should have
an average homogeneous density of 1.2g per ml or less, when the rotor is
running at maximum speed. To spin liquids of a higher density, the speed has to
be
reduced according to the following formula:
In case you have any questions, please contact the National Labnet!
In case you have any questions, please contact the National Labnet!
In case you have any questions, please contact the National Labnet!
In case you have any questions, please contact the National Labnet!
In case you have any questions, please contact the National Labnet!
3.4
Removing the rotor
Take off the rotor lid and hold the rotor with one hand.
Turn the rotor nut clockwise, until the rotor is loose and take the rotor vertically off
the shaft.
ATTENTION:
ATTENTION:
ATTENTION:
ATTENTION:
ATTENTION:
Never operate the centrifuge with rotors or buckets which show any signs of
Never operate the centrifuge with rotors or buckets which show any signs of
Never operate the centrifuge with rotors or buckets which show any signs of
Never operate the centrifuge with rotors or buckets which show any signs of
Never operate the centrifuge with rotors or buckets which show any signs of
corrosion or mechanical damage. Never operate with strongly corrosive
corrosion or mechanical damage. Never operate with strongly corrosive
corrosion or mechanical damage. Never operate with strongly corrosive
corrosion or mechanical damage. Never operate with strongly corrosive
corrosion or mechanical damage. Never operate with strongly corrosive
materials which could damage rotor and buckets.
materials which could damage rotor and buckets.
materials which could damage rotor and buckets.
materials which could damage rotor and buckets.
materials which could damage rotor and buckets.
1,2
1,2
1,2
1,2
1,2