Graff WALL SPOUT User Manual
Page 3
c u t t i n g e d g e d e s i g n
3
IOG 2319.11
Rev. 1 April 2010
Instructions for assembly and use • Montage- und Gebrauchsanweisung • Notice technique montage et utilisation • Инcтрукция по монтажу и обслуживанию • Instrucción de Montaje y Servicio • Manuale di Montaggio e Uso
GB D
F RUS E
I
WAND-AUSLAUFGARNITUR • ROBINET MURAL
НАСТЕННЫЙ ИЗЛИВ • CAÑO DE PARED • BOCCA A MURO
WALL SPOUT
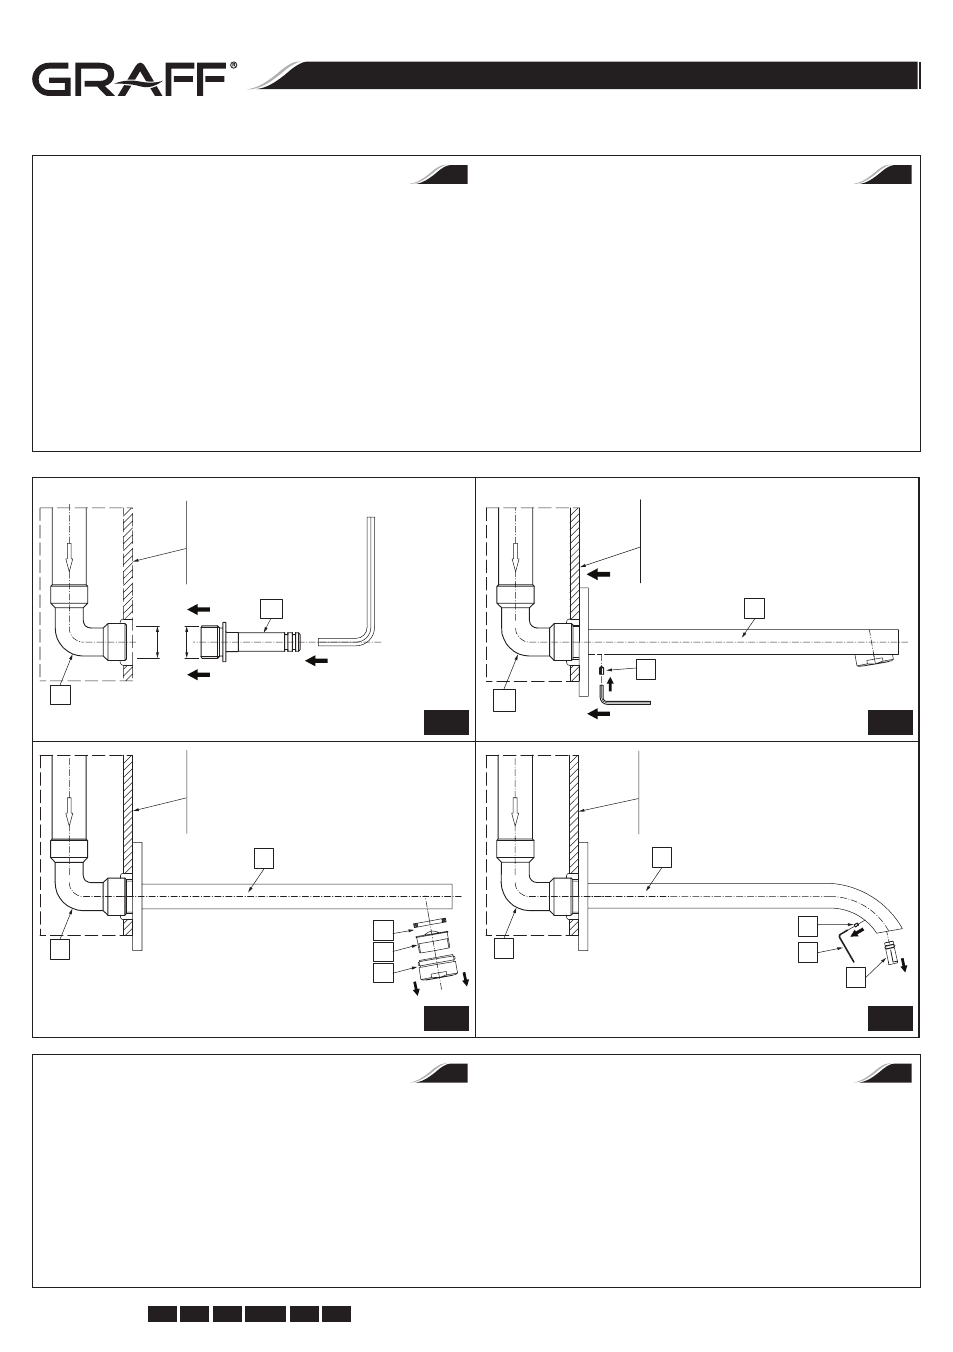
INSTRUCTION DE MONTAGE – voir schéma 2.1-2.2
1. Préparez une sortie murale femelle avec filetage de 1/2” (A) pour
le raccord de robinet (1).
2. Vissez la rosace (8) sur le robinet (1) à l’aide des vis (9).
3. Enroulez la bande téflon ou autre produit d’étanchéité pour fi-
letage sur la partie filetée du raccord (10). Vissez le raccord (10)
sur la sortie murale (A) à l’aide d’une clé Allen de 6mm.
4. Faites coulisser le robinet (1) sur le raccord (10) et positionnez le
correctement. Immobilisez le robinet à l’aide des deux vis (7) en
les serrant jusqu’au contact à l’aide d’une clé Allen de 2mm.
МОНТАЖНАЯ ИНСТРУКЦИЯ - см. рис. 2.1-2.2.
1. Подготовь вывод в стене с внутренней резьбой 1/2” (A) для
подключения излива (1).
2. Привинти розетку (8) при помощи винтов (9) к изливу (1).
3. Намотай тефлоновую ленту или другой уплотнитель резьбы
на резьбовую часть соединителя (10). Ввинти соединитель
(10) к выводу в стене (A), используй имбусный ключ 6мм.
4. Надвинь излив (1) на соединитель (10) и установи его в
правильном положении. Заблокируй излив, чтобы он не
изменил свое положение, двумя винтами (7), затягивая
их имбусным ключом 2мм до момента ощутимого
сопротивления.
F
RUS
8
G1/2"
G1/2"
6mm
2mm
1.5mm
A
8
8
1
1
1
6
K
5
7
2
3
4
10
Finished wall
Ausbauwand
Ścianka wykończeniowa
Perete finisat
Líc dokončené stěny
Finálna plocha steny
Finished wall
Ausbauwand
Ścianka wykończeniowa
Perete finisat
Líc dokončené stěny
Finálna plocha steny
Finished wall
Ausbauwand
Ścianka wykończeniowa
Perete finisat
Líc dokončené stěny
Finálna plocha steny
Finished wall
Ausbauwand
Ścianka wykończeniowa
Perete finisat
Líc dokončené stěny
Finálna plocha steny
8
G1/2"
G1/2"
6mm
2mm
1.5mm
A
8
8
1
1
1
6
K
5
7
2
3
4
10
Finished wall
Ausbauwand
Ścianka wykończeniowa
Perete finisat
Líc dokončené stěny
Finálna plocha steny
Finished wall
Ausbauwand
Ścianka wykończeniowa
Perete finisat
Líc dokončené stěny
Finálna plocha steny
Finished wall
Ausbauwand
Ścianka wykończeniowa
Perete finisat
Líc dokončené stěny
Finálna plocha steny
Finished wall
Ausbauwand
Ścianka wykończeniowa
Perete finisat
Líc dokončené stěny
Finálna plocha steny
INSTALLATION INSTRUCTION
– see drawings 2.1 – 2.2
1. Prepare the wall outlet with 1/2” female thread (A) to connect
the spout (1).
2. Screw the rosette (8) onto the spout (1) by means of
screws (9).
3. Wind the teflon tape or other thread sealant on connector’s
(10) threaded section. Screw the connector (10) into the wall
outlet (A); use a 6mm Allen key.
4. Slide the spout (1) onto the connector (10) and position it prop-
erly. Secure the spout against moving by means of two screws
(7) – tighten them against stop by means of a 2mm Allen key.
MONTAGEANLEITUNG
– siehe Abb. 2.1-2.2
1. Die Wandausführung mit dem Innengewinde 1/2” (A) auf den
Anschluss der Auslaufgarnitur (1) vorbereiten.
2. Die Rosette (8) mittels Schrauben (9) an die Auslaufgarnitur (1)
anschrauben.
3. Das PTFE-Band oder ein anderes Gewinde-Dichtungsmittel auf
den Gewindeteil des Verbindungsstücks (10) aufwickeln. Das
Verbindungsstück (10) in die Wandausführung (A) eindrehen,
dabei ist der Innensechskantschlüssel 6mm verwenden.
4. Die Auslaufgarnitur (1) auf das Verbindungsstück (10) aufschie-
ben und anschließend richtig positionieren. Die Auslaufgarni-
tur mittels zwei Schrauben (7) gegen Umstellung sichern, die
Schrauben sind bis zum spürbaren Widerstand mit einem In-
nensechskantschlüssel 2mm anziehen.
GB
D
2.1
3.1
2.2
3.2