The gl100 manager 2 – Cooper-Atkins GL300 User Manual
Page 4
When finished making and editing groups...
•
Click on the OK button to close the window. If you click OK before saving changes, a dialog
box will appear and ask if you want to save changes.
Keypad:
The keypad has four buttons to control the operation of the HT3100.
Probe Jack:
The HT3100 probe jack accepts type K, J, or T miniature thermocouple plugs.
The 8410MK probe supplied with the HT3100 is type K.
Probe Storage:
The handle of the 8410MK probe slides onto the probe storage feature to hold
the probe while not in use, or for one-handed temperature measurement.
Tab Reader:
The tab reader permits the transfer of data to and from the location tabs. Place
the tab reader against the location tab and hold until the HT3100 beeps.
Display:
The display window presents data and messages that the user needs to
operate the HT3100.
Battery:
The battery compartment is located on the back of the HT3100. To open the
battery compartment, using a straight screwdriver, turn the battery door lock 1/4
turn counter-clockwise.
Computer Port:
The computer port connects to the download cable and permits data transfer
between the host computer and the HT3100.
Download Cable: The download cable connects between the HT3100 and the host computer to
permit data transfer.
Cleaning:
Wipe the outside of the HT3100 with a soft damp cloth only. Never place it in a
sink or dishwasher.
Using the HT3100
•
Press the ON/OFF button to activate the HT3100.
•
Hold ON/OFF down until the display starts (about 1/2 second). The HT3100 Setup Information
is displayed. The Setup Information includes:
Device Name:
The 12 characters used to identify the HT3100
Device #:
A unique number assigned to the HT3100 by the
computer during device programming
Temperature Units:
Set to either °F or °C
Probe Thermocouple Type:
Set to type K, J or T (default is type K)
Temperature Display Resolution:
Set to XXX to display whole degrees only or, XXX.X to
display tenths of a degree
The Current Time Setting
The Current Date Setting
After the setup information is displayed, the HT3100 is ready for use. The upper line of the display
shows the device name. On the lower line, the leftmost four characters show the record status (the
number of records currently stored in the HT3100 memory – the HT3100 can hold up to 2,000
records.) The rightmost characters display the current temperature reading.
(For more details on setup information see the online Help File “Programming a New Device” in
“Using the HACCP Manager Software”.)
Reading A Temperature
The temperature reading is displayed on the lower line of the HT3100 display window. With the
probe plugged into the HT3100 probe jack, place the tip of the temperature probe into the material
to be measured. Wait approximately 3 to 10 seconds, depending on the consistency of the material
(faster in moving liquid, slower in still air).
15
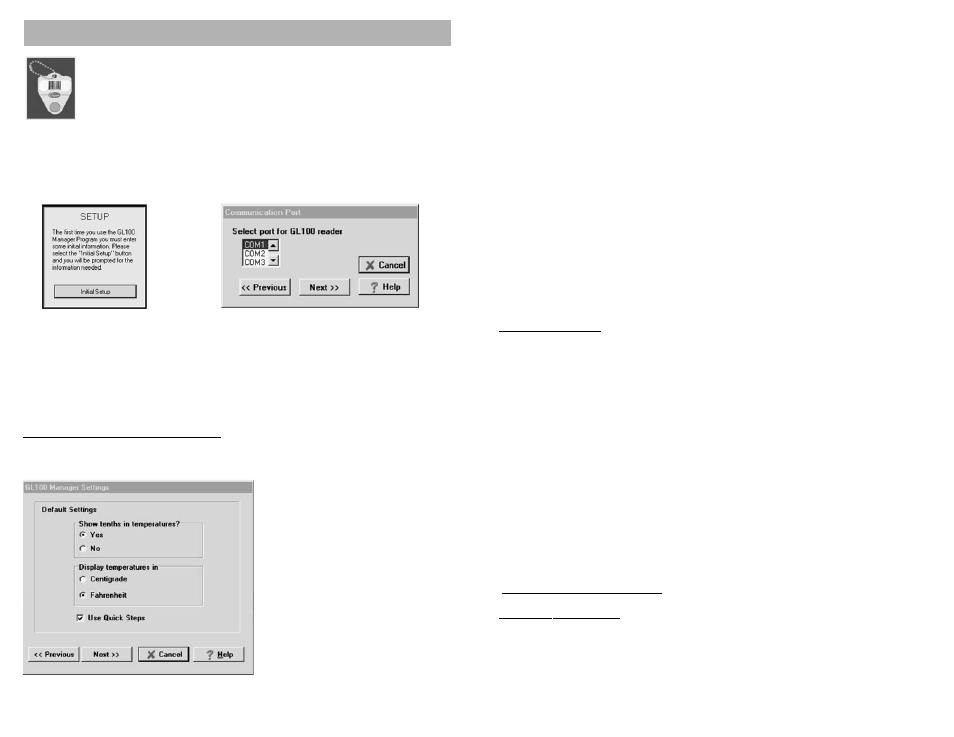
From the Welcome Screen, click on the Mini Data Logger picture to run the GL100
Manager program. The first time the GL100 Manager program runs it will ask you to
make some initial settings. The “Setup” window will appear.
Click on the Initial Setup button. ===> Then select the port to which your GL100 reader
will be connected.
===>
The GL100 reader that comes with the GL100 full system is designed to connect to your computer’s
serial communication port. On most computers, the 9-pin serial port is COM1. If you know the
number of your COM port, select it in the port selection box. If you are not sure about your machine,
leave the selection at COM1, and refer to the “Troubleshooting” section for additional information.
Click on the Next>> button to continue.
The GL100 Manager Settings Window
This window allows you to control how temperature data will be displayed.
Show tenths in temperatures?
If Yes is checked, temperatures in the
GL100 Manager will be displayed to the
nearest tenth of a degree. If No is
checked, temperatures in the GL100
Manager will be displayed to the nearest
whole degree.
Display temperatures in:
If Centigrade is checked, temperatures will
be in degrees Centigrade.
If Fahrenheit is checked, temperatures will
be in degrees Fahrenheit.
Use Quick Steps:
If checked, the “Quick Steps” window will
appear each time the GL100 Manager
program starts. If unchecked, the “Quick
Steps” window will not be displayed when
the program starts.
When the default settings have been made, click on the Next>> button to continue.
THE GL100 MANAGER
2