C.B.S. Scientific DGGEK-4801 User Manual
Page 9
16
17
www.cbsscientific.com
Cipher DGGE Instructions 2/28/14
SECTION 3
Gel Casting Options
3 1 Preparation/Cleaning of Glass Plate for Gel Casting
Hand wash both plates with a high quality lab detergent followed by a complete
rinsing with dH
2
O. Air dry or use a lint-free tissue. Spray/wipe the chosen
inner surfaces of the plate set with 95% ethanol and dry with lint-free tissue.
3 2 Gel Casting Techniques
A. Gel Wrap™ Gasket Casting Method.
B. Vertical gradient gel casting using GM-40 gradient maker and gravity flow.
C. Vertical gradient gel casting using GM-40 gradient maker and a Mini-pump.
D. Vertical gradient gel casting using GM-40 gradient maker, Mini-pump and
Multi-gel Caster.
NOTE: Prior to casting, mark the notched glass plate to designate which side is the
‘inside’ and ‘outside’. The same side of the notched plate should always sit against the
reservoir gasket.
A Gel Casting using Gel Wrap™ Gasket Casting method
For Vertical DGGE, use the set of spacers which do not have the small hole or channel
milled into the lower end, these are for casting
perpendicular gels.
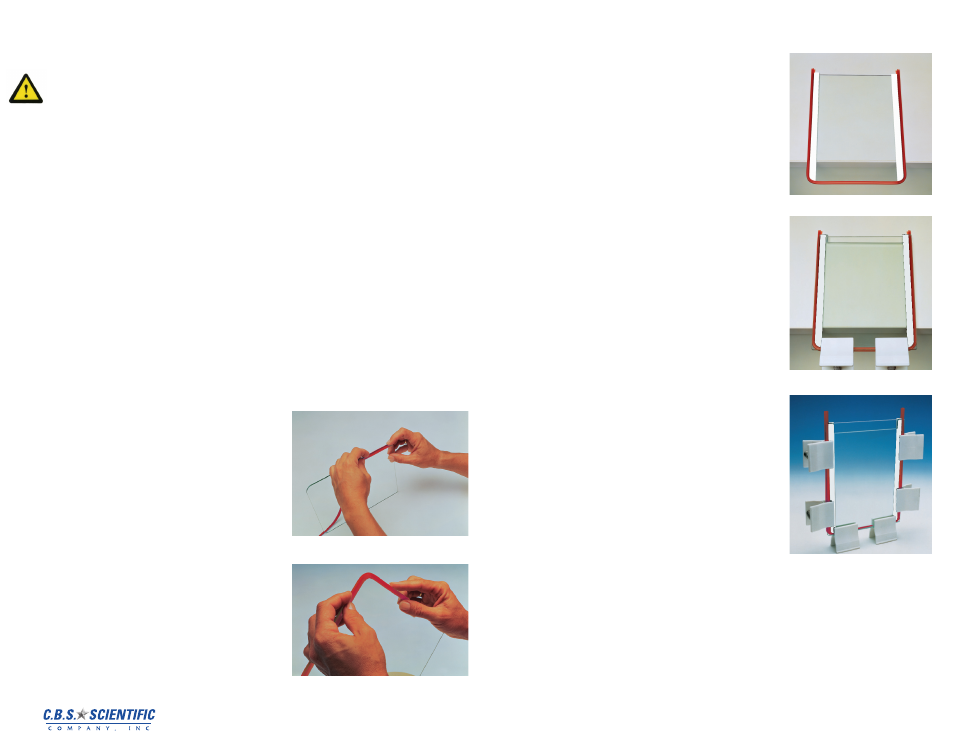
1. Start by holding the rectangular back
plate with the rounded bottom corners
and start applying the gasket around one
side of the glass plate. Note: one side
of the “U” shaped gasket is flat, and the
other side has tubing that will act as a
seal around the spacers.
2. When applying the gasket over the
rounded corners of the back glass plate,
make sure the notches on the gasket
align with the rounded corners of the
glass plate. Once the gasket is pushed
over the bottom edge and corners, work
it down the remaining side.
3. Place the gasketed plate on the lab
bench with the tubing side up, and
extend the bottom of the plate over the
edge of the bench, approximately ¾ of
an inch. Place the spacers along side
the inside edges of the gasket. Be sure
the rounded corner end of each spacer
is facing the outside bottom of the
plate, following the radius of the glass.
4. Place the notched plate on top of the
bottom assembly, starting from the
bottom edge and gently easing the
plate down. Verify the gasket is smooth
around theedges and then clamp along
the bottom.
5. Lift the assembly and stand it on the
base of the clamps. For leveling, push
glass plate assembly down until it
stops against clamp body. Clamp the
sides of the assembly with additional
casting clamps on either side. As each
clamp is attached, be sure the gasket
is aligned between the plates forming a
seal.