C.B.S. Scientific DGGEK-4801 User Manual
Page 12
22
23
www.cbsscientific.com
Cipher DGGE Instructions 2/28/14
3 5 Perpendicular Gradient Formation
To determine the range of perpendicular gradient appropriate for your fragment
analysis, please read the enclosed paper by Myers, Sheffield and Cox, as well
as the Methods and Enzymology V. 212 paper by Abrams and Stanton. This
gives you an excellent overview of the determination of melting behavior of your
fragments.
2. The following is a typical protocol for casting a 40%-60% gradient gel. Refer to
Section 3.2 Vertical Gradient Gel Casting, figure 3.5, for apparatus assembly.
In an ice bucket, place two 50ml conical tubes labeled “A” and “B”. Add to tube
“A”
•
11.5ml of 40%/7.5%
•
80 µI (10%) APS
•
5 µl TEMED
2. Add to tube “B”:
•
11.5ml of 60%/7.5%
•
80 µI (10%) APS
•
5 µI TEMED
3. Pour solution "B" into right side of gradient maker,(GM-40), and open interior
valve to allow air bubble to escape. Let as much as 1 ml "B" solution BACK-
FLOW into left side of gradient maker. Decant the 1ml back into right side with
pasteur pipette. Remove any residual solution with absorbent paper.
4. Add solution “A” to left side of gradient maker.
5. Turn on magnetic stirrer.
6. Exit tube should be attached to near side of gel plate with tape.
7 Open inside (V-1) valve first, then outside (V-2) valve to start flow.
8. Gel volume is 23ml, using the 0.75mm spacers. Allow 20-30 minutes for gel
polymeraztion. If gel volume is not enough to fill gel sandwich, use 0% to “top-
off”.
Go to Section 4 for Gel Running Preparation
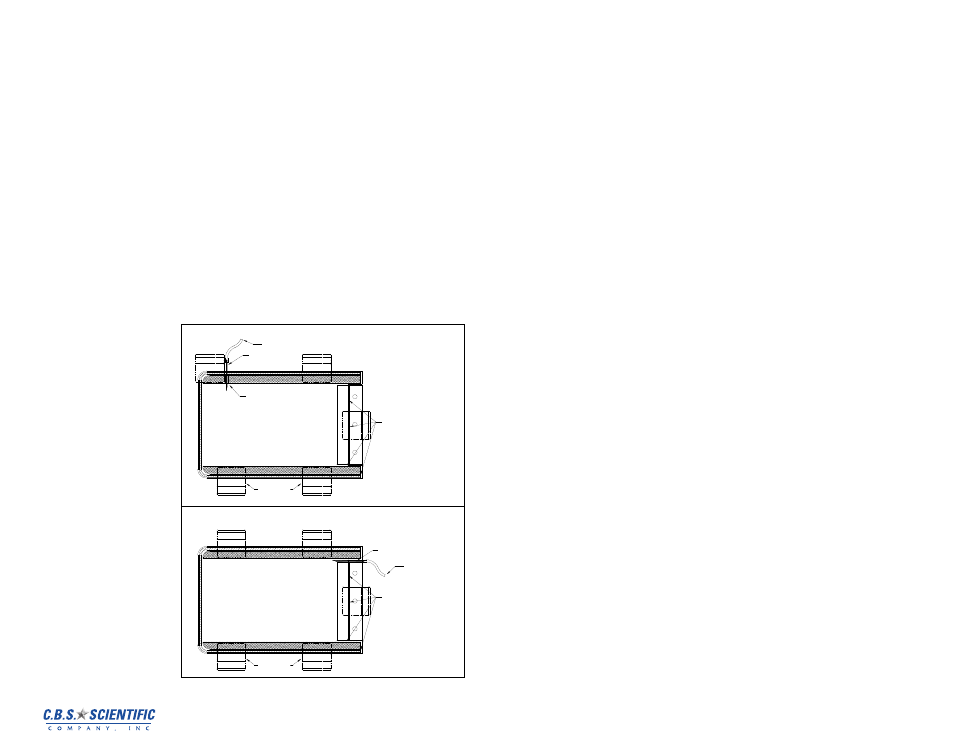
FIGURE 1
FIGURE 2
1.0mm AND THICKER
.75mm AND THINNER
PERPENDICULAR GEL CASTING
TO GRADIENT MAKER
20 GAUGE NEEDLE
SEAL WITH AGAROSE
HOLE THROUGH SPACER
GEL PLATE
CLAMPS
TO GRADIENT MAKER
20 GAUGE NEEDLE
SEAL WITH AGAROSE
GEL PLATE
CLAMPS
3 4 Perpendicular Gel Casting
NOTE: Prior to casting, mark the notched glass plate to designate which side is the
‘inside’ and ‘outside’. The same side of the notched plate should always sit against the
reservoir gasket.
1. For perpendicular gel casting, locate the spacer which has a channel machined
into it on one end which will be referred to as the “channel spacer”. The gel
sandwich will be cast on its side, with the channel spacer on top and the channel
further away from the single well comb (see figure 1 for casting gels 1.0mm and
thicker, see figure 2 bottom for casting gels .75mm or thinner).
2. Follow the Gel Wrap instructions 1-5 (pages 16-17),
making sure to use the
channel spacer
3. Insert single well comb into glass notch. A small amount of agarose is needed in
two places once the gel sandwich is placed on its side, both places are located
on the lower
corner where the single well comb interfaces the spacer, and on the
other side of the spacer where it interfaces the gel wrap.
4. Once the agarose has
set, insert the gradient
maker outflow tube tipped
with a 20ga. through the
Gel Wrap and into the
“channel” (figure 1), or
space created between
the horizontal spacer and
the comb (figure 2). You
may use the same piece of
Gel Wrap many times (20-
30) for the perpendicular
gels: do not use a piece
of Gel Wrap Gasket for
Vertical casting after you
have poked a hole in it for
perpendicular casting—it
will leak.