PHCC Pro Series Pro Series C11 User Manual
Page 9
Page 8
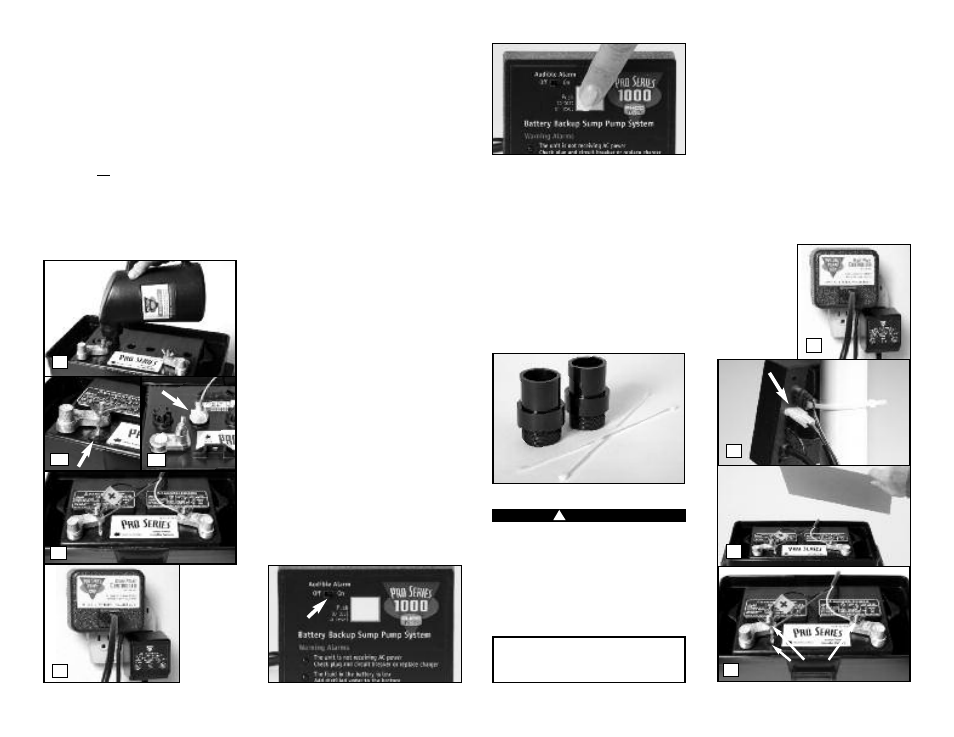
5. Pry up the two battery caps, or unscrew the
six
battery
caps
depending
on
the
configuration of your battery. Add distilled
water to the battery filler bottle and replace
the nozzle. Place the nozzle of the battery
filler into each cell of the battery and press
down.
It will fill the battery cell to the
correct level and stop automatically.
If
distilled water is not available, tap water with
a low mineral content may be used.
Well
water is not recommended.
NEVER ADD
MORE ACID.
6. Replace the battery caps. Replace the fluid
sensor in the hole on the top of the battery,
or in the cap 2nd from the POSITIVE (+) post,
depending on the configuration of your
battery.
7. Replace the battery cables…the WHITE wire
to the NEGATIVE (-) post, and the BLACK wire
to the POSITIVE (+) post. Replace the wing
nuts and tighten.
8. Replace the cover on the battery box.
9. Plug the primary pump into the blue
piggyback controller, and plug both into the
wall outlet. (You should provide additional
protection for the control unit by using a
surge protector.)
3
The pump was activated
When the water rises in the sump pit and
activates the float switch, the pump will begin
pumping, and the “Pump was activated” light
and alarm will turn on. The alarm stays on to
alert you to the fact that the standby system was
used to empty water from the sump.
Try to
determine what caused the system to activate.
• Check the main AC pump for failure. It may
not be working, the float switch may be stuck,
or it may be too small to handle the inflow of
water.
• Make sure the discharge pipe is not clogged or
frozen.
• If the power was out, the backup pump was
automatically activated. You need to push the
WHITE button on the front of the control panel
to reset the alarm.
During a power outage or times when the pump
is activated repeatedly, you can temporarily
silence the alarm by sliding the “Audible Alarm”
switch to OFF. When the primary pump has
resumed normal operation, and the backup
pump is no longer activating repeatedly, slide
the switch to the ON position to resume the
full monitoring capability.
The alarm and
pump light will still be on. Push the WHITE
button on the front of the control panel to
silence the alarm.
REPLACING THE BACKUP PUMP
Before you begin this process, you will need a
new backup pump. You may also want to change
the check valves at this time. The check valves
have a 1½” MPT on one end, and a 1½” SLIP on
the other end. See page 15 for part numbers.
You will also need two (2) new wire ties.
Risk of electrical shock or battery explosion,
which can cause serious injury or death. Wear
eye protection.
Work in a well-ventilated
area. Do not smoke or allow a spark or flame
in the vicinity of the battery. Avoid dropping
metal tools on the battery. Review the safety
instructions on page 1.
YOU WILL BE DISCONNECTING ALL THE
WIRES. BE SURE THEY DO NOT FALL INTO
THE SUMP PIT.
1. Unplug the primary pump, and its blue
piggyback controller from the wall outlet.
Unplug the charger for the backup pump
control unit, too.
2. Unplug the backup pump from the back of the
black control unit.
3. Remove the cover of the battery box and fan
the area around the top of the battery with a
piece of cardboard (or another non-metallic
material) to remove any hydrogen or oxygen
gas that may have been emitted from the
battery
4. Remove the sensor from the battery, and
remove the battery wires from the battery
terminals.
Be
sure they do
not touch each
other while one
is connected to
the battery.
!
DANGER
9
3
1
2
4
Remove
7
6a
6b
5