Editing: ez (easy) tone, Enter ez (easy) tone mode, Quick guide – Boss Audio Systems GT-100 User Manual
Page 14
14
Quick Guide
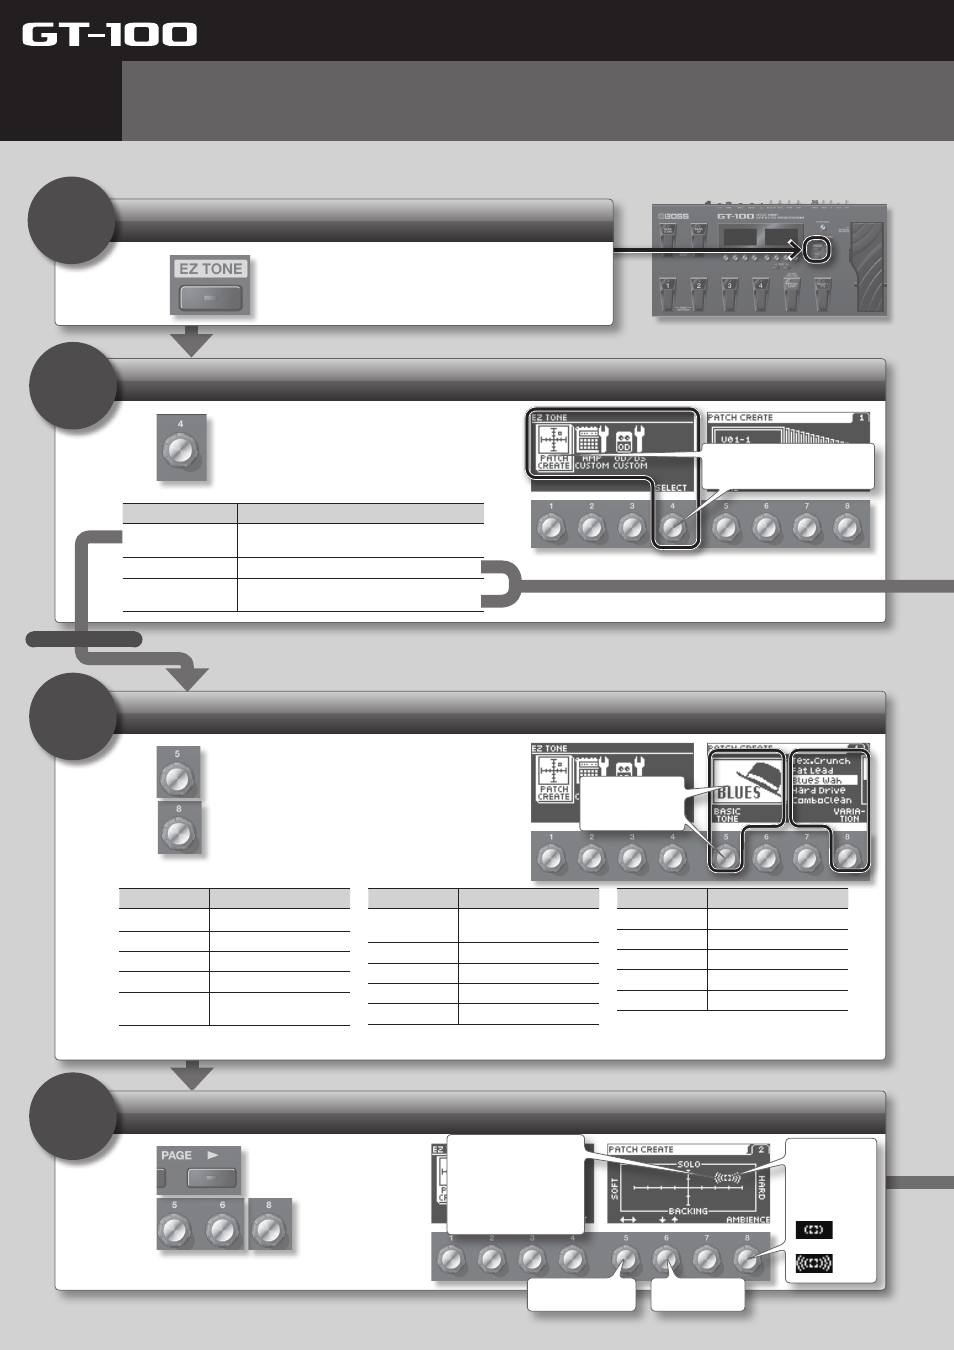
Enter EZ (Easy) Tone mode
Press
.
1
Select the type of editing
Select a musical style
Adjust the sound
2
3
4
EZ (Easy) Tone lets you create your sound intuitively, simply by turning knobs as indicated in the screen.
If you want to edit the parameters of each effect in the patch, refer to “Editing: Editing the Effects” (p. 16).
Use
to select the type of editing
Use
to choose the basic tone,
and
to select a variation .
Use
to switch screens .
Use
to adjust the
sound .
Turn the knobs
to edit the
values.
Editing: EZ (Easy) Tone
Turn knob [4] to select a menu
item (the cursor will move).
Move horizontally
Move vertically
Amount of distortion
Up: For soloing
Down: For backing
Left: Warm distortion
Right: Sharp distortion
Resonance
Knob [8]
adjusts the
length of the
resonance.
: Less
: More
4
Menu
Explanation
PATCH CREATE
Lets you easily create your sound starting from
your choice of musical style and type of song.
AMP CUSTOM
Lets you intuitively customize the amp.
OD/DS CUSTOM
Lets you intuitively customize the overdrive/
distortion.
Basic tone
Explanation
BLUES
Blues sound
Soul Funk
Soul and Funk sound
Jazz
Jazz sound
LIVERPOOL
British Rock
70’s Hard Rock
The Hard Rock sound
popular in the ’70s
Basic tone
Explanation
80s METAL
The Metal sound popular in
the ’80s
MODERN METAL Modern Metal sound
West Coast
West Coast sound
Fuzz Rock
Fuzz
STUDIO
Recording Studio
Basic tone
Explanation
PROGRESSIVE
Progressive
SURF ROCK
Surf Rock sound
COUNTRY
Country
Acoustic
For Acoustic Guitar
Punk Pop
Punk Pop
For PATCH CREATE
* Upon selection of a variation, as described above, the unit will be set to the appropriate preamp type (p. 52). However, if PREAMP under PREFERENCE (p. 41) is set to
SYSTEM 1 through 3, the preamp type that has been set within will be retained. In such cases, there's no need to proceed to the next step, "4. Adjust the sound."