Oven cleaning, Risk of burns, Preparing for oven cleaning – Neff C17E54N3GB User Manual
Page 24: Starting oven cleaning, Set the operating mode selector to zoven cleaning, Ending/cancelling oven cleaning, Press the clock function button, Removing and fitting the appliance door, Risk of injury, Removing the appliance door
24
Oven cleaning
The back wall, ceiling and side walls of the cooking
compartment are coated with a highly porous ceramic layer.
This coating absorbs and disintegrates splashes from baking
and roasting while the oven is in operation.
If these self-cleaning surfaces (rough surfaces) in the oven no
longer clean themselves adequately, they can be regenerated
using the
z
Oven cleaning operating mode.
:
Risk of burns!
The appliance becomes very hot during Oven cleaning. Keep
children away from the appliance.
Preparing for oven cleaning
1.
Remove accessories and hook-in racks, telescopic shelves
or separate fitting systems from the cooking compartment.
2.
Clean the enamel surfaces (smooth surfaces) to avoid any
lasting stains (see section: Cleaning and care).
Starting oven cleaning
1.
Set the operating mode selector to
z
Oven cleaning.
2.
Turn the temperature selector to set the desired cleaning
setting.
Your setting is automatically accepted after 10 seconds and
Oven cleaning starts.
x
and the selected operating time
setting light up on the clock display. The operating time cannot
be changed.
You can activate the preselection mode in the 10 seconds
before Oven cleaning starts.
When the operating time has elapsed, a signal sounds,
‹
:
‹‹
appears on the clock display and the
y
symbol flashes.
Ending/cancelling oven cleaning
1.
Turn the operating mode selector back to the
Û
position.
2.
Press the clock function button.
Removing and fitting the appliance door
You can remove the appliance door to clean it more
thoroughly.
:
Risk of injury!
The hinges of the appliance door may snap shut with great
force. Always open the hinge locking lever fully when removing
the appliance door and close it fully after refitting. Do not reach
into the hinge.
:
Risk of injury!
If the appliance door has only been unhinged on one side, do
not reach into the hinge. The hinge can snap back with great
force. Call the aftersales service.
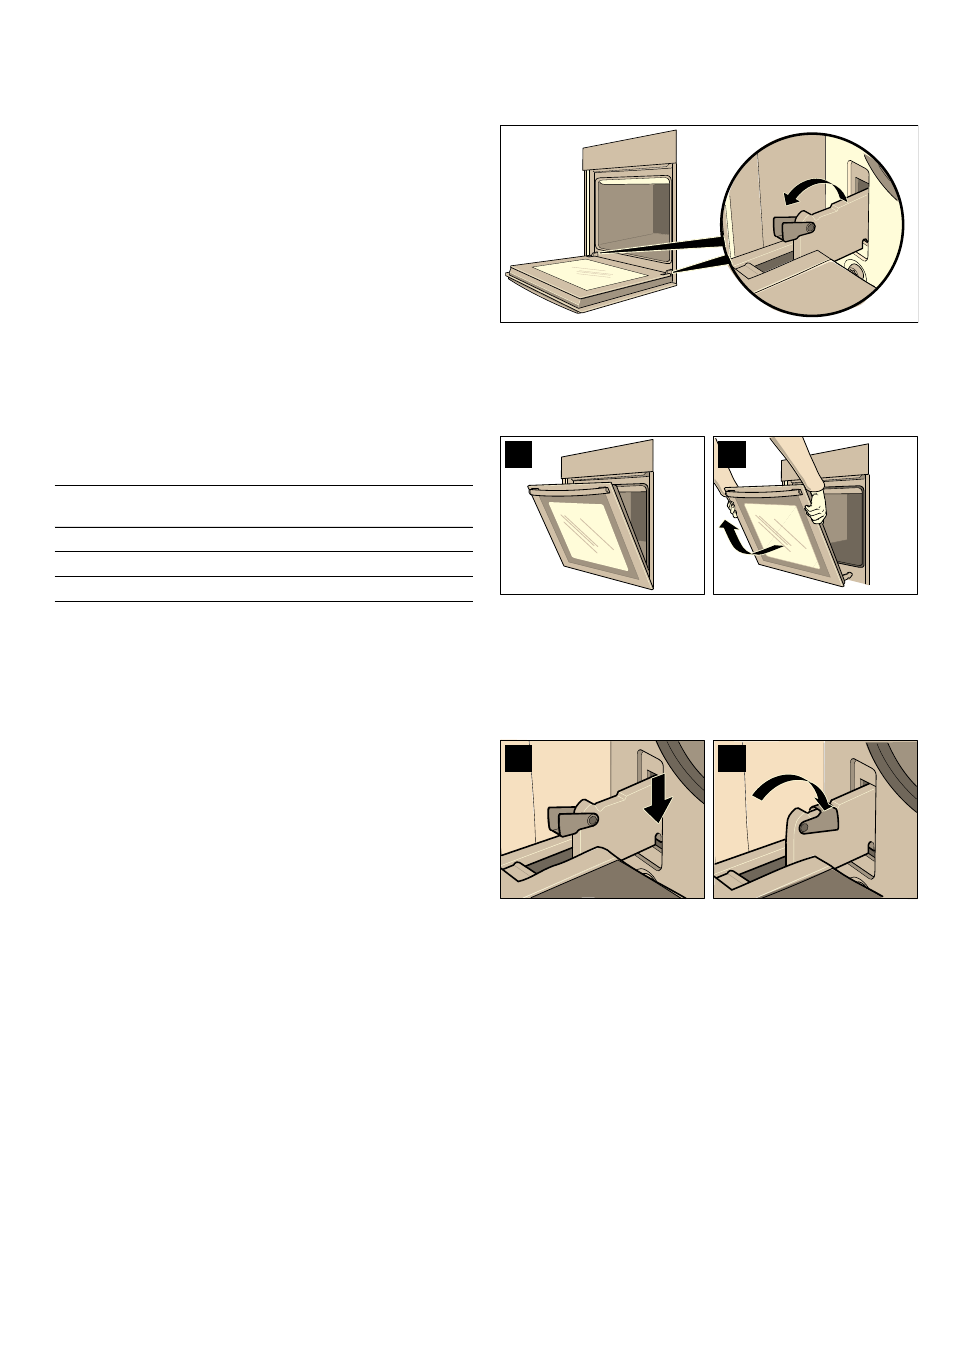
Removing the appliance door
1.
Open the appliance door fully.
2.
Open the locking levers on the left and right-hand side fully.
The hinges are secured and cannot snap closed.
3.
Close the appliance door until resistance becomes
noticeable (figure A)
4.
With both hands, grip the door on the left and right-hand side,
close the door a little more and pull it out (figure B).
Fitting the appliance door
1.
Insert the hinges in the left and right-hand holders (figure C).
The notch on both hinges must engage.
2.
Open the appliance door fully.
3.
Close the locking levers on the left and right-hand side fully
(figure D).
The appliance door is secured and can no longer be
removed.
4.
Close the appliance door.
Cleaning the door panels
To facilitate cleaning, you can remove the inner door panels
from the appliance door.
:
Risk of injury!
The components inside the appliance door may have sharp
edges. Take care not to cut yourself. Wear protective gloves.
:
Risk of injury!
The appliance must not be used again until the door panels
and appliance door have been correctly fitted.
Cleaning set-
ting
Temperature
display
Clock display (operating
time in hours)
low
‚
‹
:
…†
medium
ƒ
‚
:
‹‹
intensive
„
‚
:
‚†
$
%
&
'