Maintenance, Storage, Disposal – Silverline Automatic Optical Level User Manual
Page 7
6
GB
Angle measurement
• Align the vertical hair with Point A – see Fig 8
Fig.8
• Note the reading on the Horizontal Calibrator (5) at the Horizontal
Calibrator Reference Point (6). Let this reading be 'x'
• Use the Horizontal Movement Dial (11) to turn the instrument and align
the vertical hair with Point B and note the reading on the horizontal
calibrator. Let this reading be 'z'
• The angle y = x − z
Checking and adjusting the vial
Checking the vial
• Use the Foot Screws (12) to centre the bubble in the vial (see Fig. 3)
• Turn the instrument 180°. The bubble should remain centred
• If the bubble moves out of centre, the vial needs adjustment
Adjusting the vial
• Use the foot screws to bring the bubble halfway to the centre
(Fig. 9, below)
Fig.9
• Then, using the hex key supplied, turn the Vial Adjustment Screws (8) to
centre the bubble (see Fig. 4)
• Repeat the above procedure until the bubble remains centred when the
instrument is turned 180°
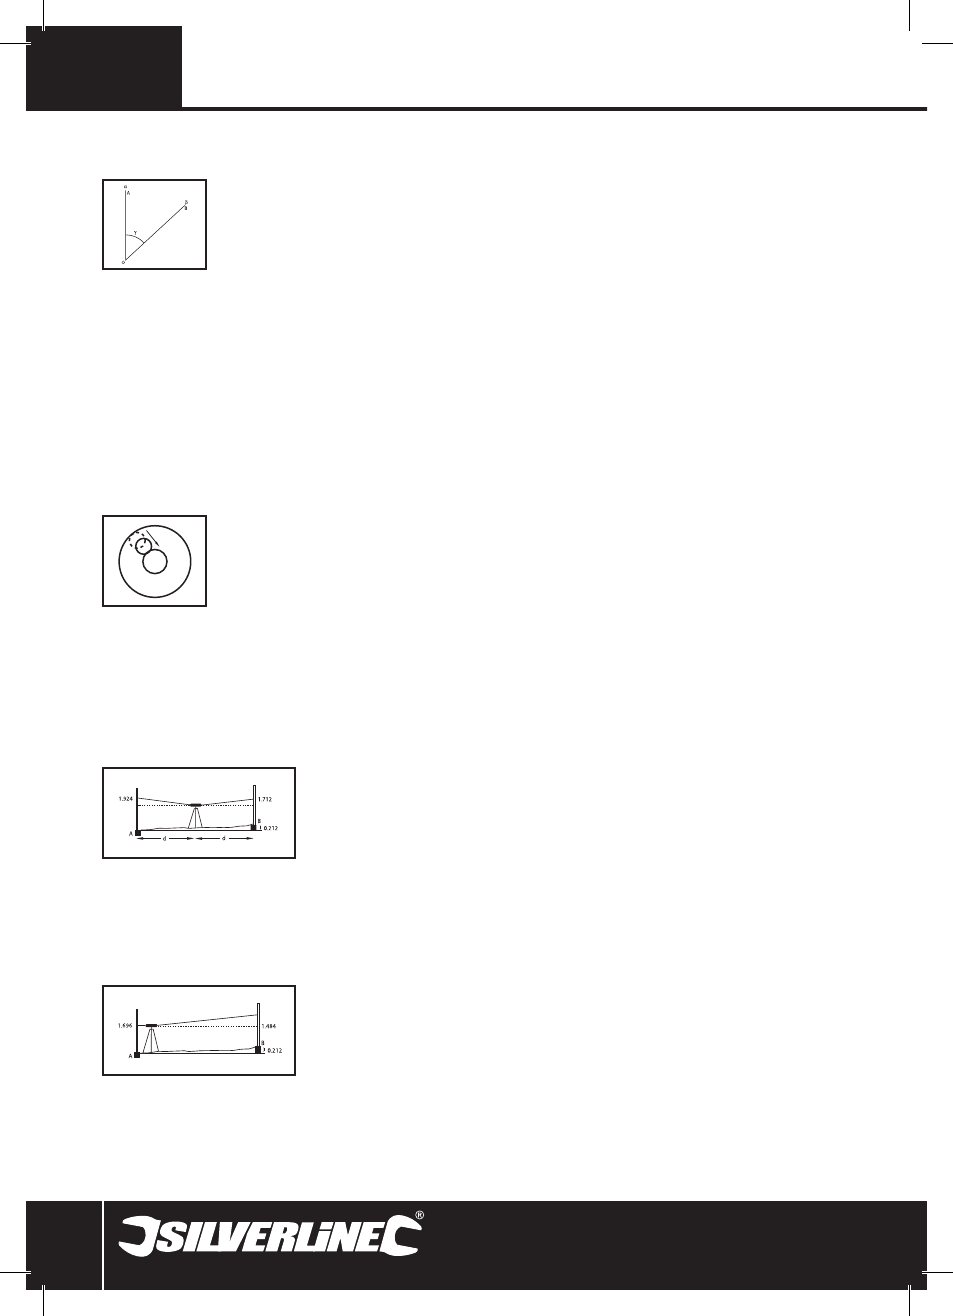
Horizontality of the line-of-sight
The line-of-sight needs to be horizontal within 3mm of level to be accurate.
Establish datum
• Set up the level on a tripod halfway between two measuring staffs (Fig.
10) and set approximately 39m to 50m apart. Centre the bubble
Fig.10
• Take the reading on staff A where it is intersected by the middle hair – for
example: 1.924m
• Rotate the level and take the reading on staff B where it is intersected by
the middle hair– for example: 1.712m A – B = 0.212m. Thus B is 0.212
higher than A
Check the line-of-sight
• Move the level and set it up about 1m from A (Fig.11)
Fig.11
• We know that B is 0.212m higher than A. Thus the reading to B should be
0.212 less than that to A
• Read the staff at A – for example 1.696m
• Subtract 0.212m; therefore the reading to B should be 1.484m
• Read staff at B. If the reading is 1.484m ±3mm, the line-of sight is
horizontal
To correct line of sight, if necessary
• Screw off the Eyepiece Cover (3)
• Turn the adjusting screw (See Fig. 5) until the middle hair gives the
required reading of 1.484m on the staff at B
• Replace the cover, but do not over tighten
Maintenance
• To protect all parts and retain accuracy, take good care of this instrument
• After use, clean the lens with a soft brush or lens cloth. DO NOT touch the
lens with your fingers
• Use a soft brush or cloth to clean the body of the machine
• If the instrument is damaged or faulty, it must be checked and repaired
only by a qualified technician
Storage
• Store the instrument in the case provided, in a clean, dry place. Avoid
storage in areas prone to large temperature fluctuations
• If the level is not used for an extended period of time, occasionally
remove the instrument from its case to allow any temperature difference
between the carry case and its storage area to equalise
• A bag of silica gel is included to absorb any moisture in the case. If the
bag is damp, dry it out or replace with a new one
Disposal
• Do not dispose of power tools, or other waste electrical and electronic
equipment, with household waste
• Contact your local waste disposal authority for information on the correct
way to dispose of tools
633665_Z1MANPRO1.indd 6
26/10/2011 15:44