Step 6 - final assembly, Step 5 - shelf & hanger bar assembly – Edsal 3011 User Manual
Page 4
Assembly Instructions : Edsal 3011KA & 3012KA Series Wardrobe Cabinets Page 4
Assembly Instructions : Edsal 3011KA & 3012KA Series Wardrobe Cabinets Page 4
Assembly Instructions : Edsal 3011KA & 3012KA Series Wardrobe Cabinets Page 4
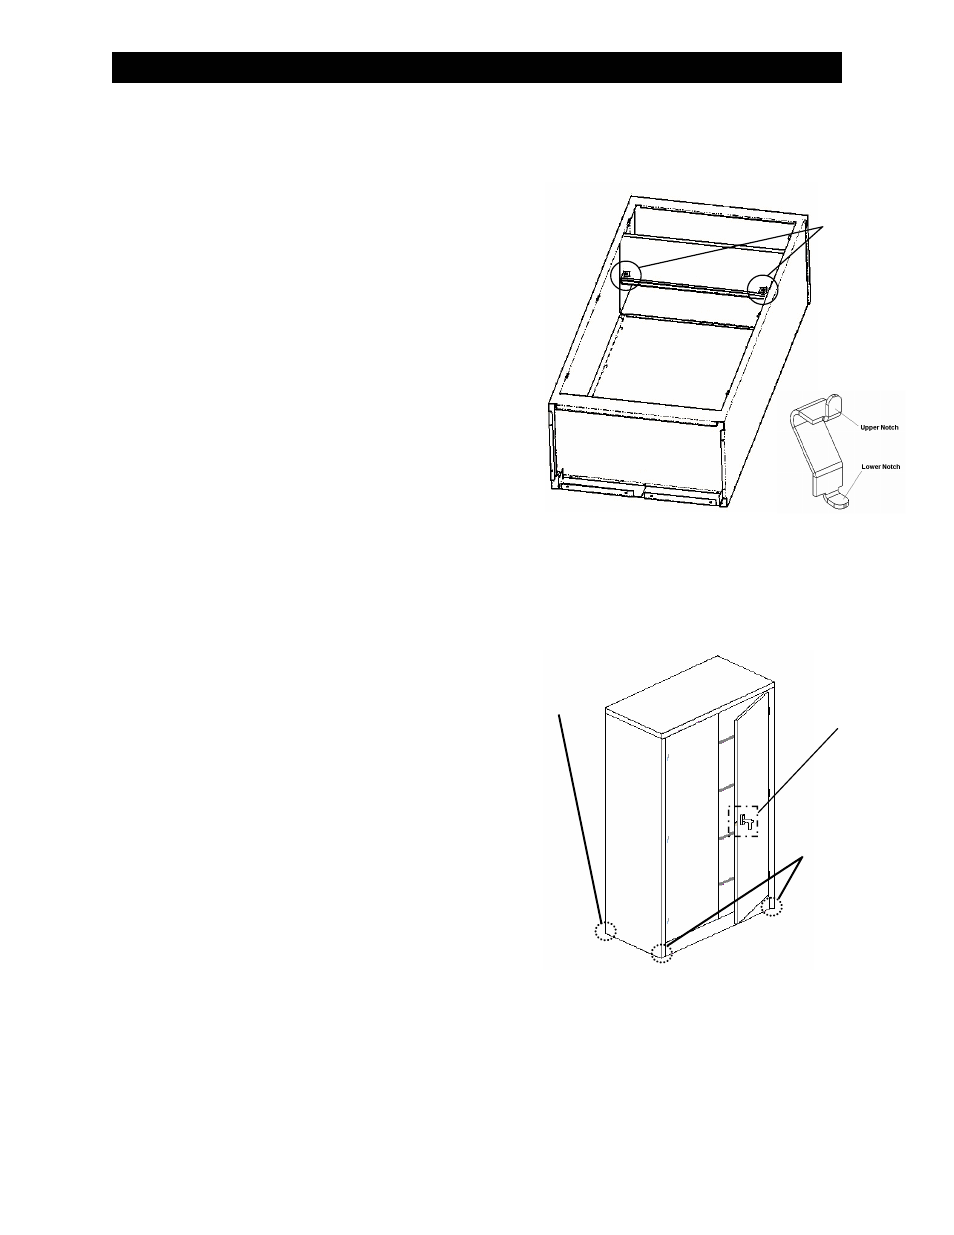
Figure 5 - Shelf Assembly
Step 6 - Final Assembly
To complete the unit, the locking handle needs to be in-
stalled on the right hand door. Follow the assembly in-
structions as written on the handle hardware bag. Help-
ful hints on installation: The door rods will slide into
small plastic guides on the door. Install the handle to the
right hand door, then place the cam in position. Slide the
tip of the door rod into the lower plastic guide and posi-
tion the door rod onto the pin located on the cam and
hold it in place. Install the other door rod in the upper
plastic guide and position onto pin located on the cam.
Install the remaining hardware. If the cabinet is not lo-
cated on a level surface, two (2) leg levelers have been
supplied. Install the cage nut over the holes located in
the bottom front of the kick plate, or on the bottom back
return flanges of the sides. Install the threaded leg lev-
eler into the nut, and adjust as necessary.
Figure 6 - Final Assembly
Right Hand Door
Handle Location
Front Leg Leveler
Holes located
On Bottom of
Cabinet at these
Points
Rear Leg Leveler
Holes located On
Bottom of Cabinet
at this Point
(opposite side also)
Step 5 - Shelf & Hanger Bar Assembly
The unit is now ready for the shelf and hanger bar. First
select a level for the shelf by selecting a set of square
notches located inside the unit on the back left and back
right sides. A series of round holes are located on the
inside of the left and right hand side panels near the
hinges. Using a shelf clip, insert the upper notch into a
round hole opposite the selected square holes where the
shelf is to be located. Push and “snap” the lower notch
of the clip into place using the next lowest round hole.
Repeat the shelf clip installation on the opposite corre-
sponding side. To insert the shelf, angle the shelf so
that the shelf will engage the square notches on the back
panel and lower onto the front shelf clips. Install the
hanger bar to the top shelf by using the 10-24 x 3/8”
screws and nuts (see figure 4 for screw locations).
Figure 5 - Shelf Assembly
Screw Locations
For Hanger
Bar
NOTE : DOORS ARE NOT SHOWN IN GRAPHIC
FOR ILLUSTRATION PURPOSES.