Edsal 9000 User Manual
Page 4
Assembly Instructions : Edsal 9000 Series Quick Assemble Storage Cabinets Page 4
Assembly Instructions : Edsal 9000 Series Quick Assemble Storage Cabinets Page 4
Assembly Instructions : Edsal 9000 Series Quick Assemble Storage Cabinets Page 4
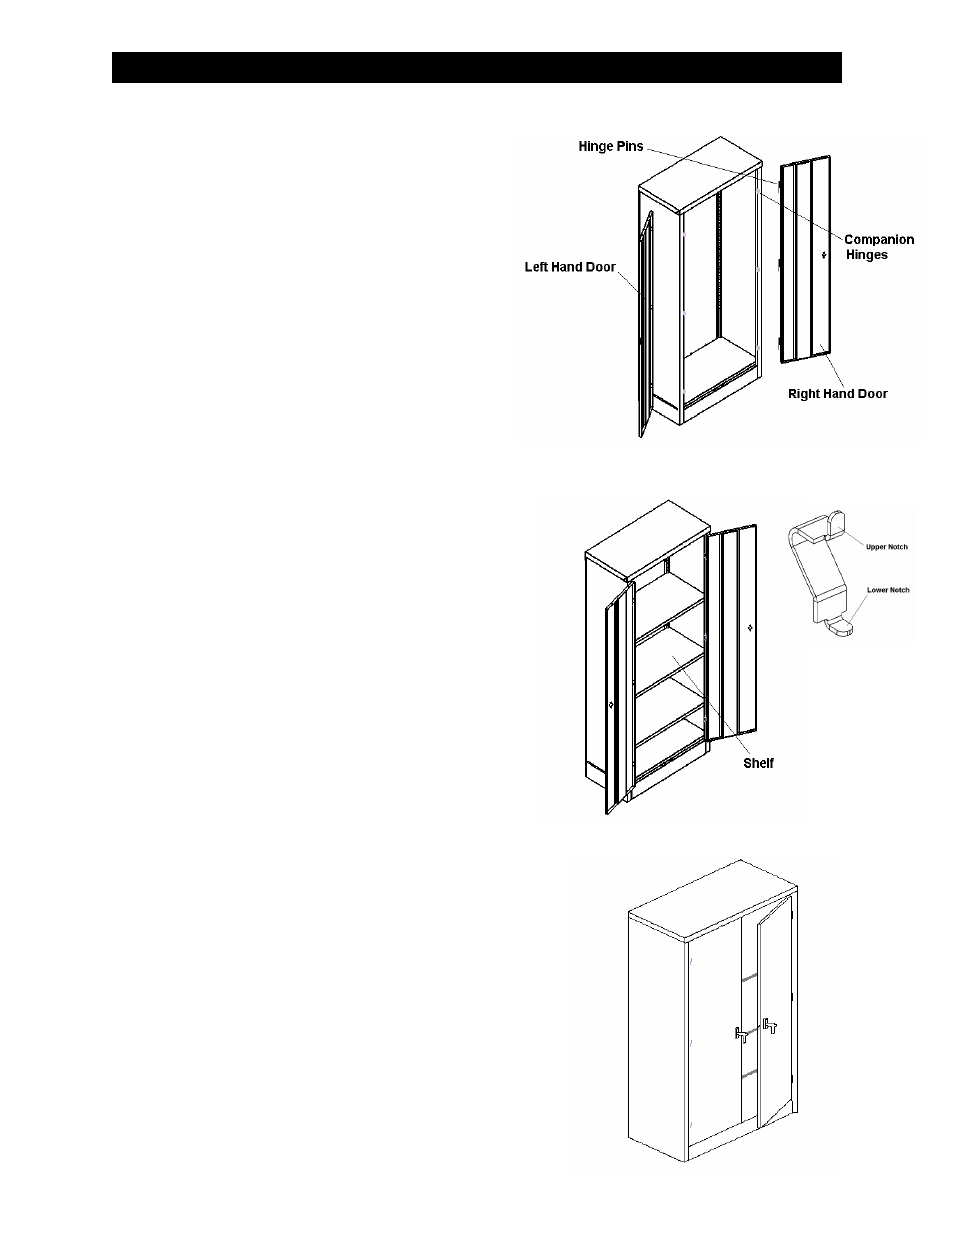
Figure 5 - Door Assembly
Step 6 - Shelf Assembly
First select a level for the shelf by selecting a set of
square notches located inside the unit on the back left
and back right sides. A series of round holes are located
on the inside of the left and right hand side panels near
the hinges. Using a shelf clip, insert the upper notch into
a round hole opposite the selected square holes where
the shelf is to be located. Push and “snap” the lower
notch of the clip into place using the next lowest round
hole. Repeat the shelf clip installation on the opposite
corresponding side. To insert a shelf, angle the shelf so
that the back of the shelf will engage the square notches
on the back and lower onto the front shelf clips. Repeat
the process for all remaining shelves.
Figure 6 - Shelf Assembly
Step 7 - Final Assembly
To complete the unit, the locking handle needs to be in-
stalled on the right hand door. Follow carefully the as-
sembly instructions as written on the handle hardware
bag. Helpful hints on installation: The door rods will
slide into small plastic guides on the door. Install the
handle to the right hand door, then place the cam in posi-
tion. Slide the tip of the door rod into the lower plastic
guide and position the door rod onto the pin located on
the cam and hold it in place. Install the other door rod in
the upper plastic guide and position onto pin located on
the cam, and Install the remaining hardware. Install the
blank door handle to the left hand door with the hardware
provided.
Figure 7 - Final Assembly
Step 5 - Door Assembly
Now the doors are ready to be hung. With the hinge pins
pointed down, take the right hand door and align the
door’s hinge pins with the companion hinges located on
the right side panel. Some of the hinge pins may have
moved or come out of alignment during shipping and
handling. If so, move the hinge pins back to the proper
position so that they align with the companion hinge
holes. Slowly slide the hinge pins into the holes and ro-
tate the door slightly from left to right while applying mini-
mal downward pressure until the pins seat properly to the
companion hinges. Repeat the same process for the op-
posite door.