8” wall mount, Installation – Maximum Wall Mount - 8 User Manual
Page 2
8” WALL MOUNT
INSTALLATION
30 Samuel Barnet Blvd.
New Bedford, MA 02745
(508) 995-2200
Page 2
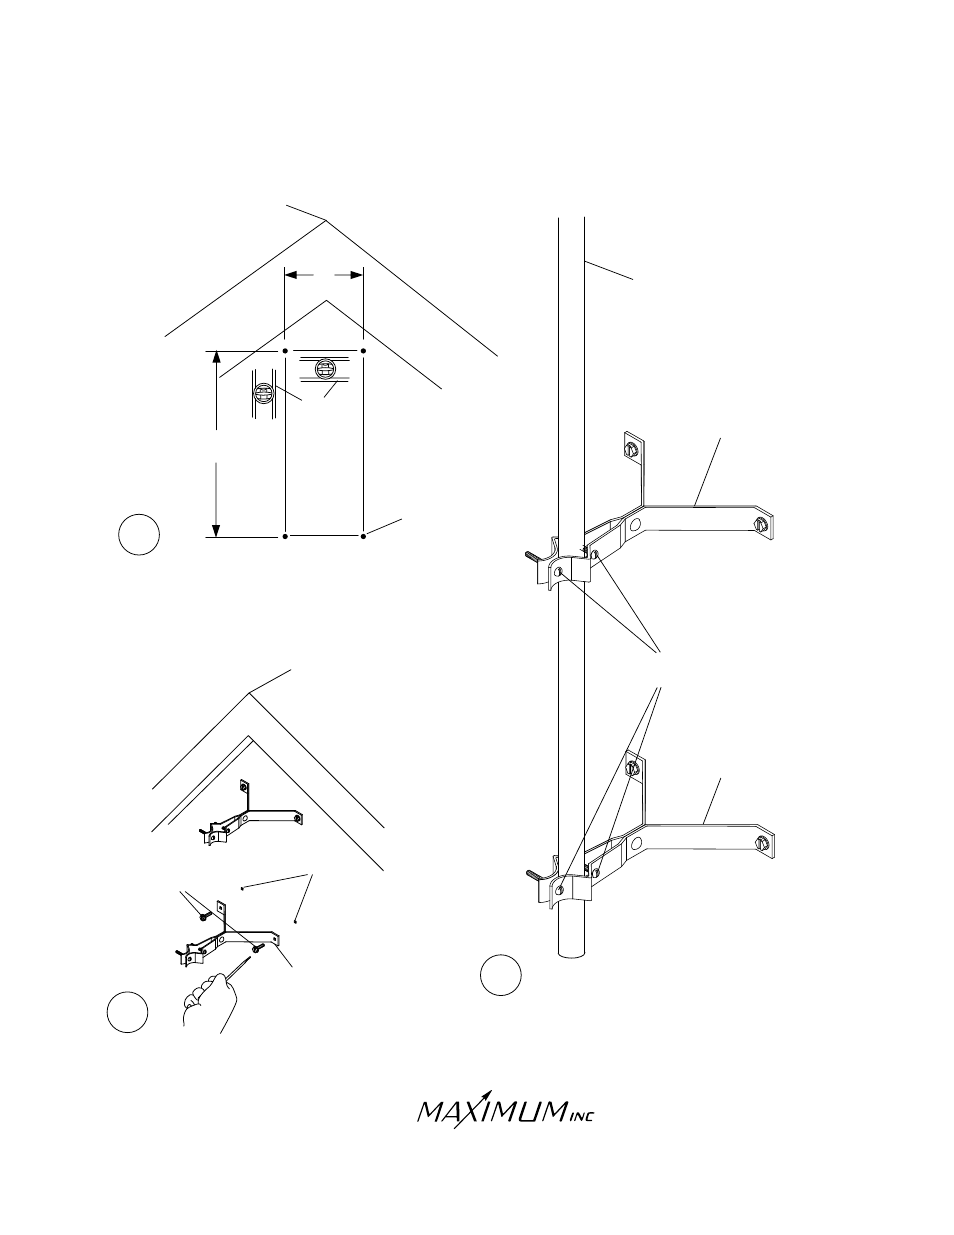
1/8” PILOT
HOLES
4
Drill two 1/8” level pilot holes 6” apart for each
bracket. Brackets must be separated from each
other by at least 18” for mast stability. Both
brackets must be aligned vertically for the mast
to be straight when installed.
5
Secure the brackets
with the lag screws
6
Slip mast into brackets and tighten
with the clamping screws.
CLAMPING
SCREWS
8 INCH
BRACKET
8 INCH
BRACKET
MAST
PILOT
HOLES
LAG
SCREWS
8 INCH
BRACKET
ROOF
PEAK
6”
18”
MINIMUM
LEVEL
ROOF
PEAK
See also other documents in the category Maximum Measuring instruments:
- Comfortminder (6 pages)
- Criterion (4 pages)
- Cronus (6 pages)
- Harbormaster (3 pages)
- Maestro 2S (6 pages)
- Maestro (6 pages)
- Meridian (2 pages)
- Merlin (9 pages)
- Mini-Max (5 pages)
- Mystic (7 pages)
- Nor'easter (4 pages)
- Predictor (3 pages)
- Proteus (3 pages)
- Rainwatchial (6 pages)
- Rainwatch (7 pages)
- Sirocco (4 pages)
- Stratus (8 pages)
- Vigilant (4 pages)
- Wireless Maestro (16 pages)
- Wireless Mini-Max (14 pages)
- Wireless Merlin (18 pages)
- Wireless Mystic (17 pages)
- Wireless Rainwatch (11 pages)
- Overview (1 page)
- Chimney Mount (2 pages)
- Eave Mount (2 pages)
- Wall Mount - 4" (2 pages)
- Wall Mount (3 pages)
- Merlin (pre-2001) (7 pages)
- Midshipman (2000-1010) (3 pages)
- Mystic (pre-2001) (5 pages)
- Summit (13 pages)
- Summit Remote (13 pages)
- Wireless Merlin, Mystic & Rainwatch (pre-2006) (8 pages)
- Wireless Maestro (2006-2012) (16 pages)
- Wireless Mini-Max (2006-2012) (14 pages)
- Wireless Mini-Max (pre-2006) (4 pages)
- Wireless Rainwatch (pre-2012) (12 pages)