Spraying technique, 13 2 b a a b, English – Wagner Power Painter Pro with EZ Tilt User Manual
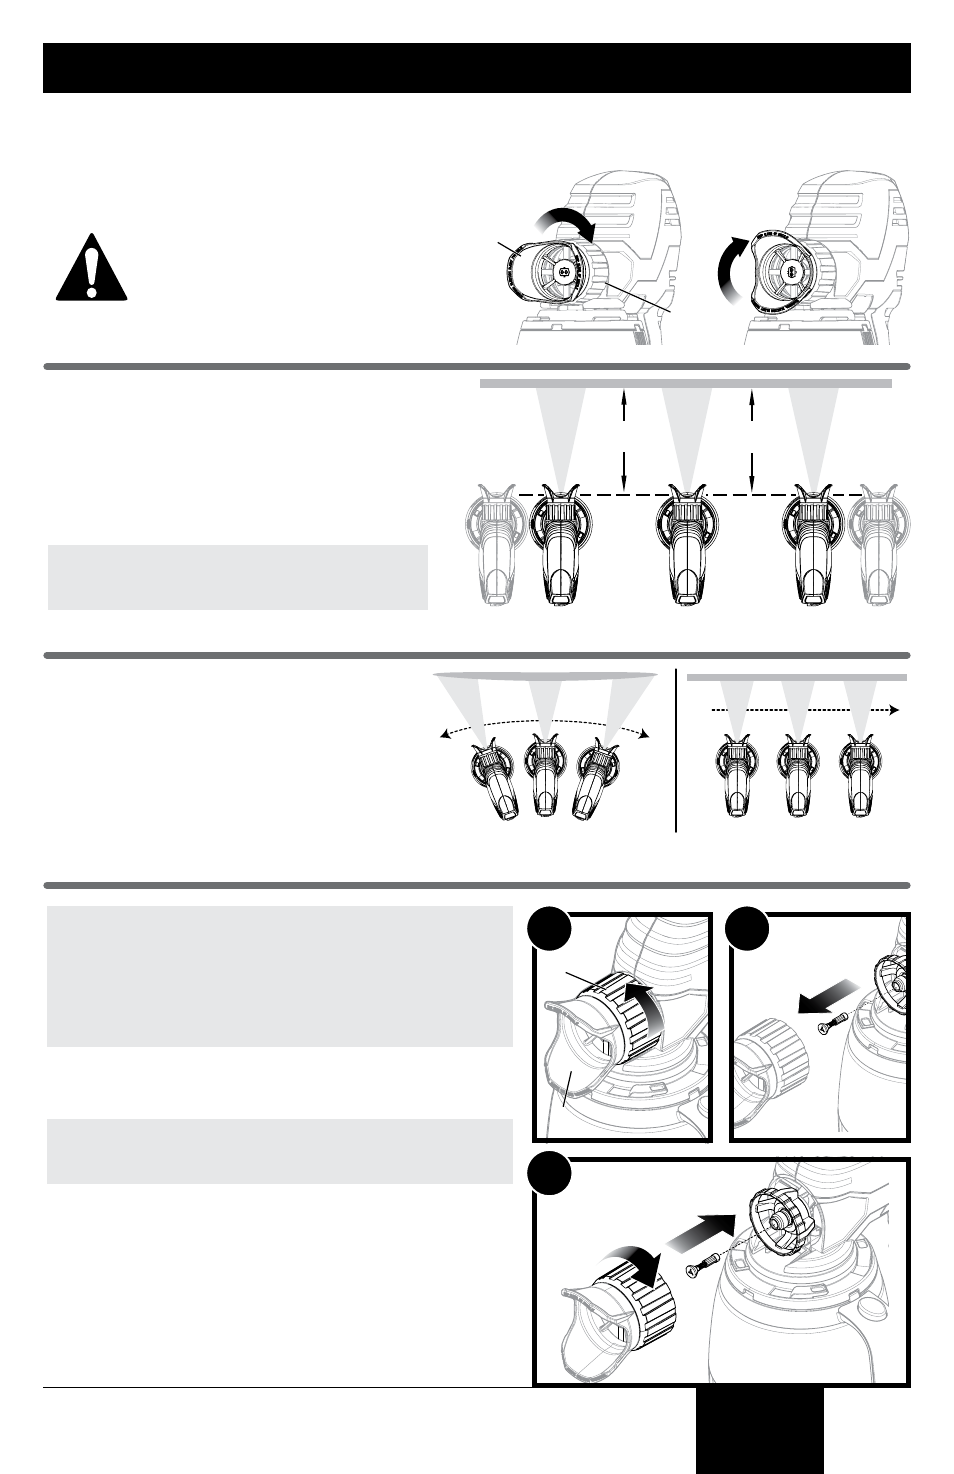
Page 13: Adjusting the spray tip assembly, Incorrect correct
English
© Wagner Spray Tech - All Rights Reserved
13
Spraying Technique
adjusting the spray tip assembly:
The adjustable spray tip assembly produces
a pattern that can be adjusted horizontally
or vertically. Rotate the spray adjustment
guard (b) as shown.
To prevent an injection hazard,
make sure the sprayer is
unplugged before you adjust the
spray tip. Make sure the spray
tip nut (a) is sufficiently hand
tightened prior to spraying.
Spraying Technique
Keep your arm moving at constant speed and
keep the sprayer at a constant distance from the
surface. The sprayer should be triggered at the
beginning of the stroke and released at the end
of the stroke.
*note: Slower speeds (if equipped) will allow
you to get closer to the spray surface.
Keep the sprayer at a consistent distance to
the surface. This means moving your entire
arm back and forth rather than just flexing
your wrist. Overlap each stroke by 50%.
IMPORTanT: If a large amount of material is leaking
from behind the adjustable spray tip assembly, turn
off the sprayer immediately or the sprayer could
be damaged. The sprayer will leak from behind the
adjustable spray tip assembly if the tip nut is not
tightened firmly. If you notice material leaking from
this area, follow the steps below.
1. Unplug the sprayer immediately.
Remove the adjustable spray tip assembly.
note: Remove the adjustable spray tip assembly by
turning the spray tip nut (a), not the spray adjustment
guard (b).
2. Remove the atomizer valve and see if it needs to be
cleaned or replaced (see page 20).
Also check the pump housing opening for any dirt or
other obstruction and clean if necessary.
3. Put the atomizer valve back in place, making sure it
can seat properly without any obstruction.
Thread on the adjustable spray tip assembly by
turning the tip nut clockwise and tighten firmly by
hand.
Spraying horizontally
(side to side):
Spraying vertically
(up and down):
Keep stroke
even
End
stroke
Start
stroke
Pull
trigger
Release
trigger
Move steadily
Aproximately
10 to 14 inches*
Incorrect
Correct
1
3
2
b
a
a
b