Troubleshooting – Actron CP7007 User Manual
Page 2
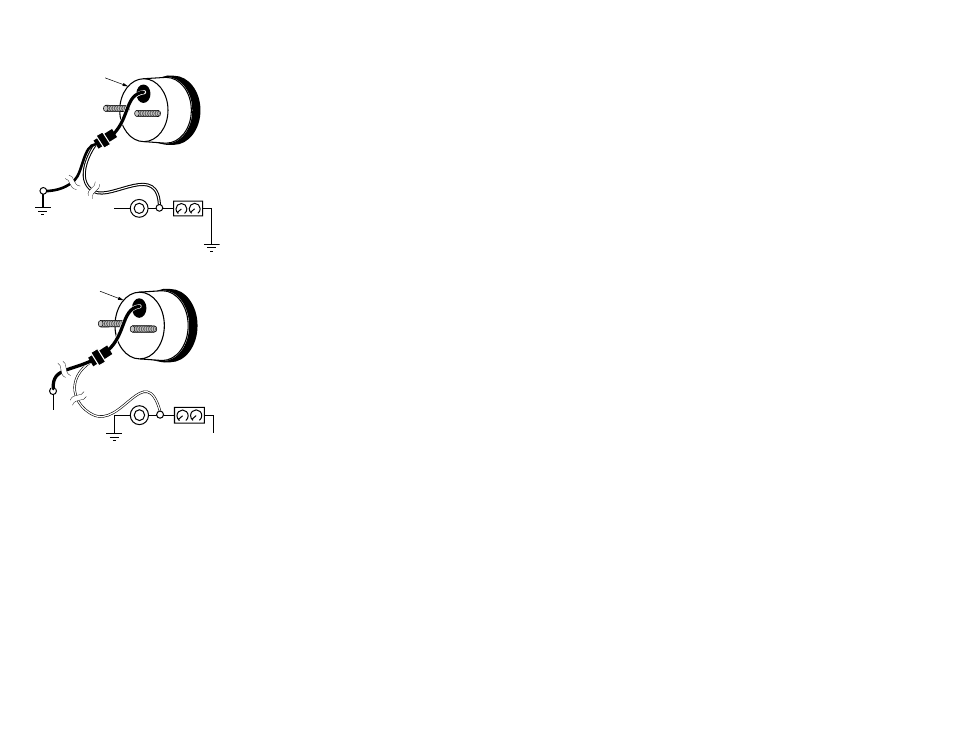
8. Connect the blue and white wires using either
Figure 3a or Figure 3b.
9. Complete the mounting of the gauge.
10. Reconnect the battery ground cable.
TROUBLESHOOTING
1. If, when you reconnected the battery ground
cable, you noticed sparks or any of the wiring
getting warm, check that all connections
are properly located, and insulated from
grounding.
2. If the reading on the gauge stays at the lowest
marked voltage when the ignition is switched
on, then try reversing the wires on the gauge’s
connection posts “+” and “–”.
3. If the gauge reads lower than you expect, check
all connections, especially those to a ground
source. A poor connection causes resistance
which gives a false low reading.
2
Figure 3a
For Positive Dimmer Controls
GAuGE
bLuE
WHITE
DASH
LIGHTING
To
GRouND
DIMMER
CoNTRoL
To
GRouND
+12V
Figure 3b
For Negative Dimmer Controls
To
GRouND
DIMMER
CoNTRoL
DASH
LIGHTING
WHITE
bLuE
+12V
+12V
GAuGE
- CP9125 (46 pages)
- CP7677 (34 pages)
- CP7665 (32 pages)
- CP7672 (1 page)
- CP7849 (1 page)
- CP7848 (2 pages)
- CP7674 (1 page)
- CP7674 (2 pages)
- CP7605 (10 pages)
- CP7611 (2 pages)
- CP7853 (2 pages)
- CP7827 (1 page)
- CP7821 (1 page)
- CP7838 (8 pages)
- CP7818 (4 pages)
- CP7803 (2 pages)
- CP7830 (2 pages)
- CP7835 (3 pages)
- CP7527 (26 pages)
- CP7676 (72 pages)
- CP7854 (2 pages)
- KAL3221 (2 pages)
- KAL2501 (2 pages)
- KAL2504 (4 pages)
- KAL2505 (1 page)
- KAL2510 (8 pages)
- KAL2512 (4 pages)
- KAL2513 (1 page)
- KAL2535 (22 pages)
- KM2529 (2 pages)
- KAL8600 (8 pages)
- KAL8500 (8 pages)
- KAL8300 (40 pages)
- KAL8100 (2 pages)
- KAL4780 (8 pages)
- CP7001 (6 pages)
- CP7005 (4 pages)
- CP7009 (4 pages)
- CP7011 (4 pages)
- CP8211 (4 pages)
- CP8214 (6 pages)
- CP8218 (12 pages)
- CP8209 (4 pages)
- CP8205 (4 pages)