81 camaro tigercage main hoop installation – Ridetech 41190000 User Manual
Page 8
Air Ride Technologies
Facto
ry
Holes
Fron
t
Hex Head Bolts
Reinforcement
Rib
Drill Template
Mark Four Holes
To Be Drilled
90º Drill
Step Bit
Front
Facto
ry
Holes
Fron
t
Four Hex
Head Bolts
Drill Template
Mark The Final
Two Holes To
Be Drilled
41190000
6
74-81 Camaro TigerCage
Main Hoop Installation
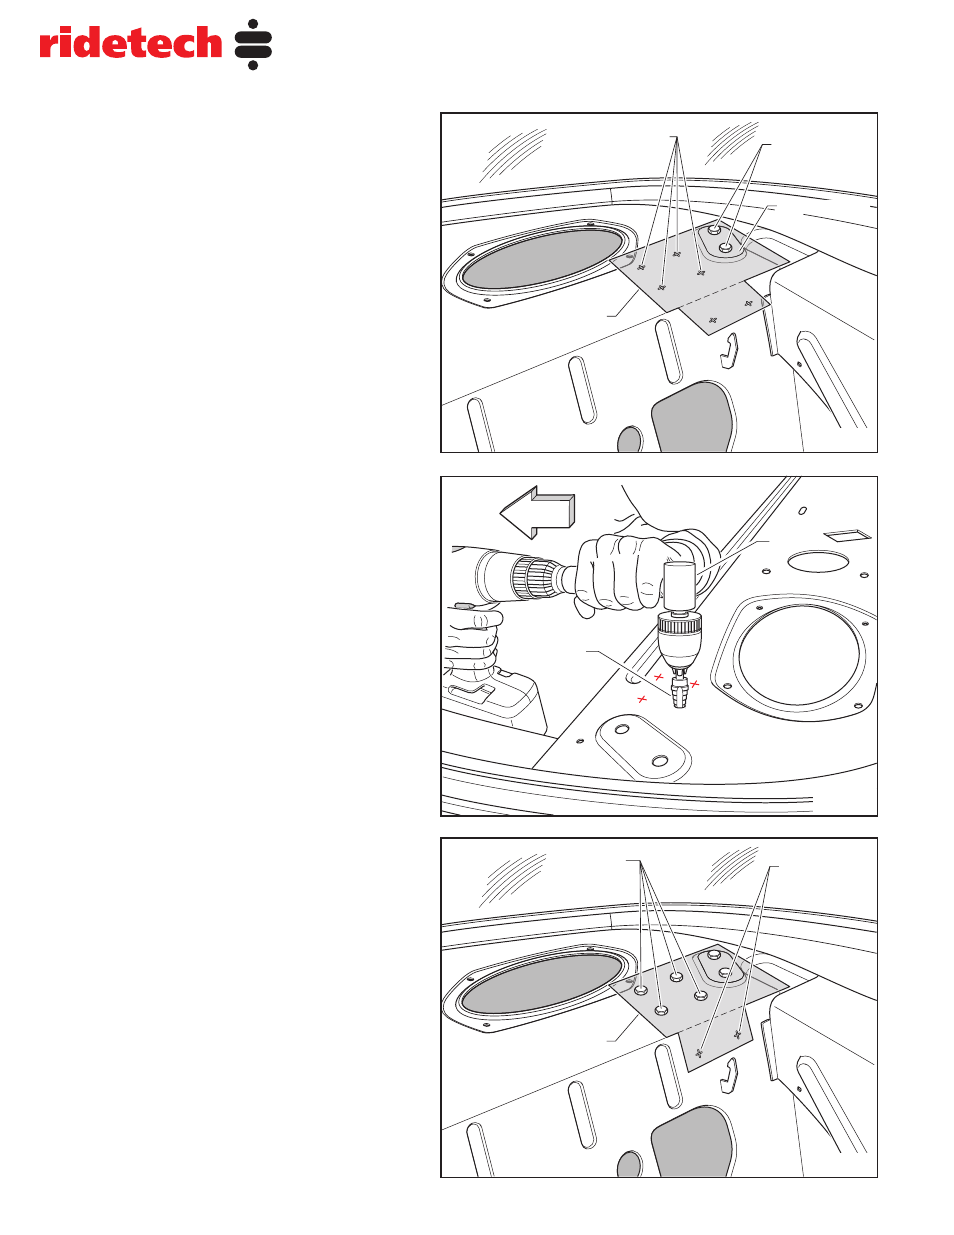
NOTE: Install all bars before final tightening.
Step 7. Remove the rear window package tray
cover and sound pad exposing the sheet metal.
If your vehicle is equipped with rear speakers
that are attached to the package tray cover, it
will be necessary to remove them.
Step 8. Slip two 3/8” hex head bolts through
the holes in the supplied drill template marked
“Factory Holes”. Insert the two bolts into the
existing holes in the raised reinforcement rib
on the drivers side of the package tray
(See Fig 9). The front edge of the template
should be parallel to the edge of the package
tray. Mark the center point of the four holes to
be drilled in the top of the package tray and
remove the template.
NOTE: When marking the passenger side the
template will need to be turned over.
Step 9. Drill four holes to 1/2” diameter using a
90º drill or drill attachment and step bit
(See Fig 10). We suggest using a center punch
on the marks you just made to aid in drilling.
Care must be taken not to break the rear glass
while using the center punch.
NOTE: If you don’t have access to a 90º drill,
drill attachment or step bit you can pick them
up at your local auto parts store.
Step 0. Align the drill template again on the
package tray in the same manner as described
in step 8. Slip four additional 3/8” hex head
bolts through the drill template and holes you
just drilled to hold the template in place. Roll
the front edge of the template down against the
seat back sheet metal and mark the remaining
two holes to be drilled (See Fig 11). Remove
the template and drill out the two holes using a
1/2” drill or step bit.
Fig 9
Fig 0
Fig