Merit Medical Flex-Neck ExxTended Catheter User Manual
Page 9
alternative measuring and cutting Instructions for the
upper chest catheter
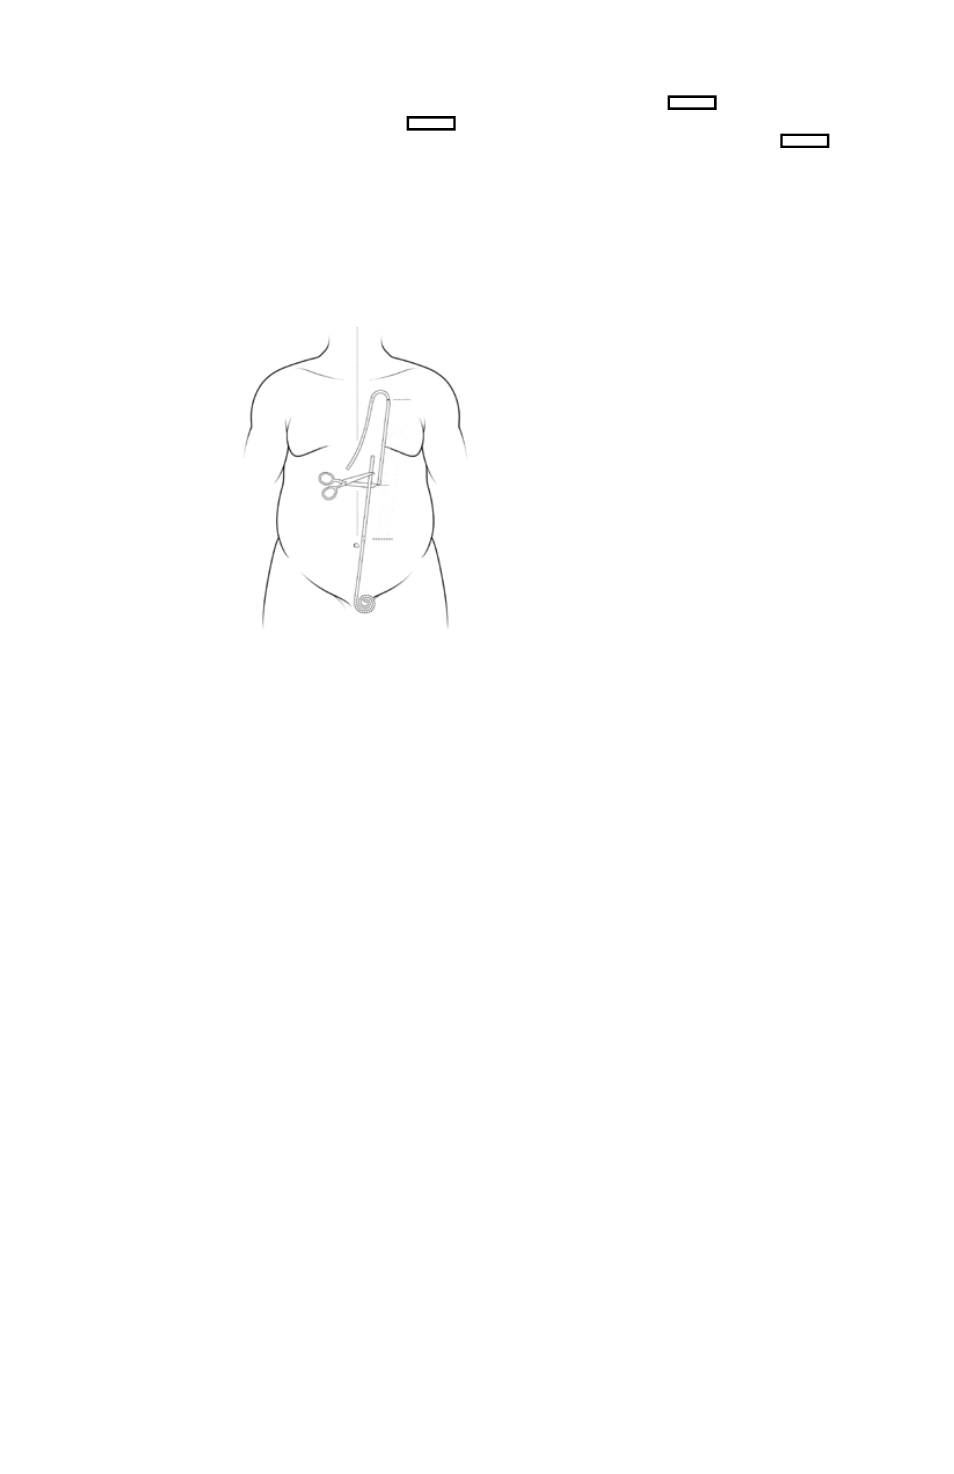
1. position the upper catheter on the abdominal wall with the
black marker ring on the secondary incision, rectangle .
2. overlap the upper and lower catheters and choose an appro-
priate location to cut and join the two. See figure 16
note : keep in mind that one of the catheters will need to be
further shortened as described in step 5 below.
3. cut the two catheters at the location selected in step 2.
4. using the measuring rod, measure the distance from the
fascia to the skin at the primary incision site, at the skin surface
level.
5. cut either the upper or the
lower catheter (not both) to
further shorten it by the
distance measured in step 4.
note: In order to be able to
work with the lower catheter,
avoid using a length of
less than 5 cm.
Figure 16
connecting the lower and upper catheters
1. Wet the tapered tips of the double-barbed Titanium
connector in sterile saline or sterile water. do not use any other
lubricant.
2. Insert one end of the double-barbed Titanium connector
into the proximal end of the lower catheter. push the catheter
tip all the way to the connector’s center ring barrier. do not use
a twisting motion to force the catheter onto the connector. push
the connector into the catheter with a single forward motion.
do not dislodge the deep (rectus) cuff.
3. Insert the opposite end of the double-barbed Titanium con-
nector onto the ascending limb of the upper catheter, that is,
the limb with the marker ring, NoT the limb with the cuff. push
the catheter tip all the way to the connector’s center ring barrier.
do not use a twisting motion to force the catheter onto the
connector. push the connector into the catheter with a single
forward motion.
Note that for the upper chest exit-site, the lower and upper
catheters will be implanted with the same “side” up relative
to the positions of the radiopaque stripes. When inserting the
Titanium connector into the upper catheter, rotate the upper
catheter as necessary to ensure that the radiopaque stripes are
aligned.
4. check that radiopaque stripes are aligned. If the catheter
is implanted in the patient’s left side, both radiopaque stripes
will be face up (anteriorly). If the catheter is implanted in the
patient’s right side, both radiopaque stripes will be face down
(posteriorly).
5. Tie a non-absorbable suture, such as 2-0 or 0-polypropylene,
around each catheter, behind the barb on the Titanium connec-
tor. The two sutures may then be tied to each other to further
prevent tubing separation.
6. Test the integrity of the junctions by pulling firmly on each
catheter in turn while holding the connector. do not dislodge
the deep (rectus) cuff during this pull test .
Implanting the upper catheter with an upper chest exit-site
1. make a 2.0 - 3.0 cm horizontal incision at the marked second-
ary incision site, rectangle .
2. at the secondary incision site, rectangle , perform
dissection with a combination of hemostat clamps and ribbon
retractors to the pectoralis fascia. on the surface of the fascia,
create a subcutaneous pocket to contain the preformed arcuate
bend of the upper catheter. In addition, perform dissection
caudally in the retromammary space to facilitate passage of the
exxTended catheter Tunneling Tool tip from the primary (lower)
incision to the secondary (upper) incision.
3. Insert the blunt, bullet-shaped end of the Tunneling Tool into
the primary incision site.
4. Guide the Tunneling Tool along the surface of the fascia to
the secondary incision site.
note:
a. make sure that the Tunneling Tool stays in the relatively loose
avascular areolar tissue plane between the muscle fascia and
subcutaneous tissue. do not insert the tool and catheter into
the subcutaneous fat. doing so may cause the catheter to
kink during certain patient activities.
b. do not cross the patient’s midline of the abdomen or chest.
do not cross the sternum.
c. Follow the marked Tunnel Track, as indicated by the Stencil,
when feasible.
d. If a laparoscopic catheter implantation approach is being
used, the presence of a pneumoperitoneum provides a firm
fascial surface that facilitates passage of the Tunneling Tool.
5. advance the Tunneling Tool far enough through the second-
ary incision site so that it can be grasped with the other hand.
6. attach the proximal end of the upper catheter (the end
of the catheter closest to the cuff) to the barbed tip of the
exxTended catheter Tunneling Tool.
7. Secure the catheter end onto the tip with a suture.
8. carefully pull the Tunneling Tool out through the secondary
incision site far enough so that the Tunneling Tool can be laid
down.
note: do not twist the catheter. observe the radiopaque stripe
to ensure that the catheter remains straight.
9. continue to pull the catheter gently until the marker ring is
visible at the secondary incision site.
note:
a. When the marker ring is visualized on the surface of the fas-
cia at the secondary incision site, the length of the catheter
between the marker ring and the deep (rectus) cuff should
be relatively straight.
b. do not dislodge the deep (rectus) cuff.
c. do not twist or rotate the catheter. observe the radiopaque
stripe to ensure that the catheter remains straight. excess,
non-straightened tubing may cause future kinking and flow
failures under some conditions.
10. cut the catheter free of the Tunneling Tool.
note:
a. do not attempt to use the end of the catheter that was
inserted over the barbed tip of the Tunneling Tool. It is
stretched too much to be able to hold the connector
securely.
b. When cutting the catheter free of the Tunneling Tool, make a
straight, perpendicular cut of the tubing with suture scissors.
always verify that the cuts are perpendicular to the catheter
tubing so that the connector fits well in the catheter.
11. Infuse a minimum of 60 ml of sterile saline to verify patency,
and that there are no twists or kinks in the catheter.