Merit Medical Flex-Neck ExxTended Catheter User Manual
Page 5
regardless of which implantation technique is used, alWaYS
make sure to:
a) place the deep cuff within the rectus muscle.
b) angle the catheter inferiorly as it passes through the rectus
muscle to direct it into the pelvis.
c) do not twist or rotate the catheter; verify that the radi-
opaque stripe is straight throughout the procedure.
d) Test lower catheter patency by infusing a minimum of 60
cc of sterile saline and observing the outflow rate before
proceeding with the implantation procedure.
the following is a general implantation procedure for the
exxtended catheter’s lower catheter. adapt as appropriate
to the technique used.
1. administer patient anesthesia as appropriate for the tech-
nique used.
2. abdominal preparation: Surgical skin preparation is per-
formed according to hospital protocol. drape patient and ab-
domen in standard manner. consider the use of plastic adhesive
skin barriers with or without iodine impregnation when large
skin surface areas will be exposed.
optional: place patient in typical Trendelenburg position.
3. prepare the catheter by soaking it in sterile saline. Squeeze
the air out of the cuffs by rolling the submerged cuffs between
fingers. Flush the lumen of the catheter with sterile saline.
4 at the designated primary incision site, T-bar , make a
horizontal skin incision appropriate in length according to the
catheter implantation technique being used. The primary inci-
sion is the lower catheter insertion site and the rectus muscle
cuff location.
5. dissection is performed down to and exposing the anterior
rectus muscle sheath. perform dissection on the surface of the
fascia in a cranial direction along the anticipated path of the
catheter to the planned upper abdominal secondary incision.
This subcutaneous path will create a starting point for insertion
of the Tunneling Tool tip at a later step.
6. catheter insertion should be performed through the body
of the rectus muscle appropriate to the technique being em-
ployed, and may include puncture or muscle-splitting incision.
7. With the lower catheter straightened over a stylette (sold
separately), keeping the radiopaque stripe straight, the catheter
tip should be directed toward a deep pelvic location between
the parietal and visceral peritoneum.
note: The lower catheter must be used only with the coordi-
nating Flex-Neck adult catheter Implantation Stylette that is
specifically sized to match the overall length and inner diameter
of the lower catheter.
8. If the catheter is implanted in the patient’s left side, the
lower catheter radiopaque stripe will face up (anteriorly). If
the catheter is implanted in the patient’s right side, the lower
catheter radiopaque stripe will face down (posteriorly).
9. The catheter cuff should be positioned in the rectus muscle
to provide for good tissue ingrowth and firm fixation of the
catheter to prevent pericatheter leaks and hernias.
10. appropriate to the technique being used to insert the cathe-
ter, careful placement of purse-string sutures may be performed
to reduce the risk of pericatheter leaks.
note: use care in placing sutures to assure catheter is not
damaged and flow is not impeded.
11. Test catheter patency via infusion of a minimum of 60 ml
sterile saline, and observe the outflow rate.
note: If the abdomen was insufflated during laparoscopic
insertion, deflate the abdomen to avoid false fluid outflow rates.
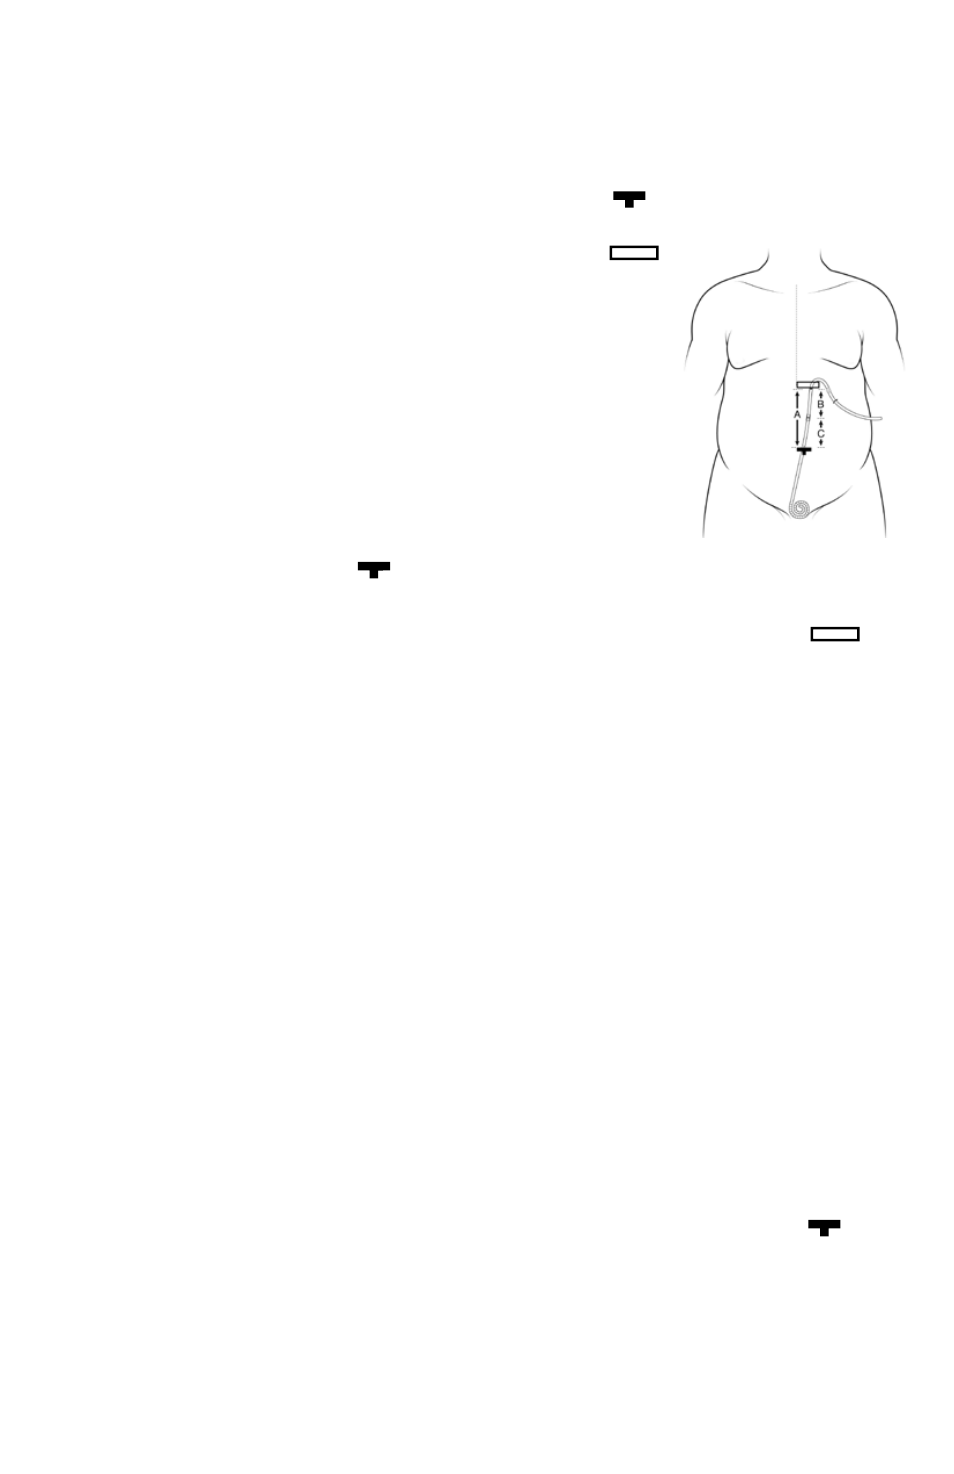
section c
InstructIons for ImPlantIng uPPer aBdomInal
catheter: sIzIng, connectIng and Placement
measurement locations for sizing the upper abdominal
catheter
measurements are based on three locations: 1) the primary
Incision Site, T-bar , where the rectus cuff is located and
the lower catheter is temporarily exiting the abdomen; 2) the
Secondary Incision Site, as indicated
by the rectangle ; and
3) the location where the two
catheters will be joined
together. These instructions
presume that the primary
and secondary incision sites
were marked during patient
preparation prior to surgery.
See Figure 8.
Figure 8
Preparation for sizing the upper abdominal catheter
1. catheters should NoT be trimmed until after the lower
(abdominal) catheter has been implanted and the rectus cuff
is securely in place in the muscle, and after the secondary
incision has been made at the marked rectangle . This
will prevent catheter waste in case some aspect of the surgical
procedure should change, thus modifying the measurements.
2. The patient should be supine in order to properly measure
the distance between the primary and secondary incision marks.
The flat position will assure that the patient will be provided the
maximum required catheter length, and prevents the catheter
from being trimmed too short. If the patient was placed in the
Trendelenburg position during implantation of the lower cathe-
ter, return the patient to a supine position for this portion of the
procedure.
although the patient may normally have a slumping posture in
the upright position, if the catheter is properly positioned on
the fascial surface between the primary and secondary incisions,
kinking will not occur.
ensure that: a) no padding was placed behind the shoulders by
the anesthesia personnel; b) that there are no bends (flexion or
hyperextension) in the table; and c) that there is no abdominal
distension from laparoscopically-induced pneumoperitoneum.
3. note:
a) all measurements described herein are in centimeters.
b) The distance on the upper catheter from the marker ring to
tip is 30 cm.
c) The distance on the lower catheter from the rectus cuff to
distal tip is 31 cm.
measuring and cutting the upper abdominal catheter
note: alternative measuring instructions follow this section.
1. using the provided sterile tape measure, measure the
distance between the primary incision site, T-bar (where
the lower catheter is temporarily exiting the patient), and the
secondary incision site, rectangle. keep the tape taut, without
stretching, over the torso between the primary and secondary
incision sites, keeping the tape above the abdomen contour.
do not allow the tape to follow the body contour, and do not
compensate for the amount of or depth of body fat. If the tape
is allowed to follow the body contour or if the measurements
are adjusted for body fat depth, the result will be an excessive
length of tubing between the primary and secondary incisions,
possibly leading to kinking of the catheter.