Merit Medical Flex-Neck ExxTended Catheter User Manual
Page 6
2. record that distance, “a”, in centimeters, between the
primary and secondary incision sites. This distance, a, represents
the total length needed when combining upper and lower
catheters. See Figure 8.
3. Select and note a potential location where the upper and
lower catheters will be connected together by the internal dou-
ble-barbed Titanium connector. The Titanium connector should
rest on the flat surface of the abdominal wall fascia, avoiding
locations subject to pressure discomfort from the belt line and/
or angulation produced by flexing of the torso at skin creases.
note: When selecting the location to cut and join the cath-
eters, ensure that the connector will be positioned over the
abdominal wall, and not over the costal margin or chest.
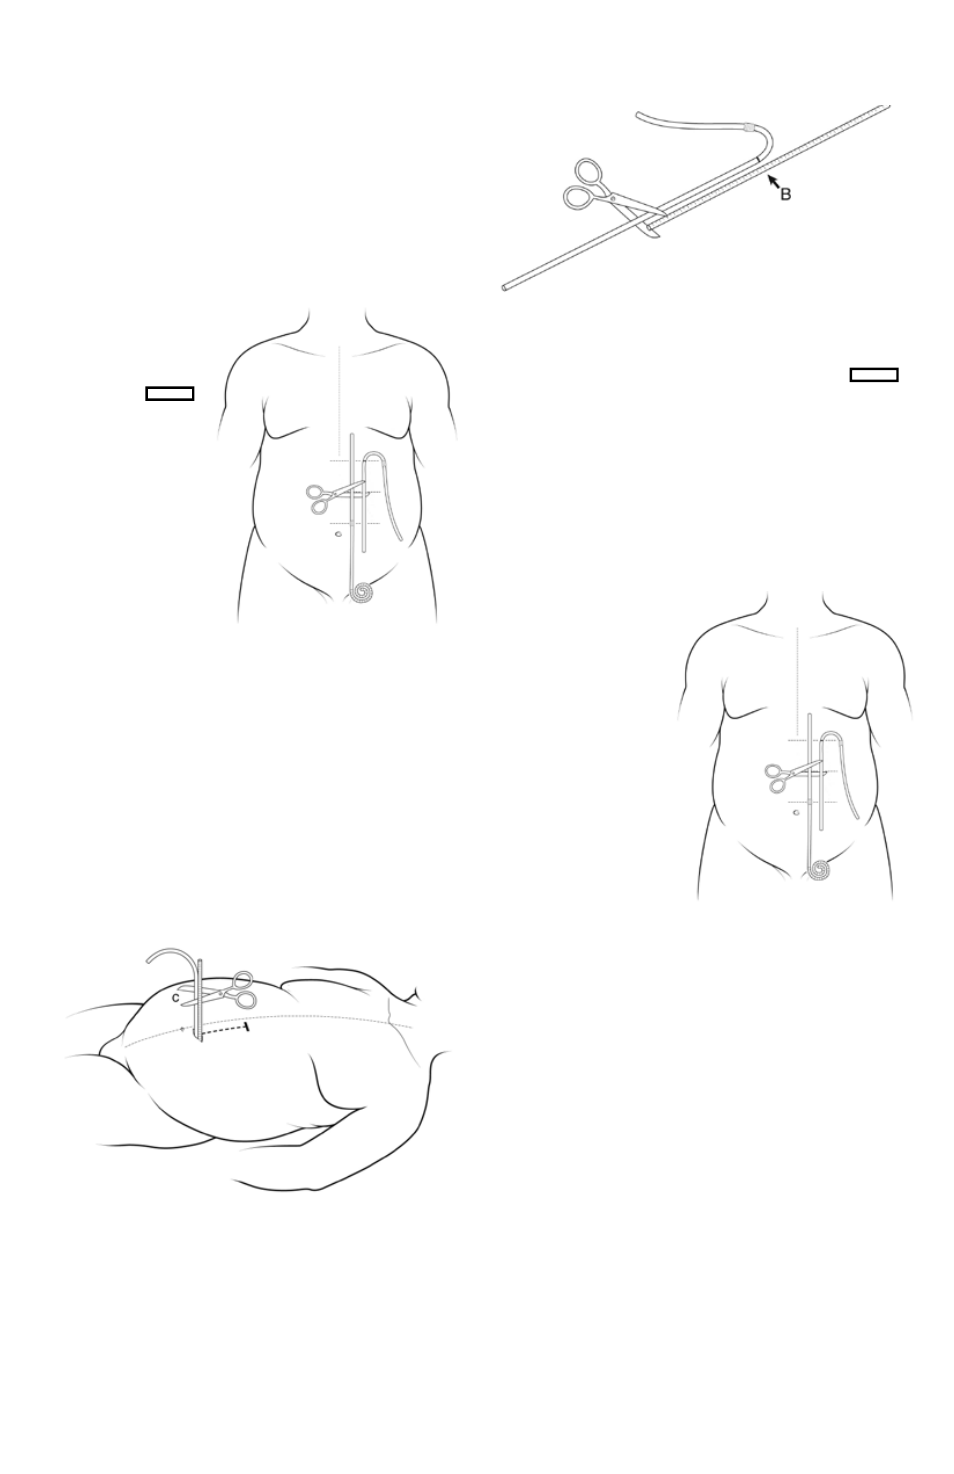
4. using the provided
tape measure, measure
the distance between
the secondary incision
site, rectangle ,
and the chosen union
site. See Figure 9.
record that distance in
centimeters, as “B”. This
will be the length needed
of the upper catheter tubing
from the marker ring to the
catheter union site.
Figure 9
5. Subtract B from a to get the length of lower catheter tubing
needed to reach from the location of the deep cuff under the
fascia to the location of the catheter union. record that distance
in centimeters, as “c”. See Figure 9.
a - B = c , c is the total length needed for the lower catheter.
note: In order to be able to work with the lower catheter,
avoid using a length of c less than 5 cm.
6. Insert the measuring rod (located in the separate sterile
pouch along with the Tunneling Tool) beginning with the tip
marking 1 cm, into the primary incision next to the lower
catheter, perpendicular to the fascia and parallel to the catheter.
advance the measuring rod until the tip meets the rectus fascia.
See Figure 10.
Figure 10
7. hold the external limb of the lower catheter next to, and
parallel to, the measuring rod. using the centimeter markings
on the measuring rod, cut the lower catheter at the c length
above the level of the fascia (Figure 10). make a single, straight,
perpendicular cut of the tubing with suture scissors.
8. place the measuring rod alongside the upper catheter with
the B recorded length on the measuring rod at the level of the
catheter marker ring.
cut the upper catheter at the level of the tip of the measuring
rod Figure 11. make a single, straight, perpendicular cut of the
tubing with suture scissors.
Figure
11
alternative measuring and cutting Instructions for the
upper abdominal catheter
1. position the upper catheter on the abdominal wall with the
black marker ring on the secondary incision, rectangle .
2. overlap the upper and lower catheters and choose an appro-
priate location to cut and join the two. See figure 12.
note : keep in mind that one of the catheters will need to be
further shortened as described in step 5 below.
3. cut the two catheters at the location selected in step 2.
4. using the measuring rod, measure the distance from the
fascia to the skin at the primary incision site, at the skin surface
level.
5. cut either the upper or
the lower catheter (not both)
to further shorten it by the
distance measured in
step 4.
note: In order to be able
to work with the lower
catheter, avoid using a
length of less than 5 cm.
Figure 12
connecting the lower and upper catheters
1. Wet the tapered tips of the double-barbed Titanium con-
nector in sterile saline or sterile water. do not use any other
lubricant.
1. Insert one end of the double-barbed Titanium connector
into the proximal end of the lower catheter. push the catheter
tip all the way to the connector’s center ring barrier. do not use
a twisting motion to force the catheter onto the connector. push
the connector into the catheter with a single forward motion.
do not dislodge the deep (rectus) cuff.
2. Insert the opposite end of the double-barbed Titanium con-
nector onto the ascending limb of the upper catheter, that is,
the limb with the marker ring, NoT the limb with the cuff. push
the catheter tip all the way to the connector’s center ring barrier.
do not use a twisting motion to force the catheter onto the
connector. push the connector into the catheter with a single
forward motion.
note: When inserting the Titanium connector into the upper
catheter, rotate the upper catheter as necessary.
3. check that radiopaque stripes are 180° opposite. If the cath-
eter is implanted in the patient’s left side, the lower catheter
stripe will face up, while the upper catheter stripe will face
down. If the catheter is implanted in the patient’s right side, the
radiopaque stripes will be inverted: the lower catheter stripe
will face down, and the upper catheter stripe will face up. When