Merit Medical Flex-Neck ExxTended Catheter User Manual
Page 8
Preparation for sizing the upper chest catheter
1. catheters should NoT be trimmed until after the lower
(abdominal) catheter has been implanted and the rectus cuff is
securely in place in the muscle, and after the secondary incision
has been made at the marked rectangle . This will
prevent catheter waste in case some aspect of the surgical
procedure should change, thus modifying the measurements.
2. The patient should be supine in order to properly measure
the distance between the primary and secondary incision marks.
The flat position will assure that the patient will be provided the
maximum required catheter length, and prevents the catheter
from being trimmed too short. If the patient was placed in the
Trendelenburg position during implantation of the lower cathe-
ter, return the patient to a supine position for this portion of the
procedure.
although the patient may normally have a slumping posture in
the upright position, if the catheter is properly positioned on
the fascial surface between the primary and secondary incisions,
kinking will not occur.
ensure that: a) no padding was placed behind the shoulders by
the anesthesia personnel; b) that there are no bends (flexion or
hyperextension) in the table; and c) that there is no abdominal
distension from laparoscopically-induced pneumoperitoneum.
note:
a) all measurements described herein are in centimeters.
b) The distance on the upper catheter from the marker ring to
tip is 30 cm.
c) The distance on the lower catheter from the rectus cuff to
distal tip is 31 cm.
measuring and cutting the upper chest catheter
note: alternative measuring instructions follow this section.
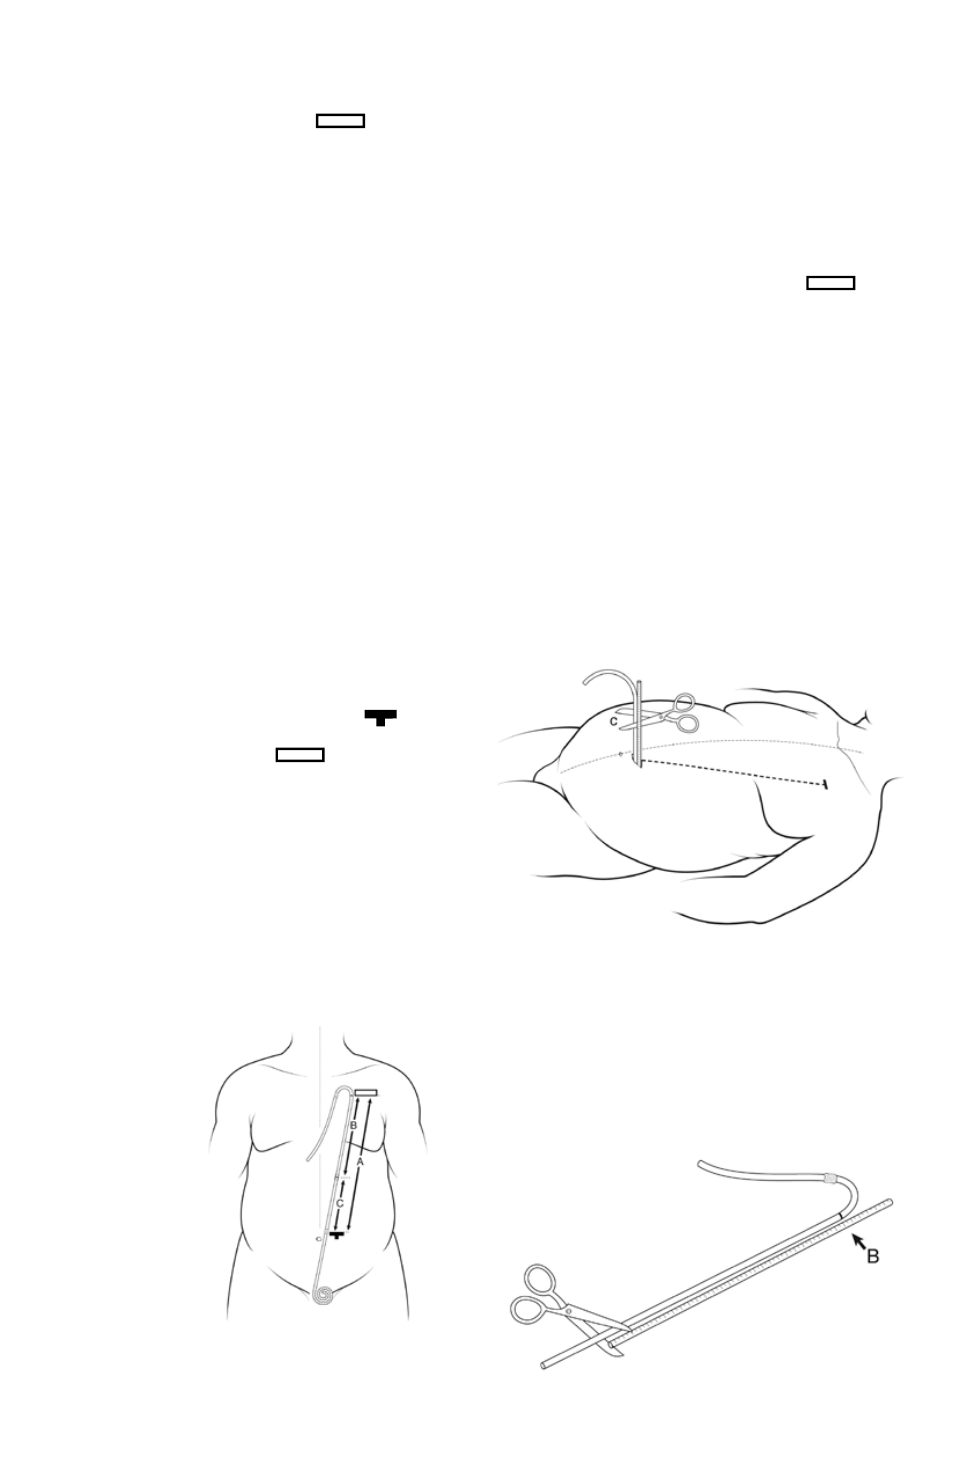
1. using the provided sterile tape measure, measure the
distance between the primary incision site, T-bar (where
the lower catheter is temporarily exiting the patient), and the
secondary incision site, rectangle . keep the tape
taut, without stretching, over the torso between the primary
and secondary incision sites, keeping the tape above the chest
and abdomen contours. do not allow the tape to follow the
body, breast, and abdomen contours, and do not compensate
for the amount of or depth of body fat. If the tape is allowed to
follow the body and/or breast contours, or if the measurements
are adjusted for body fat depth, the result will be an excessive
length of tubing between the primary and secondary incisions,
possibly leading to kinking of the catheter.
2. record that distance, “a”, in centimeters, between the
primary and secondary incision sites. This distance, a, represents
the total length needed when combining upper and lower
catheters. See Figure 13.
Figure 13
3. Select and note a potential location where the upper and
lower catheters will be connected together by the internal dou-
ble-barbed Titanium connector. The Titanium connector should
rest on the flat surface of the abdominal wall fascia, avoiding
locations subject to pressure discomfort from the bra or belt
line and/or angulation produced by flexing of the torso at skin
creases.
note: When selecting the location to cut and join the cath-
eters, ensure that the connector will be positioned over the
abdominal wall, and not over the costal margin or chest.
4. using the provided tape measure, measure the distance
between the secondary incision site, rectangle , and
the chosen union site. record that distance, in centimeters, as
“B”. This will be the length needed of the upper catheter tubing
from the marker ring to the Titanium connector. See Figure 13.
5. Subtract B from a to get the length of lower catheter tubing
needed to reach from the location of the deep cuff under the
fascia to the location of the deep cuff under the fascia to the lo-
cation of the catheter union. record that distance in centimeters
as “c”.
a - B = c, c is the total length needed for the lower catheter.
note: In order to be able to work with the lower catheter,
avoid using a length of c less than 5 cm.
6. Insert the measuring rod (located in the separate sterile
pouch along with the Tunneling Tool) beginning with the tip
marking 1 cm, into the primary incision next to the lower
catheter, perpendicular to the fascia and parallel to the catheter.
advance the measuring rod until the tip meets the rectus fascia.
See Figure 14.
Figure 14
7. hold the external limb of the lower catheter next to, and
parallel to, the measuring rod. using the centimeter markings
on the measuring rod, cut the lower catheter at the c length
above the level of the fascia (Figure14). make a single, straight,
perpendicular cut of the tubing with suture scissors.
8. place the measuring rod alongside the upper catheter with
the B recorded length on the measuring rod at the level of the
catheter marker ring. cut the upper catheter at the level of the
tip of the measuring rod (Figure 15). make a single, straight,
perpendicular cut of the tubing with suture scissors.
Figure 15