Physical features, Factory setting, Operation – SHIMPO FGV-X User Manual
Page 2: Change display units, Reverse the display, Select average or peak
2
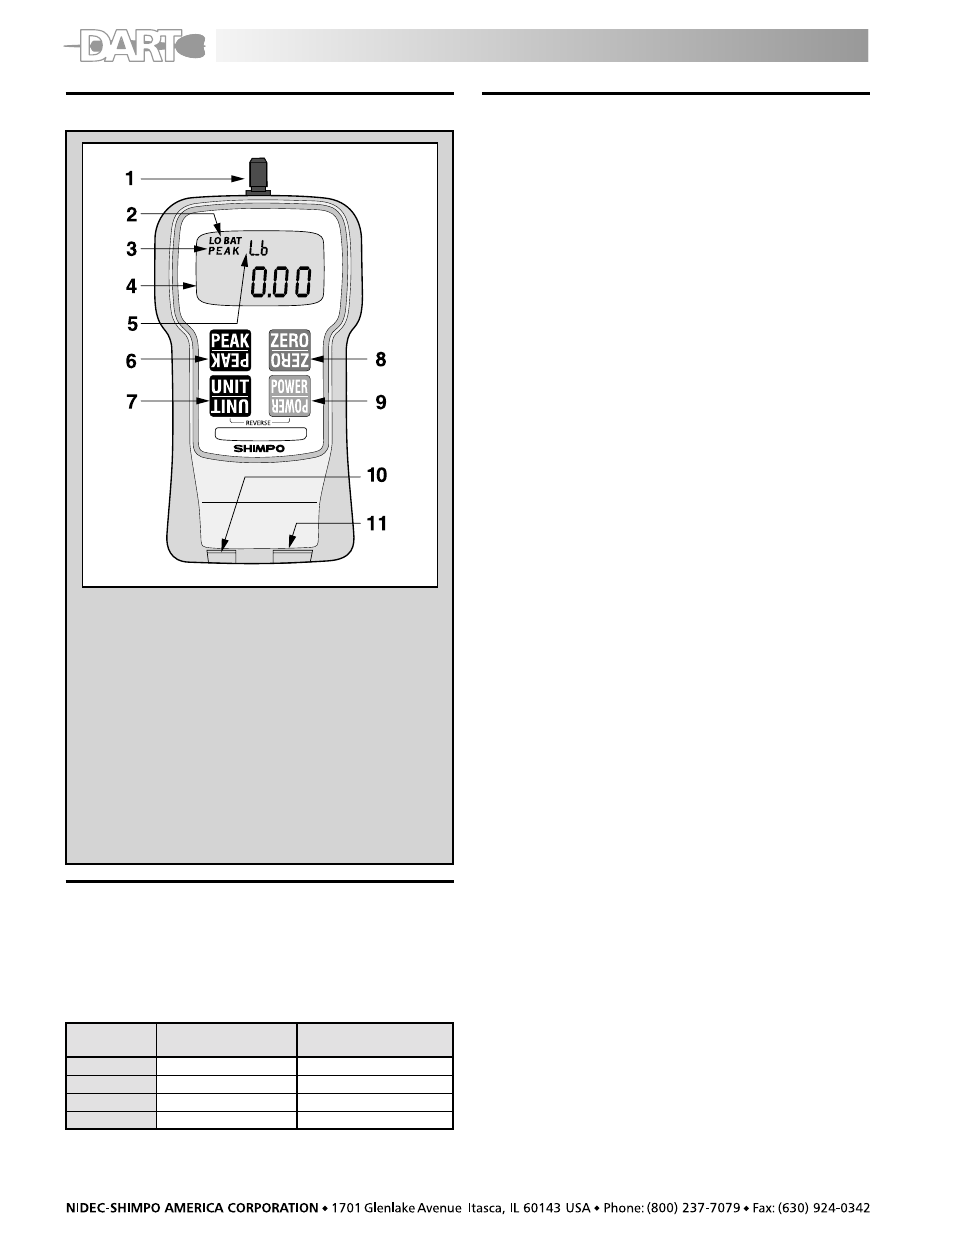
Physical Features
NO.
DESIGNATION
1.
Sensor Shaft
2.
Low Battery Indicator
3.
Peak Indicator
4.
Main Display
5.
Small Display
6.
Peak Button
7.
Unit Button
8.
Tare and Zero Button
9.
Power (ON, OFF) switch
10.
AC Adapter Port
11.
Data Output Port
Factory Setting
The FGE/V-X will revert to factory setting when the gauge
is first powered on. Consult the “Function Setting”
section to customize these default settings.
The following chart reflects the default settings as
programmed by the factory:
FUNCTION
FUNCTION
FUNCTION
FUNCTION
FUNCTION
DEF
DEF
DEF
DEF
DEFAAAAAUL
UL
UL
UL
ULT F
T F
T F
T F
T FACTORY
ACTORY
ACTORY
ACTORY
ACTORY
NUMBER
NUMBER
NUMBER
NUMBER
NUMBER
DESCRIPTION
DESCRIPTION
DESCRIPTION
DESCRIPTION
DESCRIPTION
SET
SET
SET
SET
SETTING
TING
TING
TING
TING
f01
Plus or Minus sign
0001 (plus for compression)
f02
Display update time
3 (3 times/sec)
f03
Auto power off
10 (min)
f04
Baud rate of RS-232C
2400 (bps)
Operation
1. Charge the batteries for approximately 18 hours
before using the gauge (Batteries come discharged
from the factory). The BAT indicator is on when
batteries are charging, off when the batteries are
fully charged.
2. Hand tighten appropriate attachment to unit’s
measuring shaft (do not use a wrench or any other
device to tighten the attachment).
3. Press POWER and release. The unit will display model
name in small display and capacity in main display
and then will show some zeros with the last one or
two digits changing to some random numbers. Also
the unit of measurement (lb (oz), Kg (g) or N) will
appear above the digits and stay as long as the
instrument is on.
Change Display Units
To change the display units, just press UNIT and the units
will change every time the button is pressed.
lb ! oz (0.5X, 1X, 2X models only) ! N ! Kg (g) !
Reverse the Display
If unit is used with the hanger or mounted on a test stand
and the display must be reversed, follow this procedure:
1. Press POWER and hold it; display will go blank.
2. Press and hold UNIT.
3. Release POWER while you are still holding UNIT;
display is still blank.
4. Press POWER once more and release it while still holding
UNIT. At this point you should see the display reversed.
5. Release UNIT; the display stays in that mode.
To go back to normal mode repeat steps 1 through 5.
Select Average or Peak
If you want to measure force in real time (average) the
display will show only the digits and units of the force
being measured. If you want to measure “peak” force:
1. Press PEAK; the word PEAK will appear in the upper
left corner of the display. (If you need a minus peak,
press PEAK again.)
2. The display will freeze after capturing the peak force.
3. Press ZERO to cancel previous peak and continue with
your tests.
If you want to go back to average mode press PEAK again.
The word PEAK will disappear from the display.
NOTE: It is very important that you measure forces
(tension or compression) that are in line with the
measuring shaft and not at any angle (see fig. 1). Failure
to observe this directive will damage the instrument. Also,
after the gauge is positioned and ready to take a
measurement (with the proper attachment in place) tare
the unit by pressing ZERO. To clear the display for another
measurement (in PEAK mode), press ZERO.