Installation instructions – Ventamatic CX1500 User Manual
Page 2
INSTALLATION INSTRUCTIONS
THIS GABLE-MOUNTED UNIT IS DESIGNED FOR ATTICS OF AVERAGE SIZE AND OPERATES MOST EFFICIENTLY WHEN AIR
INTAKES ARE LOCATED AROUND THE EAVES. ALTERNATIVELY, AIR INTAKE MAY BE FROM OPPOSING GABLE VENTS, BUT
NEVER FROM ROOF OR RIDGE VENTS. AT LEAST 600 SQ. IN OF NET FREE AIR INTAKE IS REQUIRED PER UNIT FOR SAFE
AND EFFICIENT OPERATION. THE MOTOR OPERATES ON 120 V, 60 HZ, A.C. CURRENT. SEE MOTOR LABEL FOR
AMPERAGE.
THIS UNIT MAY BE MOUNTED BEHIND ANY STATIC WALL VENT, OR MODELS VX1818 OR CX2121 AUTOMATIC SHUTTERS.
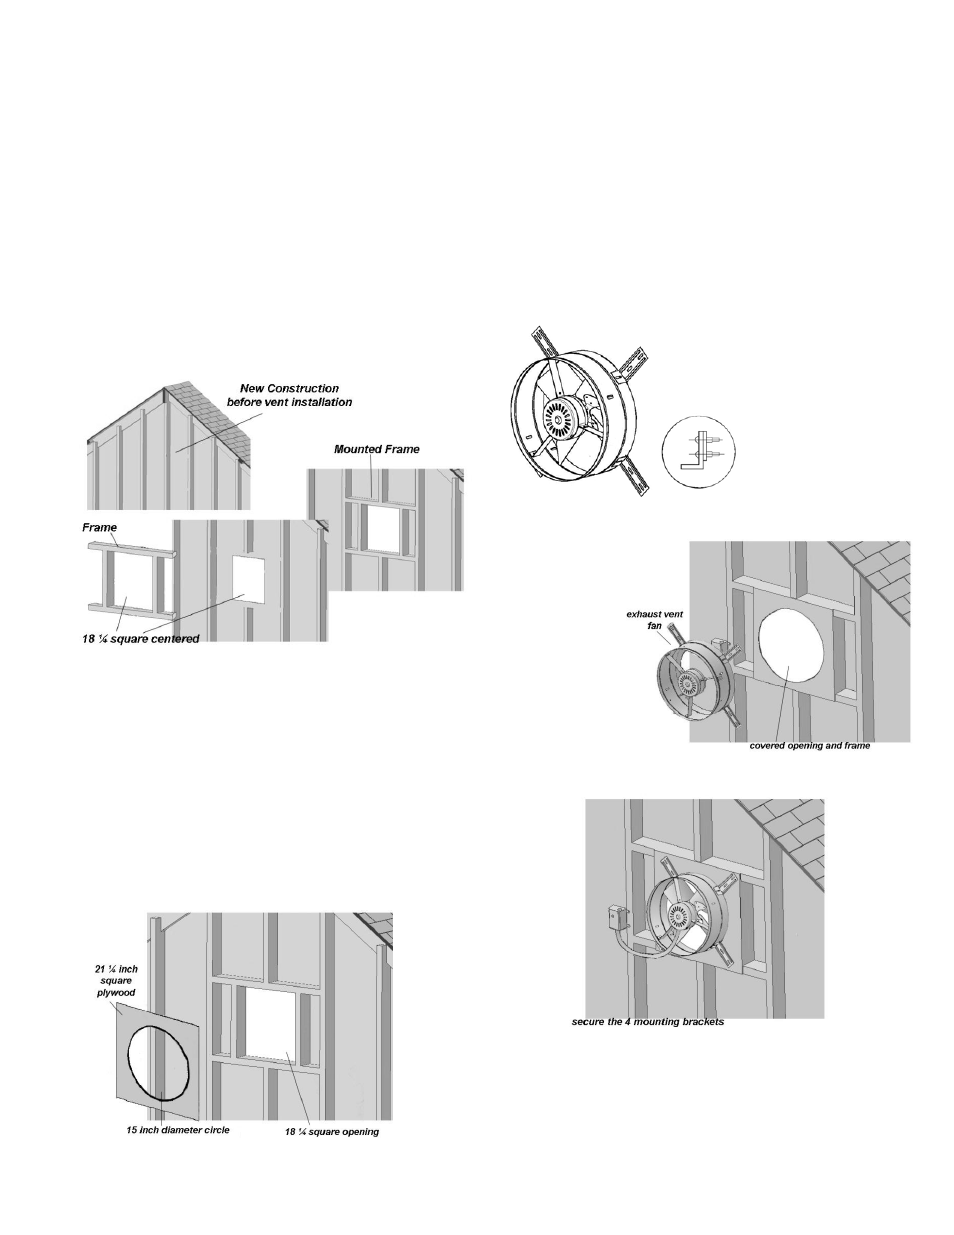
Step
1
Step
3
For new installation or installation behind
existing louvers, using 2 x 4 studs, frame an
opening at least 18 ¼-in square (depending on
stud spacing) on center, on the attic side of the
gable.
Step 2
Cover the opening with a square piece of
plywood, paneling, or sheetrock, at least
21 ¼-in square (depending on stud spacing).
Cut a 15-in diameter hole in the center of this
panel, to allow the shroud of the fan to enter the
hole.
It is important to block off any remaining open
vent area in the gable.
With the nuts and bolts furnished, secure the 4
mounting brackets to the shroud and then
fasten the unit to the frame.
Mounting the long side of the
L brackets to the shroud may
better fit your installation and
also help reduce
vibration.
The use of a
sound-dampening
barrier, such as
rubber washers or foam stripping will help
reduce resonance
in the walls. Seal
off any gaps
around
the fan,
in order for
the fan to
function at
maximum
efficiency
.
TIP:
MUCH OF THE PREPARATION, WIRING OF
THERMOSTAT, TESTING, AND MOUNTING TO THE
FRAME CAN BE COMPLETED BEFORE FINAL
INSTALLATION IN THE ATTIC.