Warning – Hired-Hand Circulation and Stir Fans: 48 MEGA FLOW User Manual
Page 2
HIRED-HAND, INC.
•
1733 County Road 68
•
Bremen, AL 35033
•
PHONE 256-287-1000
•
FAX 256-287-2000
Manual Part No. 4801-5123
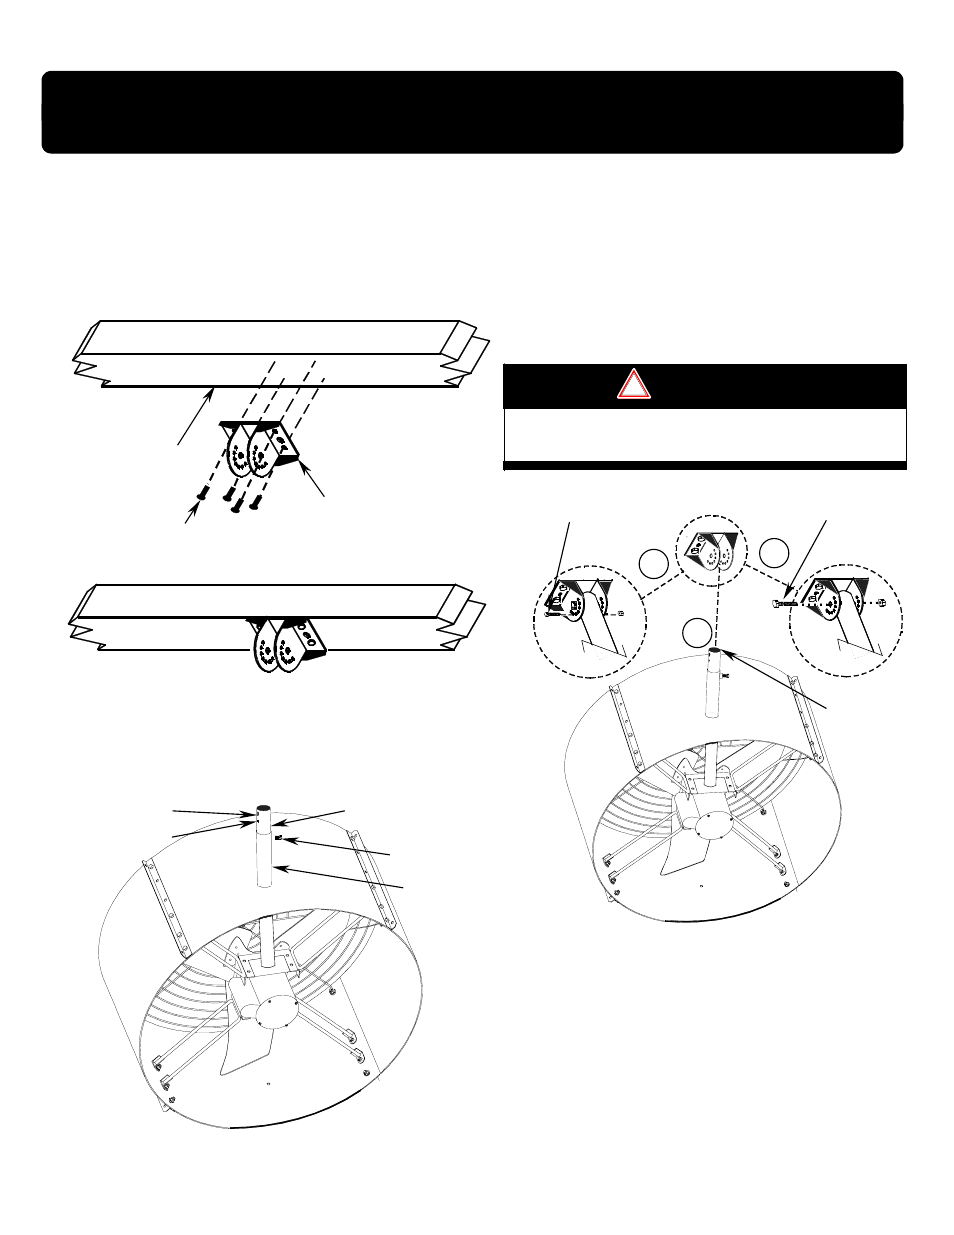
1. Your Mega Flow ceiling mount fan is shipped with the
support arm and pivot sleeve pre-assembled.
2. Determine the location where fan will be installed.
3. Install bolts or lag screws to securely fasten mounting
bracket to ceiling joist or ceiling beam (Fig. 1). Bolts &
lag screws not included in kit.
4. Refer to Fig. 2. Make sure that protruding end of pivot
sleeve is fully extended from the support arm.
5. Rotate pivot sleeve to place 'set pin' holes and bolt
attachment holes facing 90 degrees from motor side of fan
(Fig. 2).
6. Screw lock bolt into threaded lock bolt opening.
Securely tighten lock bolt.
7. Lift fan assembly and insert pivot sleeve between the
flanges of the support bracket (Detail 1 in Fig. 3).
8. Align bolt holes of pivot sleeve with bolt holes in the
flanges of the mounting bracket.
9. Insert bolt through holes in flanges, and pivot sleeve.
Attach nut to bolt. (Detail 2 in Fig. 3). Tighten bolt &
nut securely -but not to impede movement of support arm.
WARNING
Failure To Tighten All Bolts & Nuts Securely
Can Result In Serious Injury!
10.
Rotate fan to desired tilt angle.
11.
Insert set pin through desired set hole in flange of
support bracket (Detail 3 in Fig. 3)
12.
SECURELY TIGHTEN ALL BOLTS AND NUTS AT
THIS POINT OF INSTALLATION.
13. Installation
completed.
M O U N T I N G I N S T R U C T I O N S
M O U N T I N G I N S T R U C T I O N S
M O U N T I N G I N S T R U C T I O N S
M O U N T I N G I N S T R U C T I O N S
Ceiling joist
Or ceiling beam
Mounting
bracket
Lag screws
Or Bolts
Figure 1
Pivot sleeve
Bolt hole
Set pin hole
Lock bolt
Figure 2
Fan guard not
shown for clarity.
Support arm
Guard not shown for clarity.
Figure 3
Insert pin
Insert bolt &
attach nut
1
3
2
Insert pivot
sleeve into
bracket