Advertencia warning avertissement, Maintenance mantenimiento entretien, Gun handle disassembly – Lincoln Electric IMT636 POWER MIG 255 User Manual
Page 39: Démontage de la poignée du pistolet, Desensamble del mango de la antorcha
D-5
MAINTENANCE
MANTENIMIENTO
ENTRETIEN
FIGURE D.1
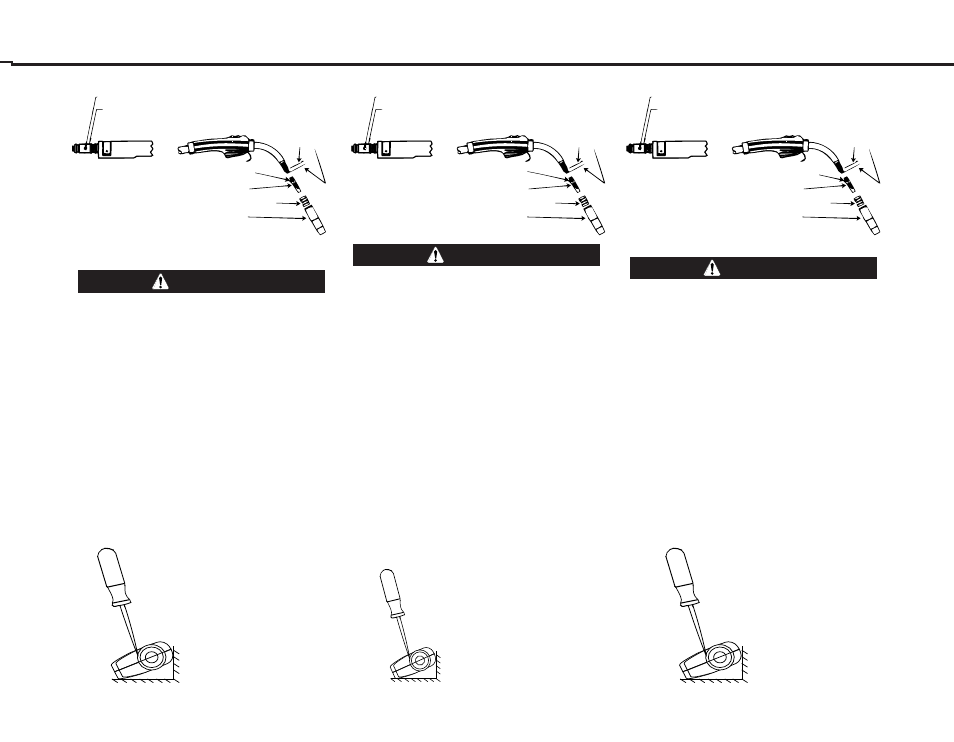
This screw should only be gently tightened.
Overtightening will split or collapse the liner and
cause poor wire feeding.
-----------------------------------------------------
GUN HANDLE DISASSEMBLY
The internal parts of the gun handle may be inspected
or serviced if necessary.
The gun handle consists of two halves that are held
together with a collar on each end. To open up the
handle, turn the collars approximately 60 degrees
counterclockwise (the same direction as removing a
right hand thread) until the collar reaches a stop. Then
pull the collar off the gun handle. If the collars are
difficult to turn, position the gun handle against a
corner, place a screwdriver against the tab on the
collar and give the screwdriver a sharp blow to turn
the collar past an internal locking rib.
FIGURE D.1
Ne serrer cette vis que légèrement. Si on la serre
trop, elle peut fendre ou déformer le conduit
intérieur et provoquer un mauvais dévidage du fil
----------------------------------------------------------------------.
DÉMONTAGE DE LA POIGNÉE DU
PISTOLET
On peut inspecter et entretenir s’il y a lieu les pièces
internes de la poignée du pistolet.
La poignée du pistolet est composée de deux parties
retenues par une virole à chaque extrémité. Pour
ouvrir la poignée, tourner les viroles d’environ 60o
vers la gauche (comme s’il s’agissait d’un filetage à
droite) jusqu’à ce qu’elles atteignent un arrêt. Puis
tirer sur les viroles pour les sortir du pistolet. S’il est
difficile de tourner les viroles, placer la poignée du pis-
tolet dans un angle, placer un tournevis contre la par-
tie en saillie de la virole et donner un bon coup sur le
tournevis pour que la virole dépasse une nervure de
verrouillage interne.
FIGURA D.1
Este tornillo debe apretarse ligeramente. Al
apretar con exceso partirá o romperá la guía y
provocará
una
alimentación
de
alambre
deficiente.
-----------------------------------------------------------------------
DESENSAMBLE DEL MANGO DE LA
ANTORCHA
Las partes internas del mango de la antorcha deben
inspeccionarse o recibir servicio en caso de ser
necesario.
El mango de la antorcha consiste de dos mitades que
están sujetas juntas con un collar en cada extremo.
Para
abrir
el
mango,
gire
ambos
collares
aproximadamente 60º en contra de las manecillas del
reloj (la misma dirección para retirar una tuerca de
rosca derecha) hasta que el collar se detenga. Luego
jale el collar fuera del mango de la antorcha. Si los
collares son difíciles de girar coloque el mango de la
antorcha
contra
una
esquina,
coloque
un
destornillador contra la orilla del collar y de un golpe
para poder girar el collar mas allá de la protuberancia
que lo asegura.
counterclockwise
A la izquierda
Vers la gauche
ADVERTENCIA
WARNING
AVERTISSEMENT
TORNILLO DE FIJACION
TORNILLO DE FIJACION
CONECTOR DE CABLE DE COBRE
DIFUSOR DE GAS
AISLADOR DE TOBERA
(SI SE UTILIZA)
TOBERA DE GAS
1-1/4"
(31.8mm)
LONGITUD DE
CORTE
TORNILLO DE FIJACION
TORNILLO DE FIJACION
CONECTOR DE CABLE DE COBRE
DIFUSOR DE GAS
AISLADOR DE TOBERA
(SI SE UTILIZA)
TOBERA DE GAS
1-1/4"
(31.8mm)
LONGITUD DE
CORTE
VIS DE FIXATION
CONNECTEUR DE CÁBLE EN LAITON
VIS DE FIXATION
LONGUEUR LIBRE
DU CONDUIT
INTÉRIEUR 1-1/4
po (31,8 mm)
DIFFUSEUR DE GAZ
ISOLATEUR DE BUSE
(ÉVENTUEL)
BUSE DE GAZ
TORNILLO DE FIJACION
TORNILLO DE FIJACION
CONECTOR DE CABLE DE COBRE
DIFUSOR DE GAS
AISLADOR DE TOBERA
(SI SE UTILIZA)
TOBERA DE GAS
1-1/4"
(31.8mm)
LONGITUD DE
CORTE
SET SCREW
BRASS CABLE CONNECTOR
SET SCREW
1-1/4 (31,8 mm)
LINER TRIM
LENGHT
GAS DIFFUSER
NOZZLE INSULATOR (IF USED)
GAS NOZZLE