Vestil LAD-RF User Manual
Page 10
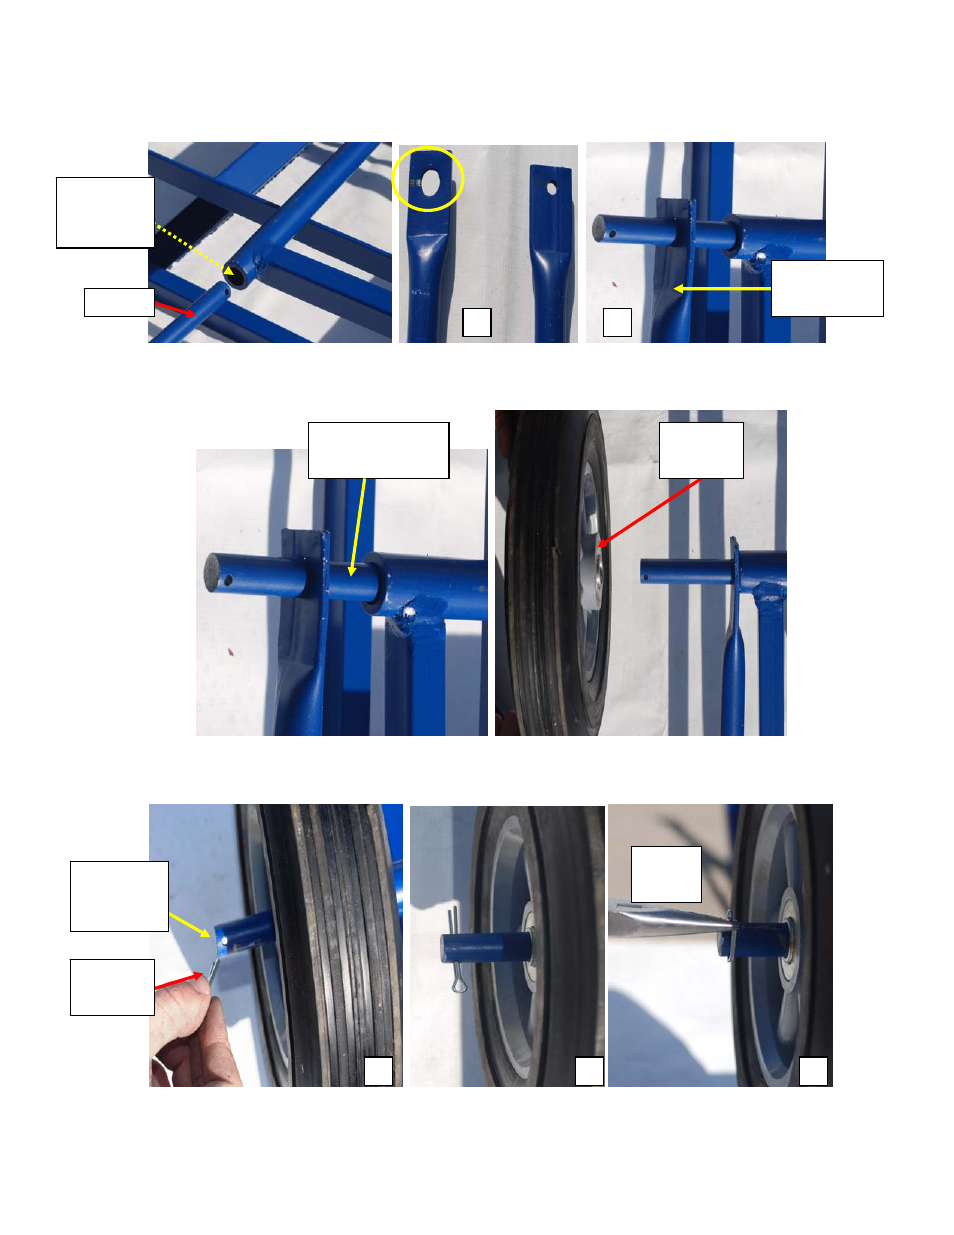
Instruction 4: Insert the axle into the axle-receiving opening of the back leg weldment as shown. A few
inches of the axle should protrude from the opening at each end of the leg weldment. Examine the
horizontal braces (3); notice that each brace has an end with a large hole (circled) and a small hole. Attach
the horizontal braces to the axle through the large hole.
Axle
receiving
opening
Back Leg
Weldment
Horizontal
Brace
Axle
2
3
Instruction 5: Attach each of the 10in. wheels (5) to the exposed portion of the axle. Notice that the
wheels have different faces. One face has a raised center; the other face does not.
Exposed
Portion of Axle
Raised
Center
Instruction 6: Secure each wheel to the axle with a cotter pin (D). Insert the pins into the pin receiving
holes at each end of the axle; then bend the arms of the pins around the axle (towards the pin head).
Bend
Arms
Pin
Receiving
Hole
Cotter
Pin
1
2
3
10
- ABLT-H (7 pages)
- ABLT-H-LP (5 pages)
- ACH-60 (20 pages)
- ALL-T-2-GPT (10 pages)
- ALL-T-2 (9 pages)
- A-LIFT (12 pages)
- AIR-2000 (12 pages)
- AHLT (12 pages)
- AHA-KIT Come-Along kit (5 pages)
- AHA (25 pages)
- AF-xxxx (4 pages)
- APPL-1200-xx (1 page)
- ASP Series (5 pages)
- ATD (6 pages)
- ATP (9 pages)
- ATS (9 pages)
- BC series (12 pages)
- BOL-OR-40-BK (3 pages)
- BOL-SS-42-5.5 (5 pages)
- BOL-SSTOR-42-4.5 (5 pages)
- BT (20, 40, & 60) (12 pages)
- SELF SUPPORTING BRIDGE CRANE (9 pages)
- CART-DS-1000 (15 pages)
- CAN-A (1 page)
- CART-23 & -24, ALL MODELS (12 pages)
- CART-500-SCL (1 page)
- CART-550-SS (15 pages)
- CART-D-FR (18 pages)
- CART-S-FR (18 pages)
- CB-PMPS (13 pages)
- CBS Series (13 pages)
- CB-W-P (1 page)
- CB-W-S (1 page)
- CC-30-MC (59 pages)
- CH series (12 pages)
- COL-3-26-14 (5 pages)
- CYL-CK (1 page)
- CUP-3131 (4 pages)
- CPC (10 pages)
- CP Series (8 pages)
- COL-4-36-23 (5 pages)
- COL-3-26-44 (5 pages)
- COL-3-26-23 (5 pages)
- H series hoppers (13 pages)
- D-150 Dock Seals & Shelter Survey Sheet (1 page)