Add shelf pegs, Attach rear panels – Salamander Designs Synergy System SNC20C/B User Manual
Page 2
Doc No. 500-980/v10.06 SNC - 2/4
2
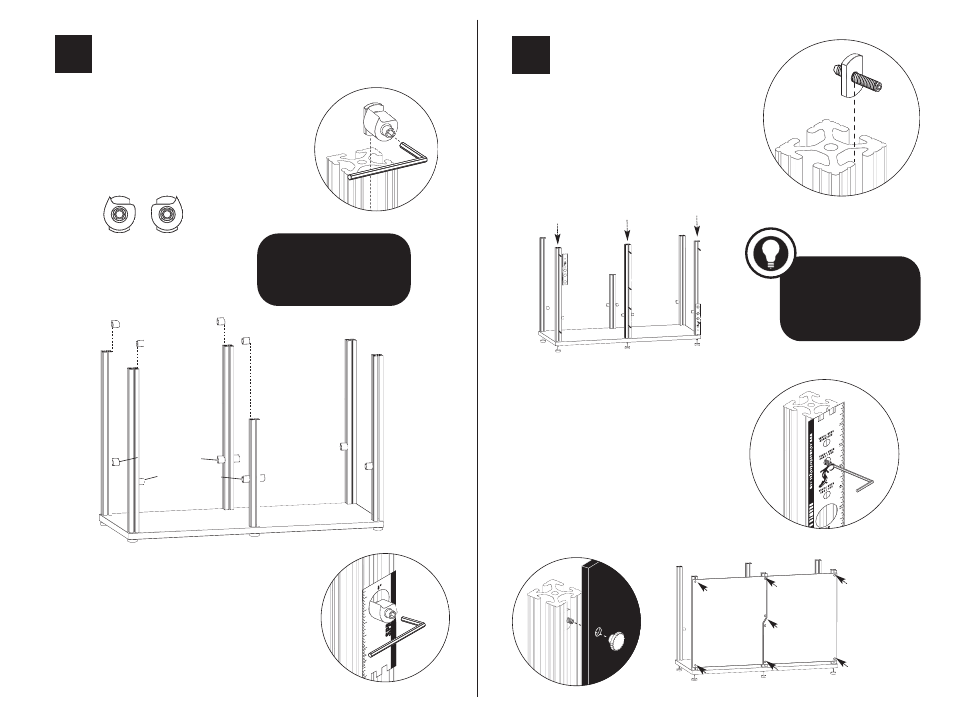
Add Shelf Pegs
A.
Pegs for Shelves
Insert one shelf peg down each post.
NOTE: There are two varieties of shelf pegs
(A and B). They are designed to cradle the
shelf in place. Refer to drawing.
B
A
A B
B
A
.
Insert Hardware
Combine the 1” threaded studs with flat nuts.
Slide 2 sets of hardware down the two outside
posts and 4 sets down the center post. Allow
studs to remain loose at bottom of post.
B
.
Position & Secure Studs
Align the Spacer Tool at the top of each post,
then position top studs through the small “Rear
Panel” hole. Repeat this step with the bottom
studs aligning the Tool along the bottom of post
to set spacing for cable passage. Use the hex key
to secure the top and bottom studs to the posts.
C
.
Place Rear Panels
Secure each panel in place with thumb nuts.
Attach Rear Panels
3
1
2
3
4
5
6
7
8
9
S20 / SVDO
REAR PANEL
41/ 2"
6"
8"
www.
s
a
la
m
a
n
d
e
rd
e
s
ig
n
s
.c
o
m
EXTENDED
REAR PANEL
S30 / S40
REAR PANEL
SP
ACER
TOOL
1
2
3
4
5
6
7
8
9
S20 / SVDO
REAR PANEL
41/ 2"
6"
8"
www.
s
a
la
m
a
n
d
e
rd
e
s
ig
n
s
.c
o
m
EXTENDED
REAR PANEL
S30 / S40
REAR PANEL
SP
ACER
TOOL
1
2
3
4
5
6
7
8
9
S 20 /
S
VDO
R EA
R P
ANE
L
41/
2
"
6"
8"
www.
s
a
la
m
a
n
d
e
rd
e
s
ig
n
s
.c
o
m
E X
TEN
DE
D
R EA
R P
ANE
L
S 30
/ S
40
R EA
R PA
NE
L
SP
ACER
TOOL
TIP
To ease installation of rear
panels gently place the unit
face down on the floor to
improve aligning of panels.
A
2X
2X
4X
B
.
Adjust Peg Height
Position the shelf peg through the Spacer
Tool and tighten at desired height. See
step 4 for fine tuning.
Note:
If installing door(s), use 2 sets
of shelf pegs at the top of short
posts to act as door stops.