Troubleshooting guide, Aerobell m rotary atomizer - maintenance – Ransburg Aerobell M Rotary Atomizer 78101 User Manual
Page 33
LN-9237-00.1
Aerobell M Rotary Atomizer - Maintenance
29
29
29
29
29
TROUBLESHOOTING GUIDE
TROUBLESHOOTING GUIDE
TROUBLESHOOTING GUIDE
TROUBLESHOOTING GUIDE
TROUBLESHOOTING GUIDE
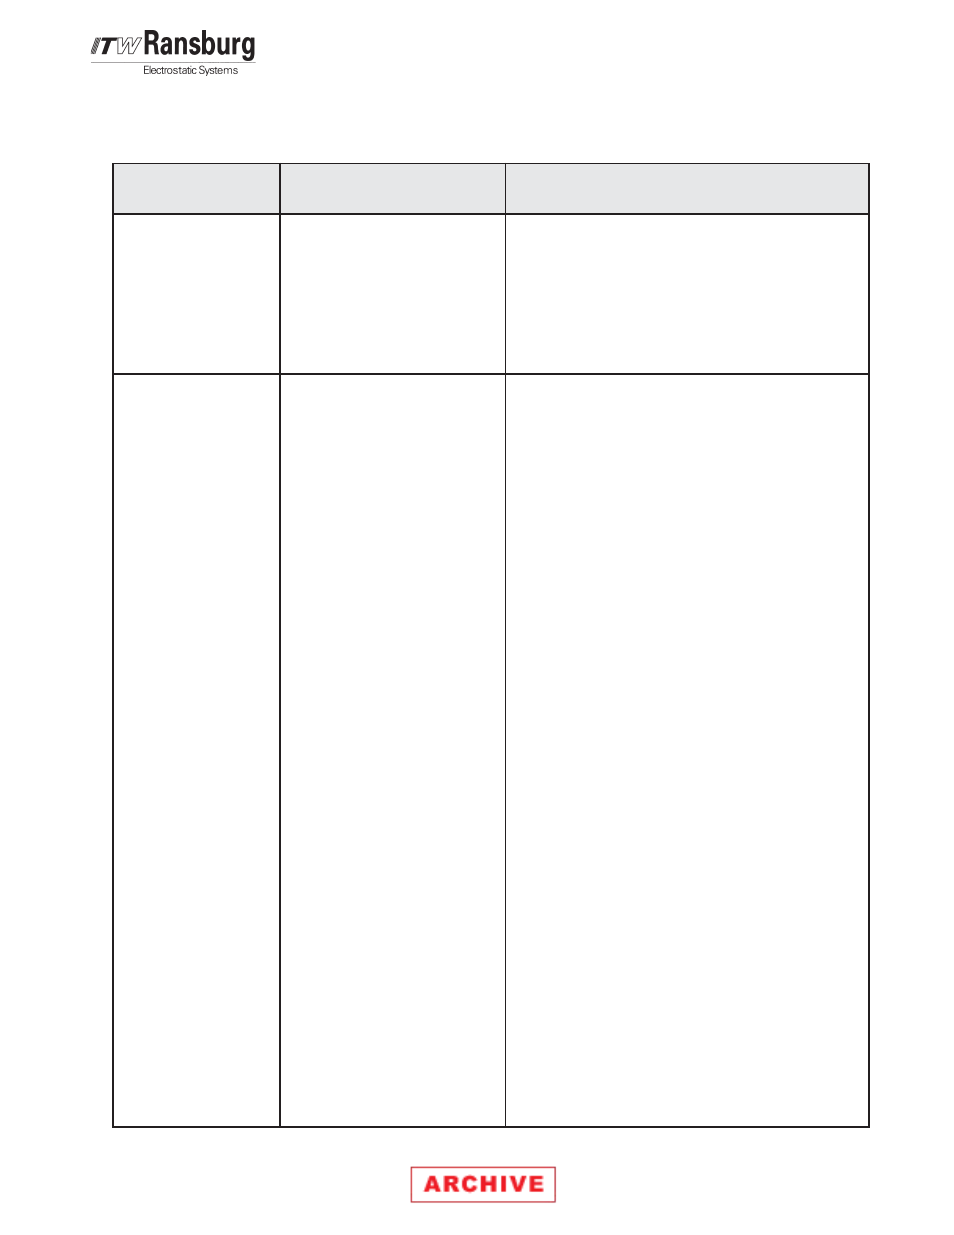
Figure 15: Troubleshooting Guide
Figure 15: Troubleshooting Guide
Figure 15: Troubleshooting Guide
Figure 15: Troubleshooting Guide
Figure 15: Troubleshooting Guide
General Problem
General Problem
General Problem
General Problem
General Problem
Possible Causes
Possible Causes
Possible Causes
Possible Causes
Possible Causes
Corrective Action
Corrective Action
Corrective Action
Corrective Action
Corrective Action
Bad Spray Pattern
Low or No High
Voltage
1.
Bell cup damaged
2.
Low voltage
3.
Bad fluid regulator
4.
Paint lodged in shaping air
ring.
1.
High current draw
2.
Solvent valve is actuated
3.
Loss of high voltage con-
nection at the power supply
4.
Loss of high voltage con-
nection at the resistor
module
5.
Loss of high voltage con-
nection at the turbine
assembly
6.
Power supply failure
7.
Improper limiting current
and voltage settings
8.
Atomizer grounding out
(usually indicated by high
current draw)
9.
Damaged high voltage
cable
between atom-
izer and
power supply
10. Improper color change
(i.e., paint or solvent in
dump line)
1.
Replace bell cup.
2.
See "low or no voltage" below.
3.
Repair or replace fluid regulator.
4.
Disassemble and clean.
1.
Paint resistivity to be .1 M
Ω to ∞.
2.
Remove solvent valve air pilot signal (high volt-
age must be interlocked with the solvent valve
air pilot signal to prevent solvent flow while
high
voltage is energized).
3.
Ensure proper high voltage connection at the
power supply. Refer to "Low Voltage Test" in
the "Weekly Maintenance" section of this
manual.
4.
Verify high voltage connection into the resistor
module. Refer to "Low Voltage Test" in the
"Weekly Maintenance" section of this manual.
5.
Verify high voltage tube connection into the
turbine housing and resistor module. Refer to
"Low Voltage Test" in the "Weekly Mainte-
nance" section of this manual.
6.
Refer to the power supply manual for detailed
troubleshooting guide.
7.
To readjust settings, refer to the power supply
manual.
8a. Clean atomizer externally with nonpolar
solvent.
b. Check the atomizer for internal fluid leaks.
c. Check for internal arcing (usually indicated by
internal sparking sounds).
9.
Repair or replace high voltage cable.
10. Optimize color change.