Troubleshooting guide, Archive, Rem automatic applicator - maintenance – Ransburg REM Automatic Applicator 73499 User Manual
Page 23
AA-87-02.3
1 8
1 8
1 8
1 8
1 8
REM Automatic Applicator - Maintenance
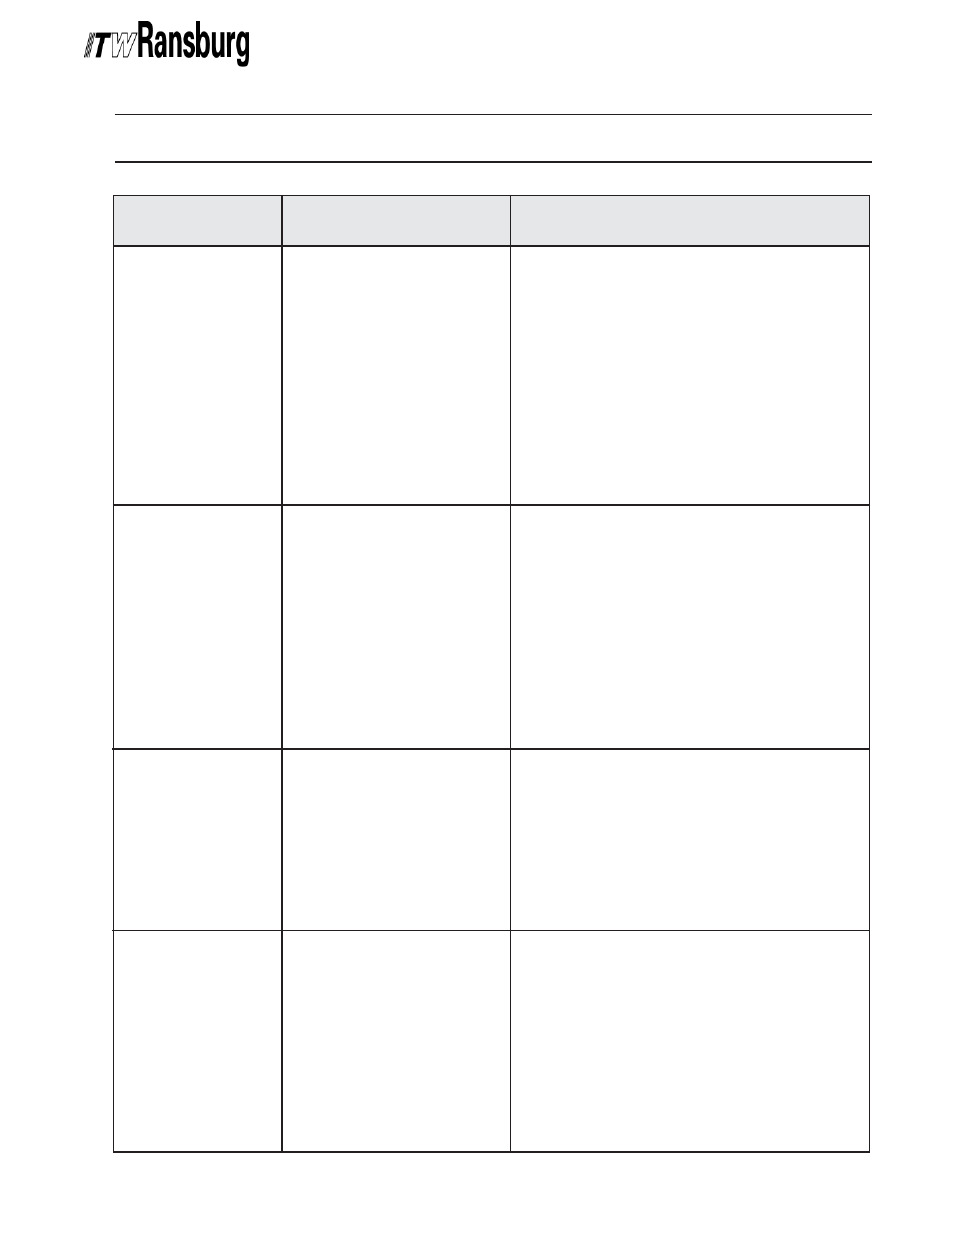
TROUBLESHOOTING GUIDE
TROUBLESHOOTING GUIDE
TROUBLESHOOTING GUIDE
TROUBLESHOOTING GUIDE
TROUBLESHOOTING GUIDE
General Problem
General Problem
General Problem
General Problem
General Problem
Possible Causes
Possible Causes
Possible Causes
Possible Causes
Possible Causes
Corrective Action
Corrective Action
Corrective Action
Corrective Action
Corrective Action
Poor Atomization
Poor Atomization
Poor Atomization
Poor Atomization
Poor Atomization
and Distribution
and Distribution
and Distribution
and Distribution
and Distribution
Poor Wrap-Around
Poor Wrap-Around
Poor Wrap-Around
Poor Wrap-Around
Poor Wrap-Around
Paint Wraps Back
Paint Wraps Back
Paint Wraps Back
Paint Wraps Back
Paint Wraps Back
On Applicator and
On Applicator and
On Applicator and
On Applicator and
On Applicator and
Mounting
Mounting
Mounting
Mounting
Mounting
(Machine)
(Machine)
(Machine)
(Machine)
(Machine)
No Paint Delivery
No Paint Delivery
No Paint Delivery
No Paint Delivery
No Paint Delivery
1. Partially clogged nozzle
2. Low fluid pressure
3. Viscosity too high
4. Improper nozzle
5. Badly worn nozzle
6. High voltage electrode bent
7. Low shaping air pressure
1. Poor atomization
2. Excessive exhaust velocity
3. Excessive fluid pressure
4. Applicator too close to target
5. Paint too conductive
6. Poor target ground
1. Poor ground on parts
2. Applicator too far from parts
3. Booth exhaust insufficient or
improperly rounted
4. Improper spray technique
1. Clogged nozzle
2. Clogged hose or filters
3. No pressure at paint pump
1. Clean out.
2. Increase pump air pressure.
3. Try nozzle with narrower fan or smaller orifice.
4. Try nozzle with narrower fan or smaller orifice.
5. Replace.
6. Straighten electrode or replace nozzle assembly.
7. Readjust shaping air pressure.
1. See above.
2. Reduce (within code limits).
3. Reduce air pressure to pump.
4. Move applicator further back.
5. Consult ITW Ransburg for technical assistance.
6. Check ground integrity from target through sup-
port to ground.
1. Check that parts are fully grounded, strip
workholders.
2. Move applicator closer.
3. Increase or adjust direction. Change booth filter.
4. Keep applicator directed at work.
1. Blow out nozzle.
2. Clean.
3. If pump air supply OK, consult pump manual.
ARCHIVE