Finish Thompson DB3, 4, 5 & 5.5 Series User Manual
Page 8
Motor/Electrical
Install the motor according to NEC requirements and local electri-
cal codes . The motor should have an overload protection circuit .
Wire the motor for counter-clockwise rotation when facing the
fan end of the motor .
CAUTION: Do not operate the pump to check rotation until
the pump is full of liquid .
Check all electrical connections with the wiring diagram on the
motor . Make sure the voltage, frequency, phase and amp draw
comply with the supply circuit .
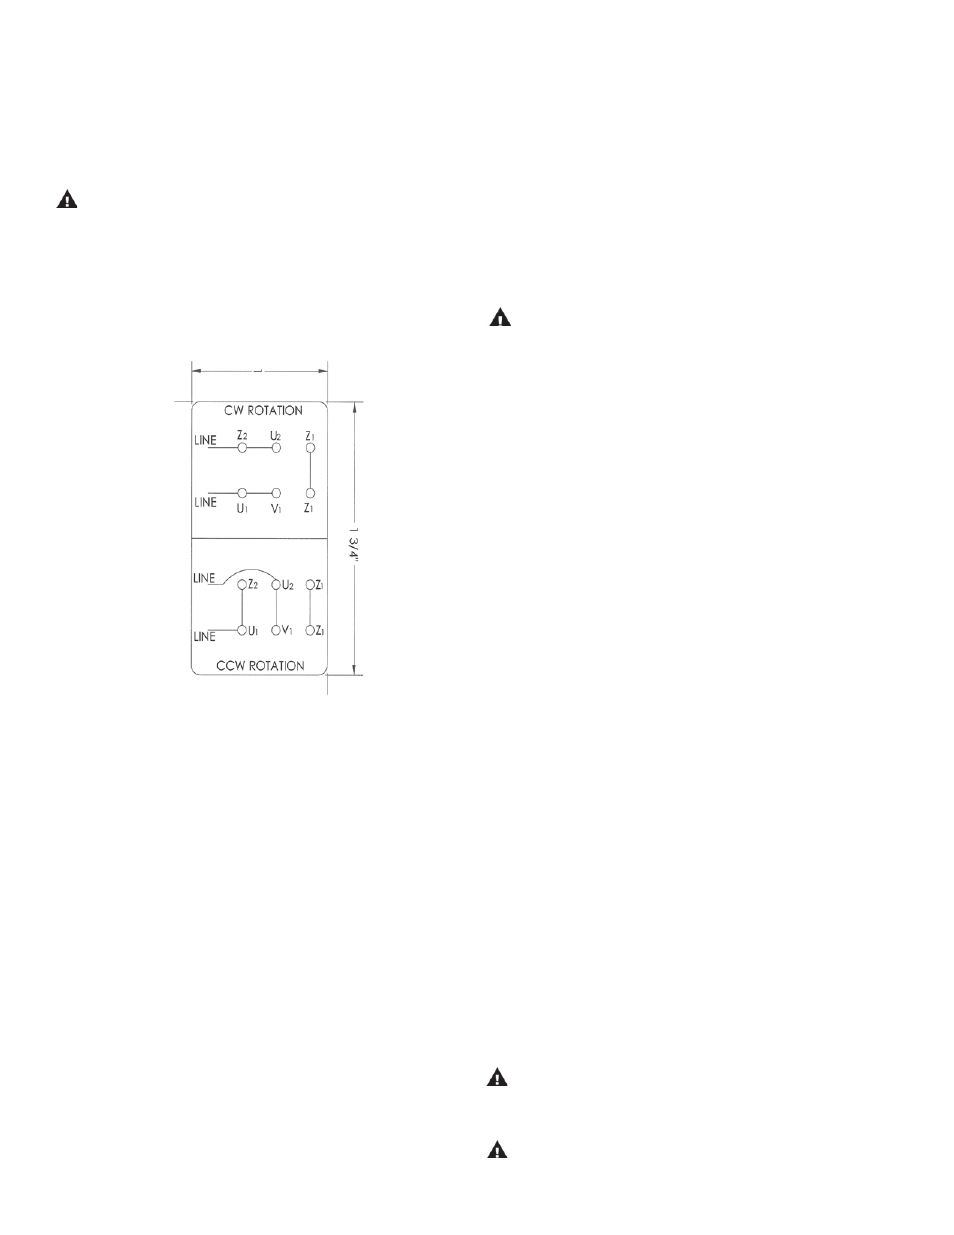
If motor is supplied by Finish Thompson please use the following
wiring diagram:
If utilized, verify that the power monitor has been properly
installed according to the manufacturers instructions .
To verify correct rotation of the motor:
1 . Install the pump into the system .
2 . Fully open the suction and discharge valves .
3 . Allow fluid to flow into the pump . Do not allow the pump to
run dry . PTFE or ceramic bushings can’t be run dry without
damage to pump components .
4 . Jog the motor (allow it to run for 1-2 seconds) and observe
the rotation of the motor fan . Refer to the directional arrow
molded into the housing .
NOTE: A pump running backwards will pump but at a greatly
reduced flow and pressure .
Section III - Start- up and Operation
1 . This pump must be filled from a flooded suction tank (grav-
ity) or primed with liquid from an outside source . DB Series
pumps are not self-priming .
2 . Open the inlet (suction) and discharge valves completely and
allow the pump to fill with liquid .
3 . Close the discharge valve .
4 . Turn the pump on . Slowly open the discharge valve . Adjust
the flow rate and pressure by regulating the discharge valve .
Do not attempt to adjust the flow with the suction valve .
5 . Use of a power monitor is strongly recommended for pumps
with PTFE bushings . The power monitor will stop the pump
and help prevent damage if the pump should run dry .
Shutdown
Use the following procedure to shutdown the pump .
1 . Slowly close the discharge valve .
2 . Turn off the motor .
3 . Close the suction valve .
Flush Systems
CAUTION: Some fluids react with water; use compatible flush-
ing fluid .
1 . Turn off the pump .
2 . Completely close the suction and discharge valves
3 . Connect flushing fluid supply to flush inlet valve .
4 . Connect flushing fluid drain to flush drain valve .
5 . Open flushing inlet and outlet valves . Flush system until the
pump is clean .
Section IV - Maintenance
Recommended Maintenance Schedule
The recommended maintenance schedule depends upon the na-
ture of the fluid being pumped and the specific application . If the
pump is used on a clean fluid, it is recommended that the pump
be removed from service and examined after six months of op-
eration or after 2,000 hours of operation . If the pump is used on
fluids with solids, high temperatures, or in other conditions that
could cause accelerated wear, then this initial examination should
be sooner .
After the initial examination of the internal components and wear
items are measured, a specific maintenance schedule can be de-
termined . For best results, it is recommended that the pump be
removed from service annually for examination .
Section V - Disassembly
WARNING: Rotating Parts . This pump has components that
rotate while in operation . Follow local safety standards for locking
out the motor from the power supply during maintenance or service .
WARNING: Chemical Hazard . This pump is used for trans-
ferring many types of potentially dangerous chemicals . Always
5