Reset – E-Mon E-MM-RTU-D-N User Manual
Page 30
Chapter 3 Multi-Mon Display Operations
Menu Operations
30
Multi-Mon
Multiple Circuit Energy Monitor
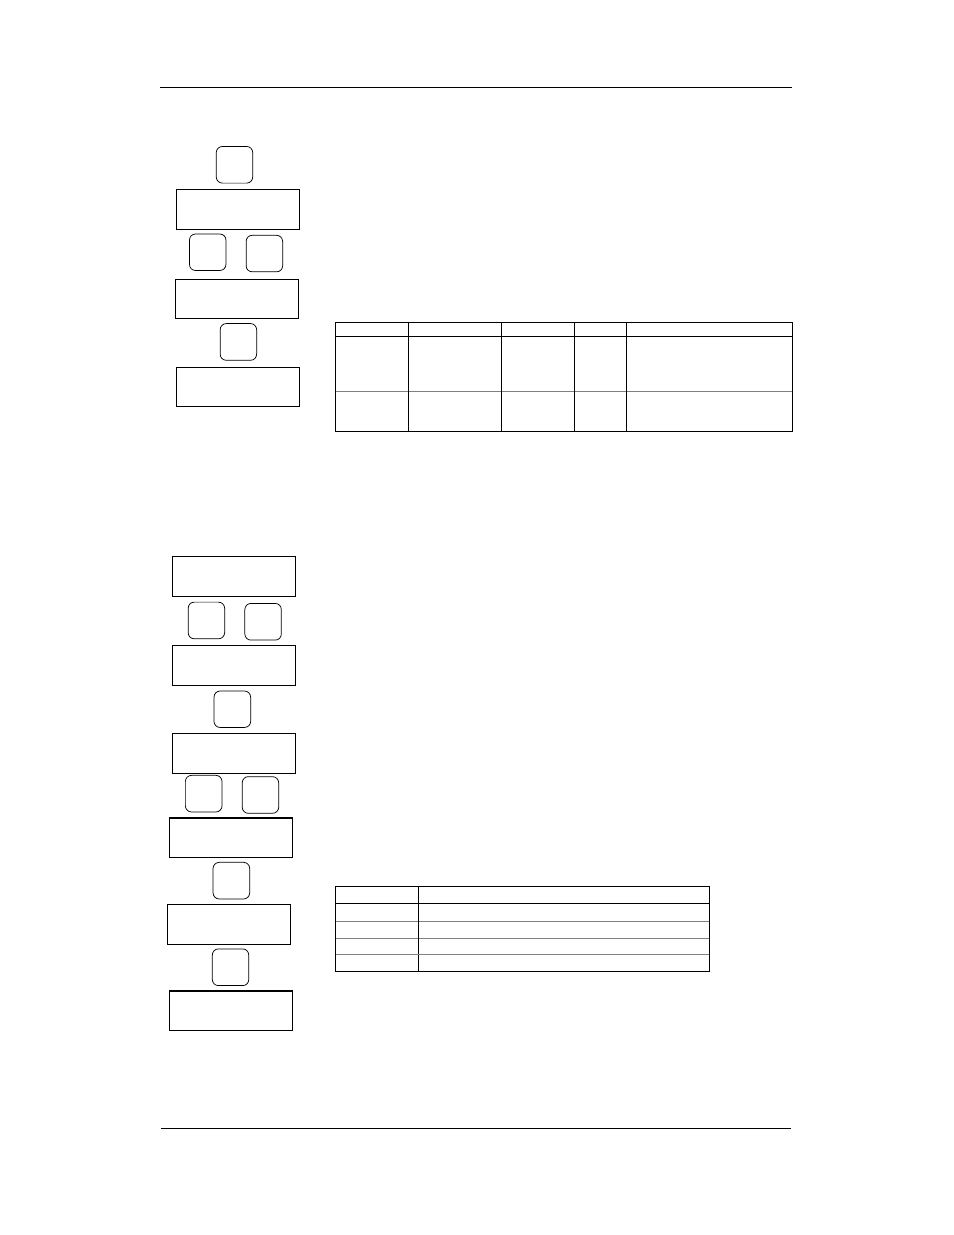
2. To link a current input to a submeter, select the desired input ID with the
UP/DOWN buttons.
3. To change the CT primary rating, highlight desired digits by briefly
pressing the SELECT button, then adjust them to the desired value with
the UP/DOWN buttons.
4. Press the ENTER button to store your selection. You return to the
parameter list to select another parameter or return to the main menu.
To exit the menu, highlight the menu name (upper-left item) with the
SELECT button, and then press the ENTER button.
The following table lists available options.
Label
Label
Label
Label
Parameter
Parameter
Parameter
Parameter
Options
Options
Options
Options
Default
Default
Default
Default
Description
Description
Description
Description
Phase L1
Phase L1
Phase L1
Phase L1
Phase L2
Phase L2
Phase L2
Phase L2
Phase L3
Phase L3
Phase L3
Phase L3
Phase current
input terminal
number
I1–I36,
None = not
connected
See
note
1
Links a current input terminal
to the corresponding
submeter’s phase voltage
input V1, V2 or V3
CT
CT
CT
CT
CT primary
current
2
1-10000 A
50 A
Specifies the primary rating of
the submeter current
transformers
1
The device is pre-configured for twelve three-phase submeters.
2
Specify the CT ratings assuming a ×200% device inputs overrange. The
device inputs are preset for 100A current transformers with a 50A primary
rating.
Reset
Reset
Reset
Reset
This menu allows you to reset maximum demands in each submeter and to
clear the device diagnostics.
To enter the menu, select the Reset entry from the main menu, and then
press the ENTER button.
To reset the desired registers:
1. Highlight the upper-right item by briefly pressing the SELECT button.
2. Select the submeter you are going to clear with the UP/DOWN buttons.
3. Highlight the lower-left item by pressing the SELECT button.
4. Scroll through the list with the UP/DOWN buttons until the desired entry
appears.
5. Press the SELECT button to highlight the lower-right item.
6. Press and hold the ENTER button for 5 seconds. The “Do” entry is
replaced with “Done” showing the operation is complete.
To exit the menu, highlight the menu name (upper-left item) with the
SELECT button, and then press the ENTER button.
The following table lists reset options.
Label
Label
Label
Label
Parameter
Parameter
Parameter
Parameter
Diag.
Diag.
Diag.
Diag.
Clears device diagnostics status
Pow.Dmd
Pow.Dmd
Pow.Dmd
Pow.Dmd
Clears maximum power demands
Amp.Dmd
Amp.Dmd
Amp.Dmd
Amp.Dmd
Clears maximum ampere and volt demands
Max.Dmd
Max.Dmd
Max.Dmd
Max.Dmd
Clears all maximum demands
Reset
SM 1
Diag.
Do
Reset
SM 4
Diag.
Do
Reset
SM 4
Diag.
Do
Reset
SM 4
Pow.Dmd
Do
ENTER
Reset
SM 4
Pow.Dmd
Do
SELECT
SELECT
Reset
SM 4
Pow.Dmd
Done
SELECT
SubMeter SM 4
Phase L1
I1
SubMeter SM 4
Phase L1 I10
ENTER
SubMeter SM 4
Phase L1 10