Using the diffraction grating, Aligning the grating – PASCO SP-9268A STUDENT SPECTROMETER User Manual
Page 9
5
012-02135F
Student Spectrometer
¨
Using the Diffraction Grating
IMPORTANT: The Diffraction Grating is a deli-
cate component. Be careful not to scratch the sur-
face and always replace it in the protective foam
wrapping when it is not being used.
Aligning the Grating
To accurately calculate wavelengths on the basis of dif-
fraction angles, the grating must be perpendicular to the
beam of light from the collimator.
1. Align and focus the spectrometer as described earlier.
The telescope must be directly opposite the collima-
tor with the slit in sharp focus and aligned with the
vertical cross-hair.
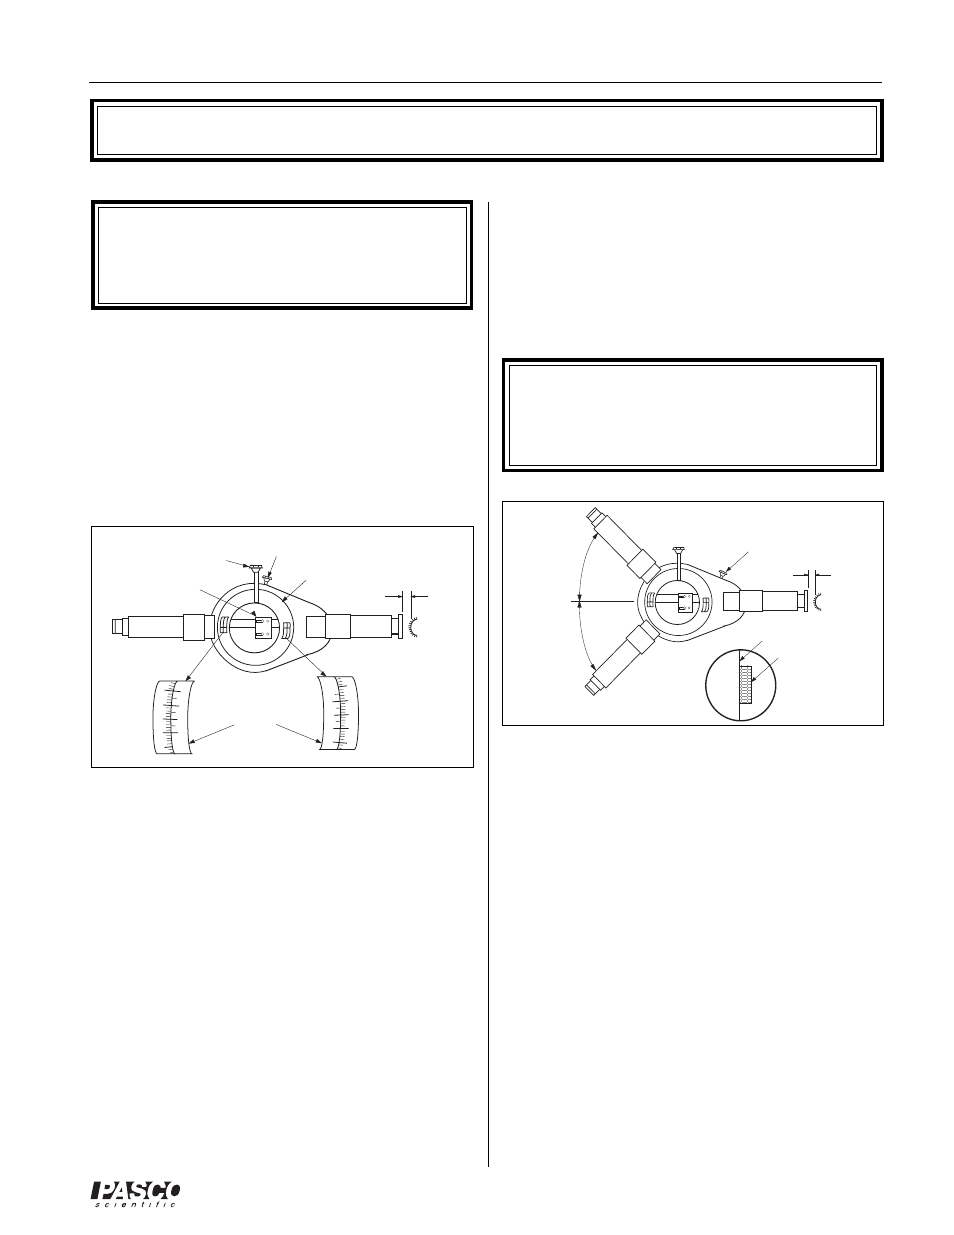
Figure 7
Perform steps 2-5 with reference to Figure 7.
2. Loosen the spectrometer table lock-screw. Align the
engraved line on the spectrometer table so that it is,
as nearly as possible, colinear with the optical axes of
the telescope and the collimator. Tighten the lock-
screw.
3. Using the thumbscrews, attach the grating mount so
it is perpendicular to the engraved lines.
4. Insert the diffraction grating into the clips of the
mount. To check the orientation of the grating, look
through the grating at a light source and notice how
the grating disperses the light into its various color
components. When placed in the grating mount, the
grating should spread the colors of the incident light
horizontally, so rotation of the telescope will allow
you to see the different colored images of the slit.
5. Place a light source (preferably one with a discrete
spectrum, such as a mercury or sodium lamp) ap-
proximately one centimeter from the slit. Adjust the
slit width so the slit image is bright and sharp. If nec-
essary, adjust the height of the spectrometer table so
the slit image is centered in the field of view of the
telescope.
IMPORTANT: Stray light can obscure the im-
ages. Use the spectrometer in a semi-darkened
room or drape a sheet of opaque material over the
spectrometer.
LIGHT
SOURCE
TABLE ROTATION
LOCK-SCREW
ª 1 cm
10
0
190
180
30
20
10
0
30
20
10
0
GRATING AND MOUNT
SPECTROMETER
TABLE BASE
SPECTROMETER TABLE
LOCK-SCREW
VERNIER
SCALES
Figure 8
LIGHT
SOURCE
ª 1 cm
ANGLE OF
DIFFRACTION
ZERO
DIFFRACTION
ANGLE OF
DIFFRACTION
SLIT IMAGE
VERTICAL CROSS-HAIR
VIEW THROUGH
TELESCOPE
TABLE ROTATION FINE
ADJUST KNOB
Perform steps 6-9 with reference to Figure 8.
6. Rotate the telescope to find a bright slit image. Align
the vertical cross-hair with the fixed edge of the im-
age and carefully measure the angle of diffraction.
(See the previous section, Measuring Angles of Dif-
fraction.)
7. The diffraction grating diffracts the incident light into
identical spectra on either side of the line of the un-
diffracted beam. Rotate the telescope back, past the
zero diffraction angle, to find the corresponding slit
image. Measure the angle of diffraction for this im-
age.
8. If the grating is perfectly aligned, the diffraction
angles for corresponding slit images will be identical.
If not, use the table rotation fine adjust knob to com-
pensate for the difference (i.e.; to align the grating
perpendicular to the collimator beam so the two
angles will be equal).