Assemblage/installation, Tv stand assembly/installation – Level Mount ELTVS60 User Manual
Page 9
40
www.levelmount.com
1-888-229-1459
EU: +44 844 5672657
UK: 0844 5672657
©2011 Level Mount - Patents Pending
Assemblage/Installation
Étape 1 – Choix du matériel approprié en fonction de
la surface arrière du téléviseur
Avant de commencer l’installation, il faut déterminer si l’arrière du téléviseur
est plat, concave ou convexe tel qu’illustré en Figure 1. Si votre téléviseur
a une surface arrière convexe ou concave, vous pourriez avoir besoin
d’utiliser les entretoises (Sachet 5) comme illustrées dans la Figure 5 ou
dans la Figure 6. L’entretoise est utilisée pour remplir la zone convexe ou
concave du téléviseur de manière à ce que le support du téléviseur soit
entièrement supporté et s’encastre avec l’arrière du téléviseur.
Arrière plat
Arrière Concave
Figure 1
Étape 2 – Installation du bras de rallonge (si
nécessaire)
Si les trous des bras fixes ou inclinables ne sont pas alignés avec les trous
qui se trouvent à l’arrière du téléviseur, ne percez pas. Au lieu de cela,
suivez ces instructions pour l’installation du bras de rallonge. Sinon, passez
à l’étape 3.
Remarque:
en cas d’utilisation des bras de rallonge, les bras de
rallonge peuvent être utilisés pour des téléviseurs qui ont un
emplacement de trou vertical VESA de plus de 370 mm ; et lors
de l’utilisation des bras inclinables, les bras de rallonge peuvent
être utilisés avec un trou vertical VESA plus grand que 500 mm.
Le manuel de votre téléviseur/les étiquettes de produit devraient
préciser l’espacement des trous VESA.
Étape 2b – Fixation de bras de rallonge complète
Les 4 bras de rallonge doivent être attachés de la même manière. Une
fois la fixation complète, vos bras fixes ou inclinables, avec les bras de
rallonge attachés, doivent ressembler à la photo de la Figure 3.
Étape 2a – Attacher le bras de rallonge aux bras fixes
ou inclinables
Attachez le bras de rallonge aux bras fixes ou inclinables en utilisant le
matériel suivant comme montré dans la Figure 2 :
• Boulons M5 (Sachet 7)
• Rondelle frein M5 (Sachet 7)
• Bras de rallonge
• Bras fixe ou inclinable
• Écrou M5 (Sachet 7)
Ajustez le boulon de la Figure 2 pour déplacer le bras de rallonge afin qu’il
soit aligné avec les trous qui se trouvent à l’arrière du téléviseur.
Figure 2
Extension bras articulé
M5 Joint de verrouillage
M5Joint de verrouillage
M5 Écrou hexagonal
M5 Boulon
M5 Boulon
Figure 3
M5 Écrou hexagonal
Bras de rallonge inférieur
Bras de rallonge supérieur
Bras fixe/rotatif
Bras fixe/rotatif
Bras fixe / rotatif
9
www.levelmount.com
1-888-229-1459
EU: +44 844 5672657
UK: 0844 5672657
©2011 Level Mount - Patents Pending
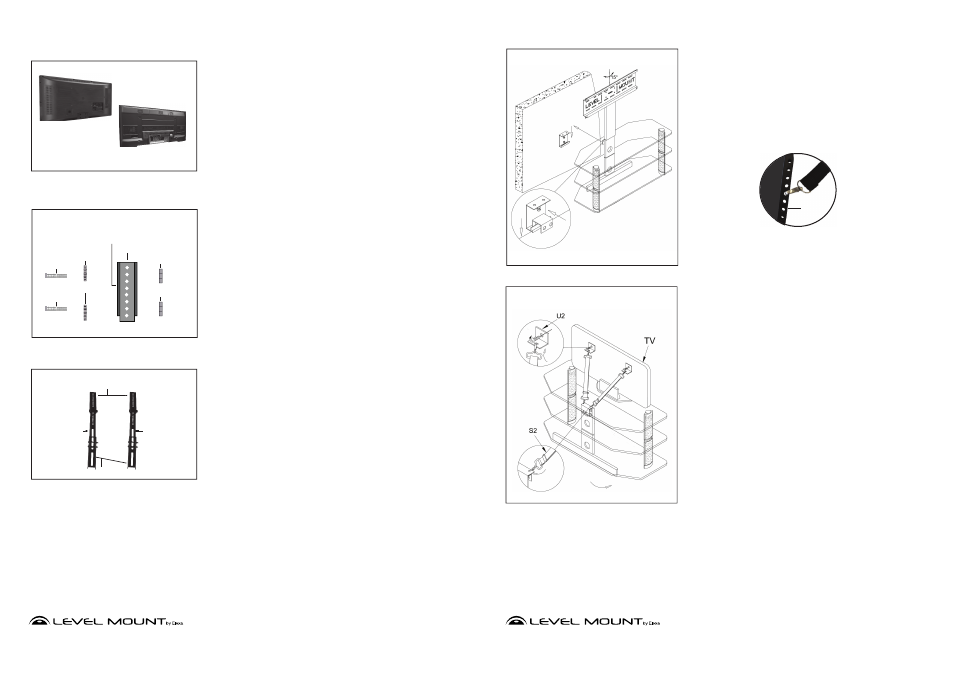
TV Stand Assembly/Installation
Step 22
- To attach TV Stand to Wall Bracket (U) -This will require
two people- lift TV Stand so the Flat Bracket (T) is level with the center
of the Wall Bracket (U). Slowly move the TV Stand closer to the wall so
the Flat Bracket (T) hovers above the lower lip of the Wall Bracket (U).
Gently hook the Flat Bracket into the slot of the Wall Bracket (U) and
lower until TV Stand rests on the floor.
Note -
If desired TV position is not located
directly in front of a drywall
stud, attach the Wall Bracket (U) to the nearest drywall stud in the
vicinity of the TV stand. Once TV is mounted on the stand (instructions
begin on page 10), clip one end of each Safety Strap (S2) into a hole in
the Wall Bracket (U) and the other ends into any of the holes in the arms
which will be attached to the TV (Figure 8A).
Figure 8
Figure 9
Step 23 - FOR ELTVS55
, ELTVS60
To secure TV to TV Stand,
attach TV Brackets (U2) to the back of the Flat Panel TV using the
correct bolts and washers that fit the TV.
Note: Manufacturers drill holes in the backs of TVs to be used to
attach wall mounting products.
Step 24
- Latch clasps of Safety Straps (S2) into the holes on the top
of the Flat Bracket (T). Connect the other ends of the Safety Straps (S2)
into the holes of the TV Brackets (U2).
Figure 8A
Back
of TV
Tilt
Arm