Montage / installation du socle télé, Attaching arms to the back of the flat panel tv – Level Mount ELTVS60 User Manual
Page 11
38
www.levelmount.com
1-888-229-1459
EU: +44 844 5672657
UK: 0844 5672657
©2011 Level Mount - Patents Pending
Montage / Installation du Socle télé
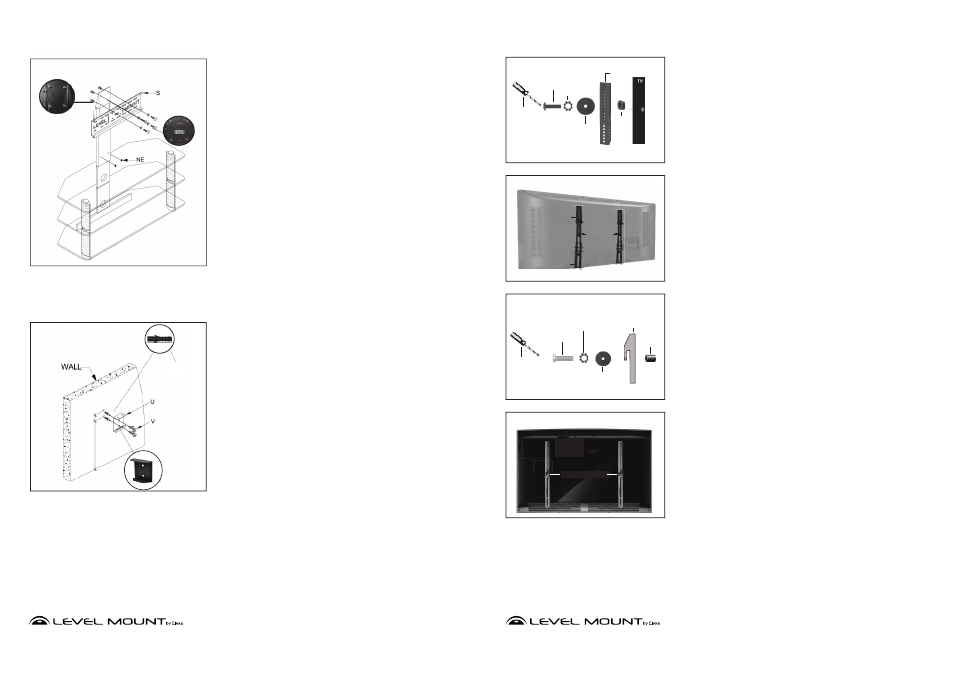
Étape 20 – Fixer le support télé (S) au support (X) à l’aide des quatre
vis M8 de 30 mm, des 2 rondelles et des écrous hexagonaux (R).
Remarque : Utiliser le niveau à bulle intégré pour garantir le bon
positionnement du support télé (S).
Étape 21 – Pour fixer le support mural (U), repérer l’emplacement
mural dans la pièce où vous monterez le socle. Mesurer 58,4 cm (23
po.) à partir du sol et utiliser un crayon pour marquer l’emplacement
sur le mur. Tenir le support mural à plat contre le mur de manière à ce
que la marque au crayon soit directement au centre du trou supérieur
du support. Faire une autre marque au crayon au centre du trou
inférieur du support mural (U).
Remarque : Une fois l’emplacement mural sélectionné, utiliser le
détecteur de montant inclus pour vérifier s’il y a un montant derrière le
mur à l’emplacement souhaité pour l’installation. Si c’est le cas, il n’est
pas nécessaire d’utiliser les chevilles pour béton car les tirefonds (V)
peuvent être vissés directement dans le montant à travers le mur.
Étape 21A – Mettre le support mural (U) de côté. Percer 2 trous dans
le mur aux emplacements marqués au crayon, comme montré à la
figure 7. Lors du perçage des trous destinés aux chevilles pour béton,
utiliser une perceuse électrique avec une mèche de 3/16 po.
Étape 21B – Insérer les chevilles pour béton dans les trous. Les
insérer au ras du mur en avec un marteau.
Étape 21C – Pour fixer le support mural (U), insérer les tirefonds
et les rondelles (V) dans chaque cheville pour béton à travers la
plaque murale (U) comme montré à la figure 7. Visser assez fort pour
garantir une fixation sécurisée, mais ne pas trop serrer pour éviter
d’endommager le support ou les vis.
Figure 7
2”
23”
U
Figure 7
Figure 6
R
P2
11
www.levelmount.com
1-888-229-1459
EU: +44 844 5672657
UK: 0844 5672657
©2011 Level Mount - Patents Pending
Step 3 – Attaching the Fixed or Tilt TV Arms to Back of
TV
There are bolts of varying lengths included in this package, located in (Bags 1
through 5). Please use the bolt with the appropriate length for your TV.
Small TVs need the following hardware: (For most TVs under 50’’ or 127cm)
(Figure 7)
• Bolt M4 (Bag 1) or Bolt M5 (Bag 2)
• Lock Washer M4 (Bag 1) or Lock Washer M5 (Bag 2)
• Washer 19mm x 5.3mm x 1.2mm (Bag 5)
• An additional Washer may be needed to prevent the bolt head from
recessing into the back of the TV
• Fixed or Tilt Arm
• Spacer (Bag 5) Only needed if the TV has a recessed back.
Large TVs need the following hardware: (For most TVs over 50’’ or 127cm)
(Figure 7)
• Bolt M6 (Bag 3) or Bolt M8 (Bag 4)
• Lock Washer M6 (Bag 3) or Lock Washer M8 (Bag 4)
• Fixed or Tilt Arm
• Spacer (Bag 5) Only needed if the TV has a recessed back.
To attach the TV arms to the back of the TV, place the 2 bolts for each arm
through the holes of the TV Arms and carefully thread them into the holes in
the back of the TV. If there is any resistance remove the bolt immediately and
select the correctly sized bolt that enables a secure and snug fit. Tighten the
bolts snugly to the back of the TV as shown in Figure 7.
Caution: Only tighten bolts until they are secure, do not over-tighten.
Attaching Arms to the Back of the Flat Panel TV
Figure 4
Only use Spacer if TV has a recessed back
Extension Arm
Washer
19.05mm x 5.3mm x
1.2mm
M4/M5/M6
or M8 Lock
Washer
M4/M5/M6
or M8 Bolt
Phillips
Screwdriver
Spacer
k
S
Step 2c - Attaching Extension Arms to the back of the
TV
Small TVs need the following hardware: (For most TVs under 50’’ or 127cm)
• Bolt M4 (Bag 1) or Bolt M5 (Bag 2)
• Lock Washer M4 (Bag 1) or Lock Washer M5 (Bag 2)
• Washer 19.05mm x 5.3mm x 1.2mm (Bag 5)
• An additional Washer may be needed to prevent the bolt head from
recessing into the back of the TV
• Extension
Arm
• Spacer (Bag 5) The spacers are only needed if TV has a recessed back.
Large TVs need the following hardware: (For most TVs over 50’’ or 127cm)
• Bolt M6 (Bag 3) or Bolt M8 (Bag 4)
• Lock Washer M6 (Bag 3) or Lock Washer M8 (Bag 4)
• Extension
Arm
• Spacer (Bag 5) The spacers are only needed if TV has a recessed back.
To attach the TV arms to the back of the TV, place the 2 bolts for each arm
through the holes of the TV Arms and carefully thread them into the holes in
the back of the TV. If there is any resistance remove the bolt immediately and
select the correctly sized bolt that enables a secure and snug fit. Tighten the
bolts snugly to the back of the TV as shown in Figure 5.
Figure 6
Only use Spacer if TV has a recessed back.
M4/M5/M6/
M8 Bolt
M4/M5/M6/
M8
Lock Washer
Washer
19mm x 5.3mm x 1.2mm
Fixed or
Tilt Arm
Spacer
Phillips
Screwdriver
Figure 7
Flat Back TV
Fixed/Tilt Arms
Fixed/Tilt Arms
Figure 5
TV
Upper
Extension
Arms
Lower
Extension
Arms
Fixed or
Tilt Arms