Assembly, Start-up – Burkert Type BBS-11 User Manual
Page 3
5
6. ASSEMBLY
WARNING!
Danger – high pressure and discharge of medium!
• When working on the product or the system, always switch off the
pressure and relieve the lines/containers.
• Wear protective equipment if media is hazardous.
Risk of injury from improper assembly!
• Installation must only be carried out by authorized technicians and
with the appropriate tools!
• Secure system from unintentional activation.
6.1. Welding in the safety ingold socket
NOTE!
Leak due to damaged sealing elements!
• Do not weld in the assembled product. It is essential to remove
the plug before welding and protect it from dust, flying sparks and
other influences!
Leak due to damaged sealing contour!
• To ensure the sealing function, protect the sealing contour during
installation, welding and cleaning procedures.
• When reworking the welded-in ingold socket, the sealing contour
must not be damaged.
• The inner diameter
Di of ingold socket has to be machined
to 25H7 respectively 40H7 after welding.
• Welding in and reworking of the safety ingold socket may be
carried out only by adequately trained professionals!
→
Connect the parts positively in a protective gas shield.
When cleaning the weld seam by grinding or acid cleaning, observe
the following before assembling the connection:
• Carefully remove all grinding dust and acid-cleaning residue.
• Do not damage the label.
• There must be no material abrasion on the sealing edges. Material
abrasion will result in sharp-edged sealing contours and a damaged
seal.
• Check sealing contour for damage.
We recommend preparing a welding report.
english
6
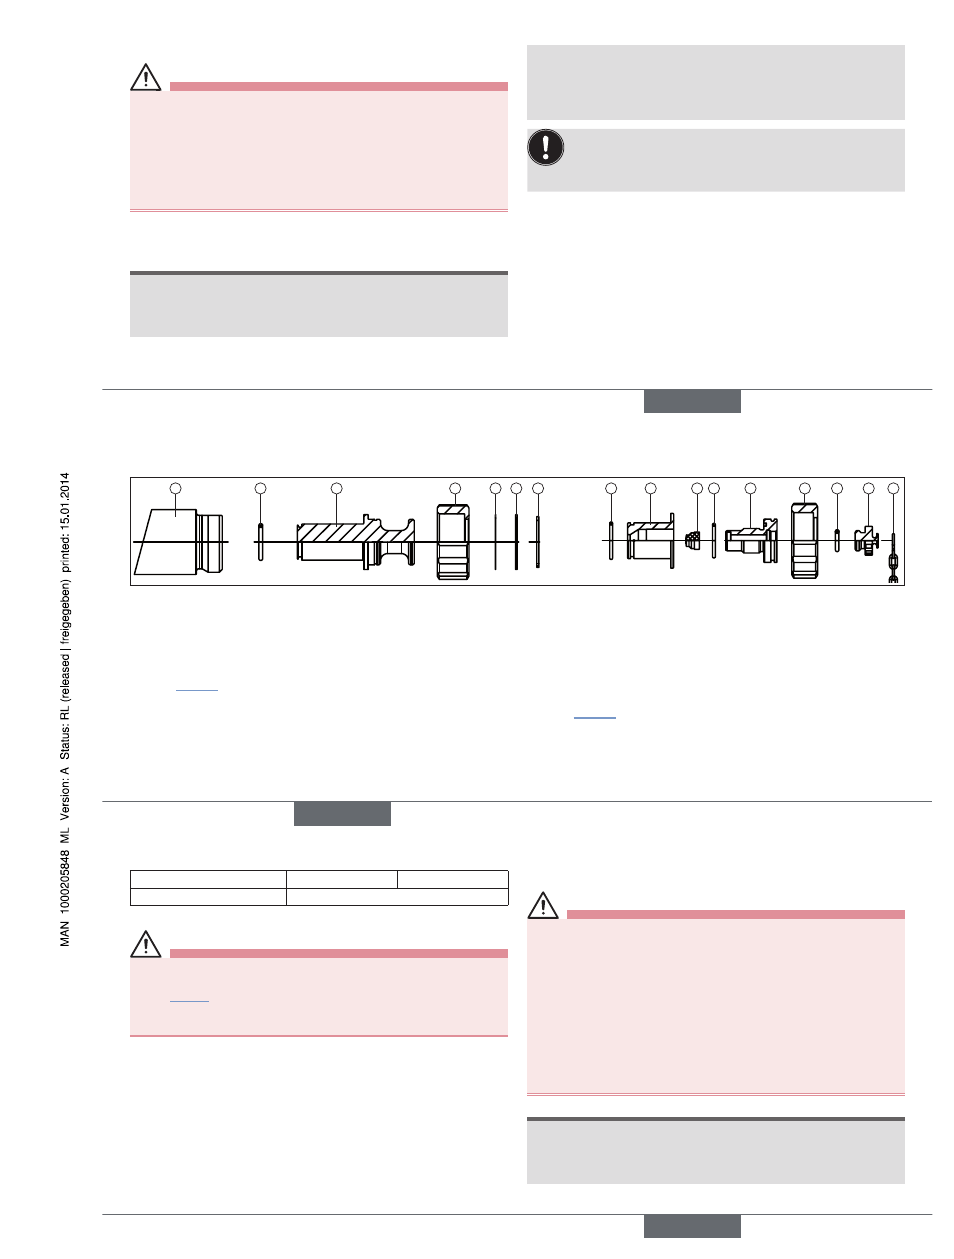
6.2. Assembly of dummy plug and Asepto sampling socket
1
2
3
4
5
6
7
2
8
9 10
11
12
13
14
4
Dummy plug
Asepto sampling socket
Fig. 2:
Assembly of dummy plug and Asepto sampling socket Type BBS-11
→
Push the diaphragm (9) forward to the limit stop in the sampling
socket (11) and screw the socket tightly to the sampling ingold (8).
Attention: This screw connection may not be loosened during
operation or when under pressure!
→
Push this assembly into the welded-in socket (1) and screw
down securely, using the union nut (4). Observe tightening torque
(see “Tab. 2”). Attention: This screw connection may not be
loosened during operation or when under pressure!
→
Screw the locking element (13) onto the sampling socket. This is
the only screw connection that may be opened during operation
(for the purpose of sampling). The chain (14) prevents that the
locking element gets lost.
Dummy plug
→
Ensure the correct position of the O-ring (2) on the dummy ingold
(3). Screw the dummy ingold into the welded-in ingold socket
(1) to lock it, using the union nut (4). Observe tightening torque
(see “Tab. 2”).
This way, sampling is no longer possible.
Shim ring (5), spacer ring (6) and retaining ring (7) have already been
mounted in the supplied state and should not be removed.
Asepto sampling socket
→
Before screwing the ingold socket in, ensure the presence and
correct position of the O-rings (2, 10, 12).
english
7
Orifice (DN)
25
40
Tightening torque (Nm)
hand-tight
Tab. 2: Tightening torque of union nut Type BBS-11 ingold socket
WARNING!
Danger – high pressure and discharge of medium!
• During operation and/or existing pressure, only the sampling cap
(see “Fig. 2”, sketch on the far right with chain) may be opened. It
can be opened with just a few turns.
• All other screw connections may not be loosened in this state.
6.3. Disassembly
Disassembly is in reverse sequence to assembly.
7. START-UP
WARNING!
Risk of injury from improper operation!
Improper operation may result in injuries as well as damage to the
product and the surrounding area.
• Before start-up, ensure that the operating personnel are familiar
with and completely understand the contents of the operating
instructions.
• Observe the safety instructions and intended use.
• Only adequately trained personnel may start up the equipment/the
product.
• Following assembly, ensure a controlled restart.
• When starting up the equipment, ensure that no unauthorized volt-
age increases and pressure surges can occur.
NOTE!
Replace wearing parts in time
• It is the responsibility of the plant operator to ensure the durability
of the wearing parts. Observe that the wearing parts are replaced
in time.
english
Type BBS-11