High elevations, 10" acc, 14" acc – Gotham High Elevations Performance Decorative Pendant 10 and 14 User Manual
Page 2: Aircraft cable and cord mount instructions
8.
Install the lower pendant assembly by engaging the 4 screws located on the
bottom of the ballast housing in the keyhole slots of the white painted bracket.
For HID units without decorative glass, the keyhole slots are located behind the
holes in the upper portion of the reflector. Tighten screws until snug (See
Figure 7). WARNING!!! RISK OF INJURY OR DEATH!!! IF SCREWS ARE NOT
TIGHTENED SECURELY, LOWER PENDANT ASSEMBLY MAY FALL!!
9.
Determine required length of cable and adjust as required. (10 FEET OF CABLE
PROVIDED). It is recommended that the cut end of cable be soldered or glued to
prevent it from fraying.
10. Insert end of the power cord at least 8 inches into the hole located next to the
aircraft cable glider (See Figure 8).
11. Loosen two screws holding the painted cover on the ballast housing, disengag-
ing them from the keyhole slots (See Figure 2). Lift the cover and place it behind
a screw located on the ballast housing bracket (See Figure 3).
12. Determine required length of cord and make necessary cuts (10 FEET OF CORD
PROVIDED).
13. Make required wire connections and tuck all wires inside ballast housing
bracket.
14. Install power cord strain relief on cord jacket just below the hole in the ballast
bracket (See Figure 10). WARNING!!! RISK OF INJURY OR DEATH!!! CABLE
SUPPORTS WEIGHT OF FIXTURE. CORD CANNOT BE USED TO SUPPORT WEIGHT.
IF AIRCRAFT CABLE IS NOT SECURELY ATTACHED TO PENDANT IT MAY FALL!!
15. Reinstall ballast housing cover and tighten screws.
16. Install cord keeper wire ties as required.
17. Install lamp(s) and energize product.
Fixture connections and hanging instructions
Figure 9
Mount-
ing plate
Support
chain
Canopy
Figure 10
Power cord
strain relief
Page 3 of 3
T
R
A
H
C
G
N
I
T
O
O
H
S
E
L
B
U
O
R
T
n
i
m
e
l
b
o
r
p
e
h
t
e
t
a
c
o
l
,
n
o
it
i
d
n
o
c
d
o
o
g
n
i
m
e
e
s
y
e
h
t
fI
.
e
l
u
d
o
m
n
i-
e
m
a
r
f
r
o
p
m
a
l
e
h
t
o
t
e
g
a
m
a
d
e
l
b
i
s
i
v
y
n
a
r
o
f
k
c
e
h
C
.
s
n
o
it
c
a
e
v
it
c
e
r
r
o
c
d
n
a
s
e
s
u
a
c
e
l
b
i
s
s
o
p
f
o
t
s
il
g
n
i
w
o
ll
o
f
e
h
t
m
o
t
p
m
y
S
e
s
u
a
C
e
l
b
i
s
s
o
P
n
o
i
t
c
A
e
v
i
t
c
e
r
r
o
C
O
T
S
L
I
A
F
P
M
A
L
T
H
G
I
L
d
e
z
i
g
r
e
n
e
t
o
n
e
r
u
t
x
if
e
h
t
g
n
i
d
e
e
f
ti
u
c
r
i
C
·
n
o
it
c
e
n
n
o
c
e
l
u
d
o
m
r
o
ti
u
c
r
i
c
n
i
r
o
r
r
e
g
n
i
r
i
W
·
p
m
a
l
y
tl
u
a
F
·
t
u
p
t
u
o
t
s
a
ll
a
b
r
o
e
n
i
L
·
t
s
a
ll
a
b
y
tl
u
a
F
·
w
o
l
o
o
t
e
r
u
t
a
r
e
p
m
e
t
t
n
e
i
b
m
A
·
.
d
e
z
i
g
r
e
n
e
s
i
ti
u
c
r
i
c
t
a
h
t
e
r
u
s
n
e
o
t
e
s
u
f
r
o
r
e
k
a
e
r
b
ti
u
c
r
i
c
k
c
e
h
C
·
e
r
a
s
n
o
it
c
e
n
n
o
c
t
a
h
t
e
r
u
s
n
e
o
t
x
o
b
e
c
il
p
s
e
r
u
t
x
if
e
n
i
m
a
x
E
·
.t
c
e
r
r
o
c
y
l
b
a
r
e
f
e
r
p
,
p
m
a
l
r
e
h
t
o
n
a
e
t
u
ti
t
s
b
u
s
d
n
a
p
m
a
l
y
tl
u
a
f
e
h
t
e
v
o
m
e
R
·
l
a
n
i
g
i
r
o
e
h
t
e
c
a
l
p
e
r
,
s
t
h
g
il
p
m
a
l
e
h
t
fI
.t
h
g
il
o
t
n
w
o
n
k
s
i
t
a
h
t
e
n
o
.
e
n
o
w
e
n
a
h
ti
w
.
e
g
a
tl
o
v
ti
u
c
r
i
c
n
e
p
o
k
c
e
h
C
.
e
r
u
t
x
if
t
a
e
g
a
tl
o
v
e
n
il
k
c
e
h
C
·
.
y
ti
u
n
it
n
o
c
ti
u
c
r
i
c
k
c
e
h
C
·
.
s
n
o
it
i
d
n
o
c
l
a
t
n
e
m
n
o
r
i
v
n
e
g
n
it
s
i
x
e
t
s
n
i
a
g
a
g
n
it
a
r
t
s
a
ll
a
b
k
c
e
h
C
·
T
U
O
S
E
O
G
P
M
A
L
G
N
I
T
H
G
I
L
R
E
T
F
A
p
m
a
l
y
tl
u
a
F
·
n
a
h
t
r
e
h
t
a
r
m
o
t
p
m
y
s
s
i
h
t
ti
b
i
h
x
e
ll
i
w
p
m
a
l
a
y
ll
a
n
o
i
s
a
c
c
O
·
.
p
m
a
l
w
e
n
a
e
t
u
ti
t
s
b
u
S
.t
h
g
il
o
t
g
n
il
i
a
f
y
l
p
m
i
s
N
O
S
E
L
C
Y
C
P
M
A
L
F
F
O
D
N
A
e
r
u
t
x
if
o
t
e
s
o
l
c
o
o
t
s
i
n
o
it
a
l
u
s
n
I·
h
g
i
h
o
o
t
e
g
a
t
t
a
w
p
m
a
L
·
w
o
l
e
g
a
tl
o
v
t
u
p
t
u
o
t
s
a
ll
a
B
·
)
"
3
t
s
a
e
l
t
a
(
e
l
u
d
o
m
d
n
u
o
r
a
m
o
r
f
n
o
it
a
l
u
s
n
i
e
v
o
m
e
R
·
.
g
n
i
s
u
o
h
n
i
d
e
if
i
c
e
p
s
e
g
a
t
t
a
w
p
m
a
l
ll
a
t
s
n
I·
.
e
g
a
tl
o
v
ti
u
c
r
i
c
n
e
p
o
k
c
e
h
C
.
e
r
u
t
x
if
e
h
t
t
a
e
g
a
tl
o
v
e
n
il
k
c
e
h
C
·
CJ520086
©2008 Gotham
Rev B. 8/08
High Elevations
®
High Elevations
®
10" ACC
AIRCRAFT CABLE AND CORD MOUNT INSTRUCTIONS
1.
Securely attach the junction box mounting plate to 4" j-box.
2.
On the ground, insert end of aircraft cable into cable glider located on top of
ballast housing. Be sure to leave at least 4" of cable exiting the glider and
ensure that the cable is securely attached (See Figure 8).
3.
Attach assembly support chain to the hole in canopy allowing fixture to hang and
make required wire connections (See Figure 9). WARNING!!! RISK OF INJURY
OR DEATH!!! IF AIRCRAFT CABLE IS NOT SECURELY ATTACHED TO PENDANT IT
MAY FALL!!
4.
Remove the assembly support chain while holding the fixture, tuck all wires inside
the canopy and attach the canopy to the mounting plate. Securely tighten the
three screws.
5.
Determine required length of cable and adjust as required. (10 FEET OF CABLE
PROVIDED). It is recommended that the cut end of cable be soldered or glued to
prevent it from fraying.
6.
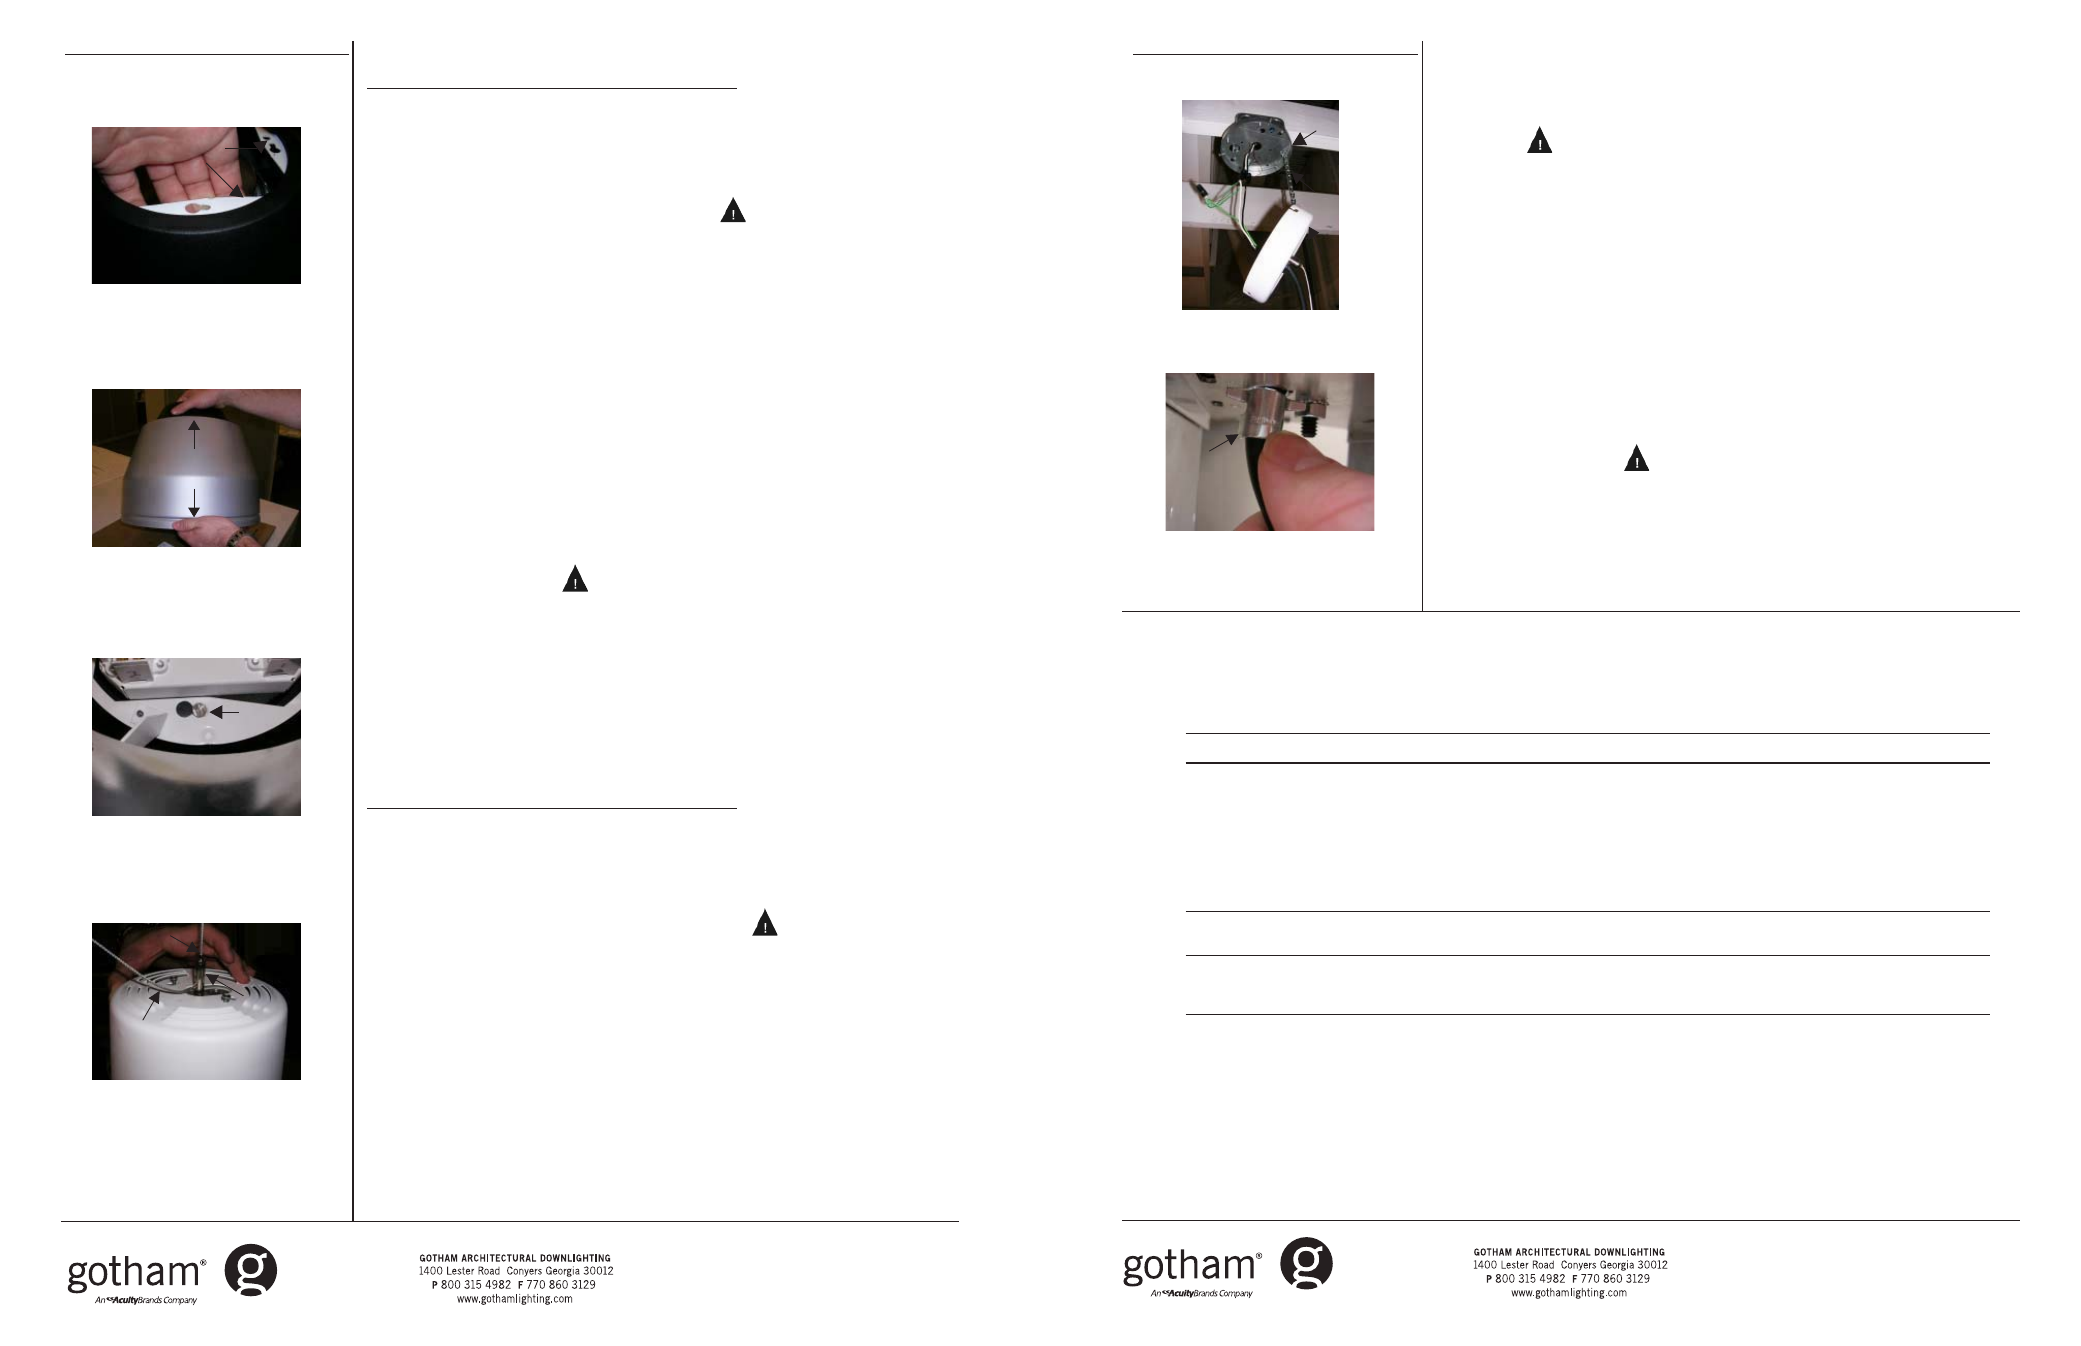
Insert end of the power cord at least 8 inches into the hole located next to the
aircraft cable glider (See Figure 8).
7.
Loosen two screws holding the painted cover on the ballast housing and
disengage them from the keyhole slots (See Figure 2). Lift the cover and place it
behind a screw located on the ballast housing bracket (See Figure 3).
8.
Determine required length of cord and make necessary cuts (10 FEET OF CORD
PROVIDED).
9.
Make required wire connections and tuck all wires inside of ballast housing
bracket.
10. Install power cord strain relief on cord jacket just below the hole in the ballast
bracket (See Figure 10). WARNING!!! RISK OF INJURY OR DEATH!!! CABLE
SUPPORTS WEIGHT OF FIXTURE. CORD CANNOT BE USED TO SUPPORT WEIGHT.
IF AIRCRAFT CABLE IS NOT SECURLY ATTACHED TO PENDANT IT MAY FALL!!
11. Reinstall ballast housing cover and tighten screws.
12. Install cord keeper wire ties as required.
13. Install trim (shipped separately).
14. Install lamp(s) and energize product.
High Elevations
®
14" ACC
AIRCRAFT CABLE AND CORD MOUNT INSTRUCTIONS
1.
Securely attach junction box mounting plate to 4" j-box.
2.
On the ground, insert end of aircraft cable into cable glider located on top of
ballast housing. Be sure to leave at least 4" of cable exiting the glider (See
Figure 8).
3.
Attach assembly support chain to the hole in canopy, allowing fixture to hang
and make required wire connections (See Figure 9). WARNING!!! RISK OF
INJURY OR DEATH!!! IF AIRCRAFT CABLE IS NOT SECURELY ATTACHED TO
PENDANT IT MAY FALL!!
4.
Remove the assembly support chain while holding the fixture, tuck all wires inside
the canopy and attach the canopy to the mounting plate. Securely tighten the
three screws.
5.
Remove all cardboard filler from carton containing the lower pendant assembly.
6.
Remove lower pendant assembly from carton and place it on a clean surface. To
remove assembly, grip the white painted bracket (See Figure 5). CAUTION!!
DECORATIVE GLASS IS NOT ATTACHED TO ASSEMBLY, EXERCISE CAUTION WHILE
HANDLING.
7.
Pick up the lower pendant assembly with both hands, ensuring that the reflec-
tor does not slip out of the assembly (See Figure 6).
Fixture connections and hanging instructions
Page 2 of 3
Figure 5
White
painted
bracket
Figure 6
Proper
handling of
14" reflector
Figure 7
Keyhole
slots
Figure 8
Aircraft
cable
Cable
glider
Cable should
exit glider at
least 4"
CJ520086
©2008 Gotham
Rev B. 8/08
High Elevations
®