Gotham GQT Trim (FINISHING SECTION) User Manual
Save these instructions, Installation instructions, Figure 1 figure 2
IMPORTANT SAFETY INFORMATION
For Your Protection, Read Carefully
WARNING - Risk of fire. Do not install insu-
lation within 3 inches of fixture sides or
wiring compartment, nor above the fixture
in such a manner as to entrap heat.
WARNING - To prevent safety hazards, as-
sure that there is a glass lens in each GQ
and GQT trim. Inspect safety lens, assuring
no scratches or nicks are present.
Before starting trim installation, assure
that the housing flange is seated flush or
slightly above the bottom of the ceiling.
Refer to Instruction sheet - CJ52046.
REQUIREMENT - Attach safety bead chain
(from housing) to bead chain receptacle
on trim prior to seating the trim in its final
position on all GQ or GQT trims.
Upon receipt, thoroughly inspect for any
freight damage which should be brought to
the attention of the delivery carrier. Compare
the catalog description listed on the pack-
ing slip with the label on the carton to ensure
you have received the correct merchan-
dise.
INSTALLATION INSTRUCTIONS
GQ and GQT
Trim
(FINISHING SECTION)
Part No. CJ52047
©2005 Gotham
3/05
SAVE THESE INSTRUCTIONS
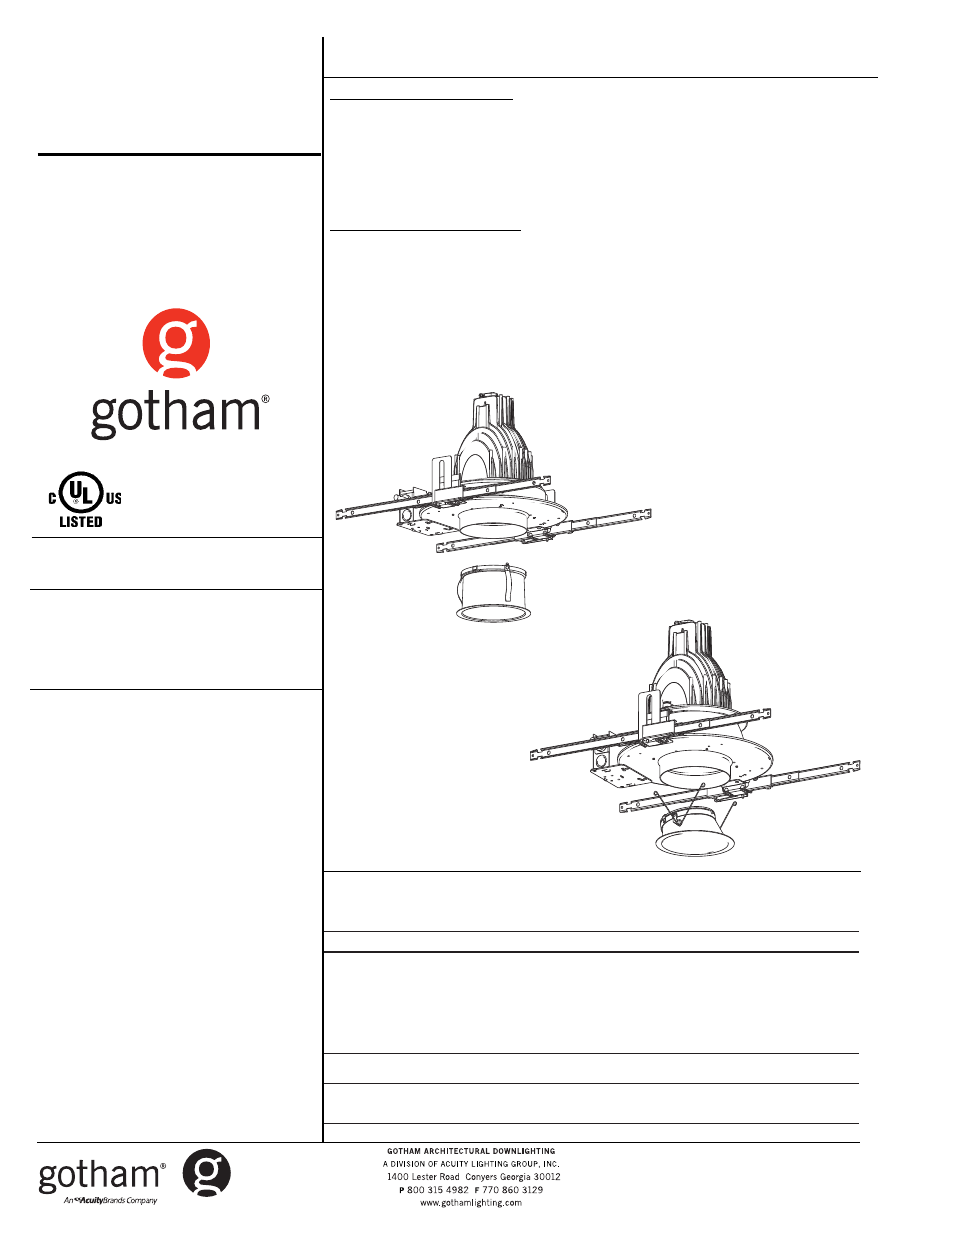
INSTALLATION FOR GQ TRIM
1. Attach safety bead chain (from housing) to bead chain receptacle on trim prior to
seating the trim in its final position on all GQ or GQT trims.
2. After attaching safety chain, gently push trim up and into the housing until seated
flush against the ceiling. Refer to Figure 1.
3. For removal of trim, gently pull down until trim is clear of housing.
INSTALLATION FOR GQT TRIM
1.
Attach safety bead chain (from housing) to bead chain receptacle on trim prior
to seating the trim in its final position on all GQ or GQT trims.
2.
After attaching safety chain, install the trim by squeezing the butterfly springs
together and engaging them into the slots provided in the housing. Gently push
the trim up and into the housing until it is flush against the ceiling. Refer to Figure 2.
3.
For maintenance and removal of trim, gently pull down until butterfly springs are
accessible, squeezing them to disengage from slots in housing.
T
R
A
H
C
G
N
I
T
O
O
H
S
E
L
B
U
O
R
T
n
i
m
e
l
b
o
r
p
e
h
t
e
t
a
c
o
l
,
n
o
it
i
d
n
o
c
d
o
o
g
n
i
m
e
e
s
y
e
h
t
fI
.
e
l
u
d
o
m
n
i-
e
m
a
r
f
r
o
p
m
a
l
e
h
t
o
t
e
g
a
m
a
d
e
l
b
i
s
i
v
y
n
a
r
o
f
k
c
e
h
C
.
s
n
o
it
c
a
e
v
it
c
e
r
r
o
c
d
n
a
s
e
s
u
a
c
e
l
b
i
s
s
o
p
f
o
t
s
il
g
n
i
w
o
ll
o
f
e
h
t
m
o
t
p
m
y
S
e
s
u
a
C
e
l
b
i
s
s
o
P
n
o
it
c
A
e
v
it
c
e
r
r
o
C
O
T
S
L
I
A
F
P
M
A
L
T
H
G
I
L
d
e
z
i
g
r
e
n
e
t
o
n
e
r
u
t
x
if
e
h
t
g
n
i
d
e
e
f
ti
u
c
r
i
C
·
n
o
it
c
e
n
n
o
c
e
l
u
d
o
m
r
o
ti
u
c
r
i
c
n
i
r
o
r
r
e
g
n
i
r
i
W
·
p
m
a
l
y
tl
u
a
F
·
t
u
p
t
u
o
t
s
a
ll
a
b
r
o
e
n
i
L
·
t
s
a
ll
a
b
y
tl
u
a
F
·
w
o
l
o
o
t
e
r
u
t
a
r
e
p
m
e
t
t
n
e
i
b
m
A
·
.
d
e
z
i
g
r
e
n
e
s
i
ti
u
c
r
i
c
t
a
h
t
e
r
u
s
n
e
o
t
e
s
u
f
r
o
r
e
k
a
e
r
b
ti
u
c
r
i
c
k
c
e
h
C
·
e
r
a
s
n
o
it
c
e
n
n
o
c
t
a
h
t
e
r
u
s
n
e
o
t
x
o
b
e
c
il
p
s
e
r
u
t
x
if
e
n
i
m
a
x
E
·
.t
c
e
r
r
o
c
y
l
b
a
r
e
f
e
r
p
,
p
m
a
l
r
e
h
t
o
n
a
e
t
u
ti
t
s
b
u
s
d
n
a
p
m
a
l
y
tl
u
a
f
e
h
t
e
v
o
m
e
R
·
l
a
n
i
g
i
r
o
e
h
t
e
c
a
l
p
e
r
,
s
t
h
g
il
p
m
a
l
e
h
t
fI
.t
h
g
il
o
t
n
w
o
n
k
s
i
t
a
h
t
e
n
o
.
e
n
o
w
e
n
a
h
ti
w
.
e
g
a
tl
o
v
ti
u
c
r
i
c
n
e
p
o
k
c
e
h
C
.
e
r
u
t
x
if
t
a
e
g
a
tl
o
v
e
n
il
k
c
e
h
C
·
.
y
ti
u
n
it
n
o
c
ti
u
c
r
i
c
k
c
e
h
C
·
.
s
n
o
it
i
d
n
o
c
l
a
t
n
e
m
n
o
r
i
v
n
e
g
n
it
s
i
x
e
t
s
n
i
a
g
a
g
n
it
a
r
t
s
a
ll
a
b
k
c
e
h
C
·
T
U
O
S
E
O
G
P
M
A
L
G
N
I
T
H
G
I
L
R
E
T
F
A
p
m
a
l
y
tl
u
a
F
·
n
a
h
t
r
e
h
t
a
r
m
o
t
p
m
y
s
s
i
h
t
ti
b
i
h
x
e
ll
i
w
p
m
a
l
a
y
ll
a
n
o
i
s
a
c
c
O
·
.
p
m
a
l
w
e
n
a
e
t
u
ti
t
s
b
u
S
.t
h
g
il
o
t
g
n
il
i
a
f
y
l
p
m
i
s
N
O
S
E
L
C
Y
C
P
M
A
L
F
F
O
D
N
A
e
r
u
t
x
if
o
t
e
s
o
l
c
o
o
t
s
i
n
o
it
a
l
u
s
n
I·
h
g
i
h
o
o
t
e
g
a
t
t
a
w
p
m
a
L
·
w
o
l
e
g
a
tl
o
v
t
u
p
t
u
o
t
s
a
ll
a
B
·
)
"
3
t
s
a
e
l
t
a
(
e
l
u
d
o
m
d
n
u
o
r
a
m
o
r
f
n
o
it
a
l
u
s
n
i
e
v
o
m
e
R
·
.
g
n
i
s
u
o
h
n
i
d
e
if
i
c
e
p
s
e
g
a
t
t
a
w
p
m
a
l
ll
a
t
s
n
I·
.
e
g
a
tl
o
v
ti
u
c
r
i
c
n
e
p
o
k
c
e
h
C
.
e
r
u
t
x
if
e
h
t
t
a
e
g
a
tl
o
v
e
n
il
k
c
e
h
C
·
Figure 1
Figure 2