Diagram #4, Relay – Derale Performance 13" High Output Single RAD Puller Fan with Plastic Shroud User Manual
Page 2
16926-InstructionSheet
Derale Performance, Los Angeles, CA
800.421.6288
www.derale.com
Warning: Installation of accessories should only be undertaken by those with mechanical knowledge and are familiar with working on
vehicles. Always use eye protection (goggles, safety glasses or shield). Park the vehicle in a well lit area, on level ground and apply the
parking brake. Only work on a cold vehicle that has been sitting overnight, failure to do so will result in severe burns and injury. Before starting
the vehicle, make sure no tools or any other items are left under hood that could interfere with or be drawn into moving parts of the engine.
Failure to follow instructions can lead to severe damage and personal injury.
WIRING OPTIONS
WIRING INSTALLATION USING SUPPLIED RELAY(S)
There are a few options on how to activate (turn on) your new Electric Fan Assembly.
1.
Manual Switch - Install a switch in the passenger compartment and turn on Electric Fan as desired.
2.
Electric Fan Thermostat Switch
A.
Adjustable Thermostat - Allows an adjustment range for you to determine optimal turn on temperature.
B.
Pre Determined Temperature - Thermostat has a pre determined temp. from the factory that determines turn on temp.
Please visit www.derale.com for available thermostat options or visit your local retailer.
When purchasing a thermostat always consider the maximum amp draw. Some thermostats are not designed to
properly handle 25 amps.
When installing the Electric Fan with a Thermostat always follow manufacturer's instructions for specific details. In some
cases you will not need the supplied relay harness.
Attach to the Positive side of Battery (+)
Attach to a good Chassis ground (-)
Attach to the BLUE Positive Electric Fan Lead (Fan +)
Attach to (+) 12V Switched Power (Thermostat or Manual Switch)
(OPTIONAL) Attach to the Positive feed from the A/C Clutch
*This wire will allow you to turn on the Electric Fan every time the vehicles air conditioning is turned on.
If you do not wish to use this option, please disregard the Green wire.
(+) Positive Fan lead Attach to the ORANGE wire coming from the relay harness
(-) Negative Fan Lead Attach to a good Chassis ground See Diagram #4
Important:
Note:
RED Wire -
BLACK Wire -
ORANGE Wire -
YELLOW Wire -
GREEN Wire* -
BLUE Wire -
BLACK Wire -
(
)
ELECTRIC FAN
TROUBLESHOOTING Q&A
Q: Why is the fan(s) blowing in the wrong direction?
A: Switch the Positive (+) and Negative (-) fan leads. This will reverse the airflow direction.
Q: Why doesn’t the fan(s) turn on?
A: 1. Check all connections to make sure all contacts are crimped correctly.
2. Check all Ground (-) connections to make sure all paint is sanded off and you are getting a metal to metal contact.
Q: I have checked all connections and fan still will not turn on?
A: Take the GREEN wire and temporarily attach it to the positive side of the battery. This should activate the fan.
If the fan comes on there most likely is a problem with the connection on the YELLOW wire/Manual Switch/Thermostat.
If the fan does not come on remove relay and reinstall making sure it is seated correctly.
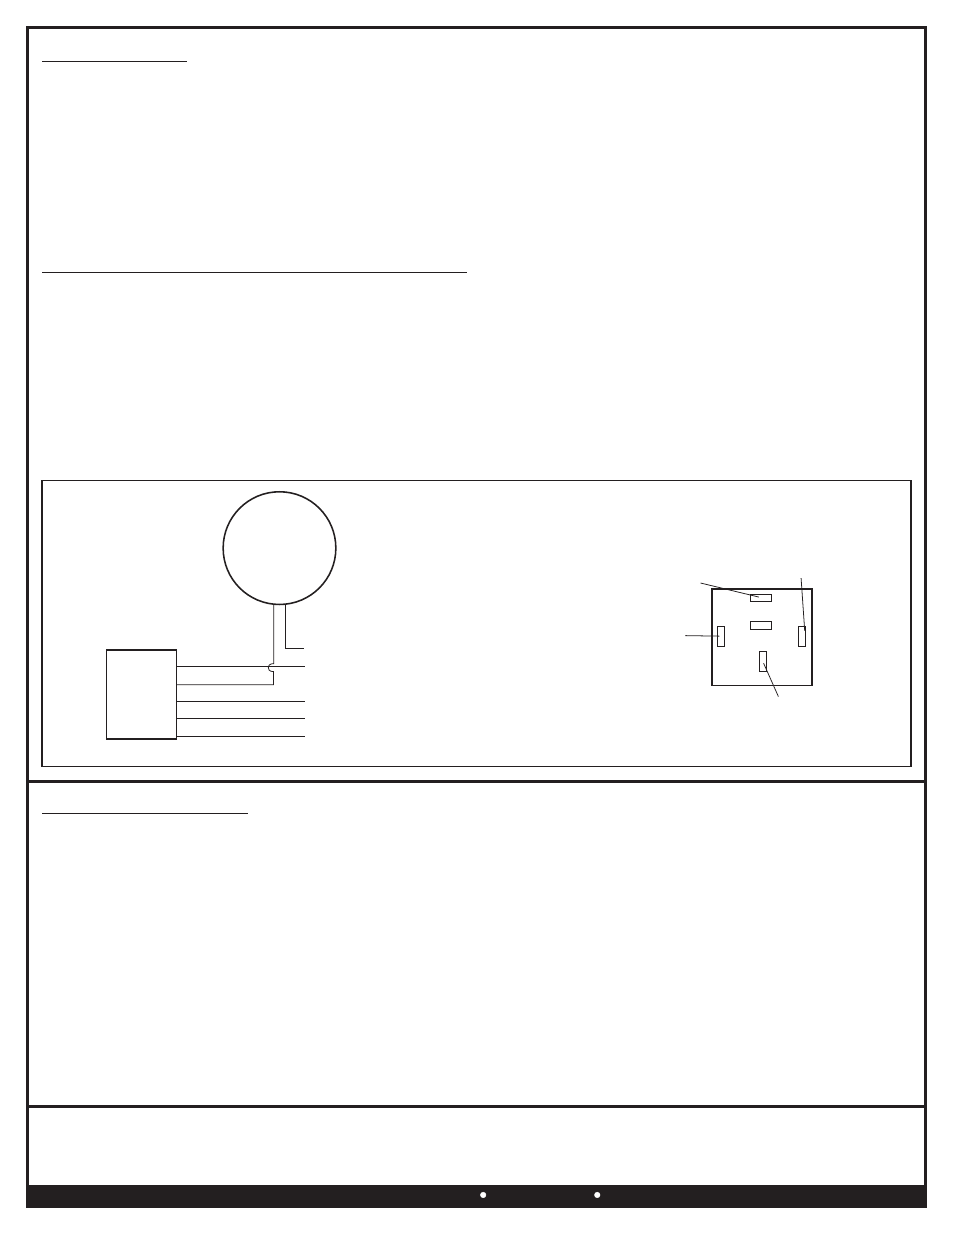
Diagram #4
Relay
Red
Orange
Yellow
Black
Green
To Positive (+) side of battery
To (+) 12V Switched Power
To ground (-)
To A/C Clutch (+)
Blue Wire (+)
Black Wire (-)
To good Chassis Ground (-)
Fan
87
87A
30
86
85
Orange
Fan (+)
Green/
Yellow
Switch (+)
Red
Battery (+)
Black
Ground (-)
Relay