Diagram #5, Diagram #6 diagram #7, Diagram #4 – Derale Performance High Output Dual Rad Fan Assembly User Manual
Page 2
Derale Performance, Los Angeles, CA
800.421.6288
www.derale.com
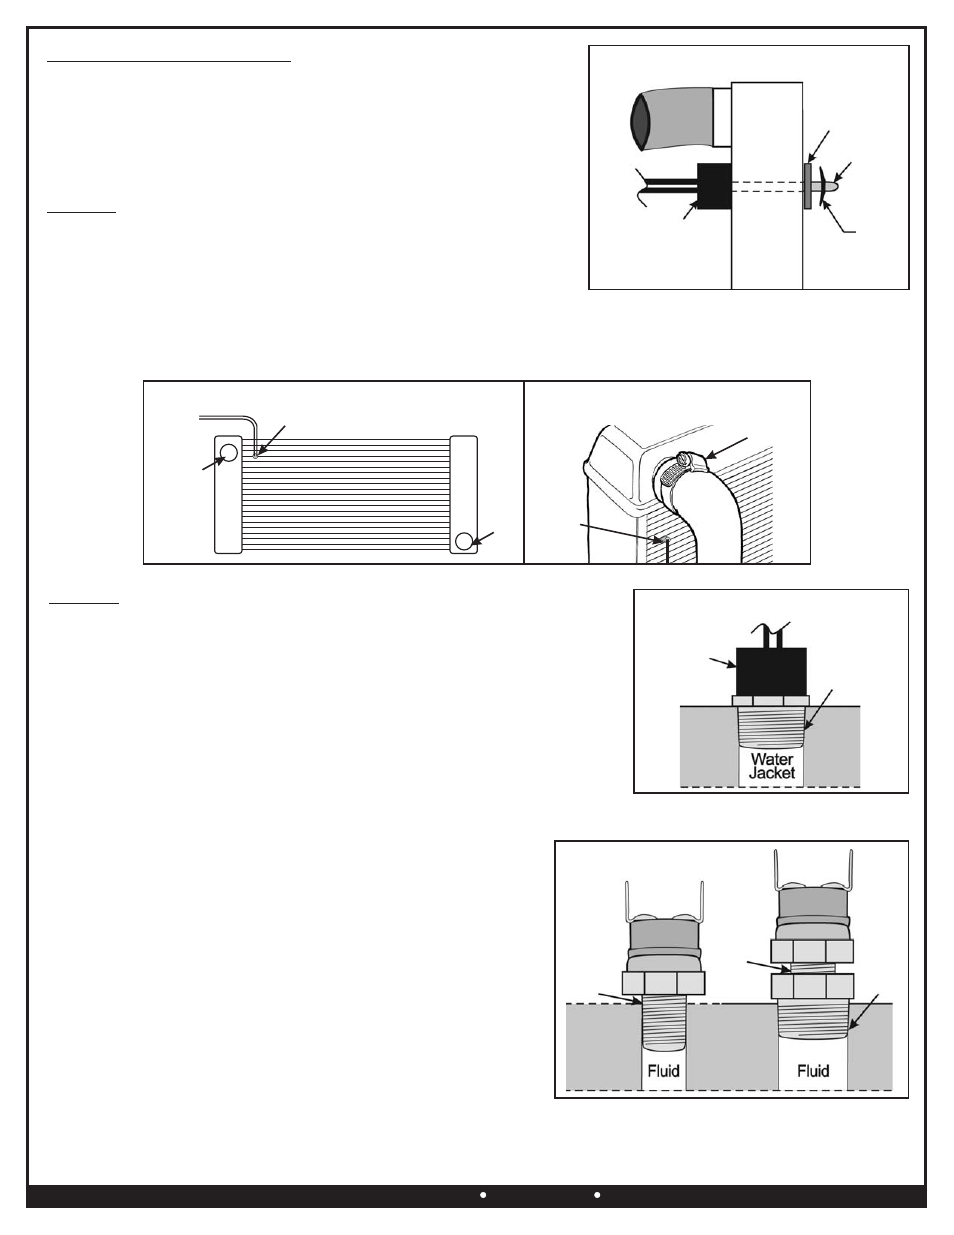
THERMOSTAT INSTALLATION
Option 1
FAN #1 - 180° Thermostat Switch
Option 1 - Push-in Radiator Probe
Option 2 - Thread-in Radiator Probe
Identify the small bag labeled “180°F Thermostat Kit”
Fan #1 has two thermostat probe options. Choose the option below
that best fits your application.
(See Diagram #4)
(See Diagram #6)
For best results we recommend installing the probe as close as
possible to the water inlet of the radiator. (See Diagram #5)
1.
Take the brass probe and thread it clockwise onto the thermostat.
2.
Carefully insert the probe/thermostat assembly into the fins of the radiator until thermostat is flush with radiator.
3.
Install the 1 x 1 foam pad onto the Push-in Probe.
4.
Install Retaining Clip onto the Push-in Probe until tight. (See Diagram #4)
Placement:
Installation:
Push-in
Radiator
Probe
Down-flow Radiator
Diagram #5
Push-in
Radiator Probe
Water
Inlet
Water
Outlet
Cross-flow Radiator
Water
Inlet
Option 2
Placement:
Installation:
Note:
Locate a 3/8” NPT port either on the radiator, waterneck, intake
manifold or cylinder heads.
1.
Using Teflon tape or suitable sealant install the probe into the 3/8” NPT port
on the vehicle.
2.
Using a 3/4” wrench tighten the probe.
3.
Carefully thread the Thermostat Switch clockwise into the Thread-in Probe now
installed on the vehicle. Sealant such as Loctite can be used for permanent
installation. (See Diagram #6)
DO NOT TIGHTEN THERMOSTAT WITH A WRENCH, HAND TIGHTEN ONLY.
Thermostat
Switch
3/8” NPT
Thread-in Probe
Diagram #6
Diagram #7
FAN #2 - 190° Thermostat Switch
Identify the small bag labeled “190° Thermostat Kit”
Fan #2 requires a threaded port either 1/8” NPT or 3/8” NPT.
(See Diagram #7)
Locate a port on the vehicle,
found on the
vehicles radiator, manifold or water outlet.
Using Teflon Tape or suitable sealant
install the Thermostat Switch into the port on the vehicle.
Using Teflon Tape or suitable sealant
install the 3/8” x 1/8” NPT Reducer Bushing into the 3/8” NPT port on
the vehicle. Using Teflon Tape or suitable sealant install the Thermostat
Switch into the 3/8” x 1/8” NPT Reducer Bushing.
(See Diagram #7)
Placement:
generally
1/8” NPT port installation -
3/8” NPT port installation -
3/8”
NPT
3/8”
NPT
1/8”
NPT
1/8”
NPT
1/8”
NPT
1/8”
NPT
Thermostat
Switch
Radiator
Foam Pad
Retaining
Clip
Push-in
Probe
Diagram #4
(Page 2)